I was right in the middle of prepping a Sunday roast when it happened. I turned the dial, the preheat light flicked on, and then—ZAP. A blinding blue flash erupted from the bottom of my oven, followed by a hiss that sounded like a miniature lightning strike. My first instinct? I thought the house was catching fire. My second instinct? I wondered if I could just ignore it and finish the roast. Spoiler alert: I couldn’t, and you shouldn’t either. Most of us treat our ovens like indestructible boxes of heat, but when that bake element starts putting on a light show, it’s a visceral signal that something is fundamentally broken. I’ve been there, staring at a half-cooked chicken and a glowing, crackling heating element, feeling totally defeated. The smell of ozone and burning metal is something you never quite forget, and it’s your appliance’s way of screaming for help. Before you even think about touching the element, you have to cut the power at the breaker. I’ve seen people try to poke at a cooling element with a metal fork—don’t be that person. Safety isn’t just a suggestion; it’s the most important part of the job.
That Fireworks Show in Your Oven Isn’t a Special Effect
When you see sparks dancing across the bottom of your oven, you’re witnessing an electrical short. The bake element is a heavy-duty wire encased in a protective metal sheath, but over time, that sheath can crack or thin out. Once the internal “live” wire touches the outer casing, you get a localized electrical arc. In my early days of DIY, I made the massive mistake of thinking I could just scrape off the “burnt part” and keep going. I ended up blowing a fuse and nearly ruining my entire oven control board. Trust me, the element is toast, and trying to “nurse” it along is a recipe for a much more expensive repair bill. It’s tempting to think it’s just a bit of debris burning off, but a true spark is a physical failure of the component itself that cannot be reversed.
Is it actually safe to ignore a few tiny sparks?
The short answer is a hard no. While it might seem like a small flicker, that spark is a high-temperature event that can melt the metal of the oven floor or, worse, ignite any grease drippings. According to the National Fire Protection Association (NFPA), cooking equipment remains the leading cause of home fires, and electrical malfunctions in these units are a significant contributor to property damage. We’re going to walk through how to handle this safely so you can get back to your recipes without worrying about an unscheduled visit from the fire department. Have you ever seen that scary glow in the back of your oven and hoped it was just “normal” wear and tear? It’s a common fear, but ignoring it only leads to a dead oven exactly when you need it most.
Your Bake Element is Giving You a Final Warning
Identifying the culprit is usually pretty straightforward because, well, it’s the thing that’s glowing like a lightsaber. But sometimes the damage is subtle. You might notice hidden cold spots in your cooking or see that your oven bakes too slow lately. These are the precursors to the big spark. Before you dive in, you need to understand some oven repair essentials to ensure you don’t turn a simple element swap into a major catastrophe. You might even hear a strange noise before the visual show starts; learning how to tell if your oven’s relay board is clicking for the wrong reasons can help you catch these issues before they turn into fireworks. The good news? Replacing the oven bake element is one of the most satisfying projects you can do, usually taking less than 20 minutes once you have the part in hand. It’s about more than just convenience; it’s about the peace of mind that comes with knowing your kitchen won’t short out the next time you want a pizza.Before you even pick up a screwdriver, you need to be 100% sure the power is dead. I don’t just mean turning the knob to ‘Off’. Go to your main electrical panel and flip the breaker. If you’re dealing with a plug-in unit, pull it away from the wall and yank that heavy cord. This is the first step in diagnosing an oven that keeps tripping the circuit breaker and ensuring you don’t become part of the circuit yourself. Removing the oven racks gives you the clearance you need to work without bruising your knuckles against the side walls.
Kill the Power and Clear the Workspace
Next, we need to verify the damage. If you didn’t see the literal spark, you’ll want to test an oven thermal fuse or the element itself for continuity. Grab a multimeter and set it to the lowest Ohms setting. Touch the probes to the element terminals. No reading? The element is physically broken inside that metal sheath. While you’re back there, take a second to check for a burnt terminal block on your electric oven. Sometimes the element is fine, but the wire connection has melted into a charred mess that needs immediate attention. 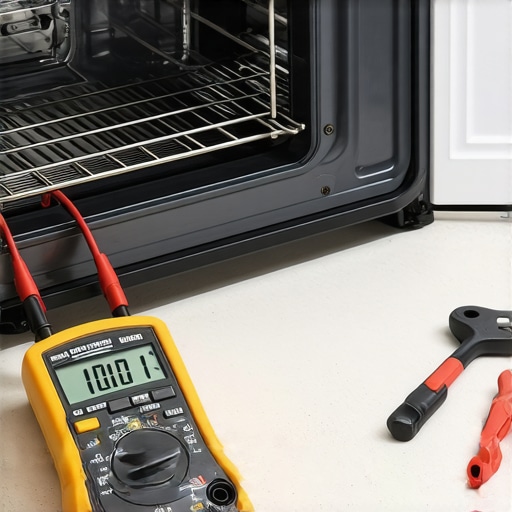
Check for Continuity Before Buying Parts
Removing the element is simple: just unscrew the two mounting plates at the back of the oven. But here is where most people fail. I once unscrewed the element on my old Whirlpool, and as soon as I pulled it out, the wires slipped out of my fingers and disappeared into the back insulation. It took me ninety minutes of swearing and fishing with a wire hanger to get them back. Now, I always use a clothespin or a small spring clamp to secure those wires to the oven frame before I disconnect the old part. It’s a five-second step that saves an hour of frustration during the process of replacing the oven bake element in 15 minutes or less.
The Clothespin Trick for Wiring Security
Once the wires are secured, gently pull the old element out. You might see a pile of white insulation or even some charred bits of the old element sheath. Use a vacuum to clear this out before installing the replacement. You want a clean surface so the new element can sit perfectly level. If the old screws are rusted or stripped, don’t try to force them back in; head to the hardware store for stainless steel replacements.
Mounting the New Heating Element
Once the old element is out, slide the new one into place carefully. Those metal ‘feet’ that hold the element off the oven floor are important; they prevent the heat from scorching the porcelain finish. If you feel resistance, don’t force it. You might be snagging on the insulation. Line up the screw holes, reconnect your wires—removing your clothespin only when the terminal is firmly attached—and tighten everything down. You might also want to take this time to test your oven’s high limit thermostat with ease if you’ve been having overheating issues alongside the sparks. A faulty thermostat can sometimes cause the element to run way too hot, contributing to an early failure.Let’s dig deeper into what I call the ‘Replacement Loop.’ Everyone tells you that if the element glows and pops, it’s a simple swap. But in my experience, a blown element is often a symptom of a much deeper electrical instability. While replacing the oven bake element in 15 minutes or less is possible, it won’t fix a failing relay that is constantly ‘chattering’ and sending spikes to your new part. If you don’t address the root cause, you’ll be back in the same spot in six months.
Why a Spark is Often Just the Tip of the Iceberg
In the world of high-level oven diagnostics, we have to look past the visible damage. A common myth is that if the part looks okay, it is okay. Contrarily, I’ve seen elements with perfect continuity that failed under load because of micro-fractures in the internal ceramic insulation. This is why you should always consider testing the resistance on your oven’s broil element even if it was only the bake element that sparked; an electrical surge rarely stays in one lane. According to data from the Association of Home Appliance Manufacturers (AHAM), electrical component degradation is frequently cumulative; one failure often stresses surrounding parts like thermostats or control relays.
Why does my new element still fail to get hot?
This is the ‘oops’ factor that catches even seasoned DIYers. You’ve swapped the part, the wires are tight, but there’s no heat. The trap here is assuming the element is the power source. Often, that big spark earlier actually fried the contacts on the control board. You need to check these 4 symptoms of a failing control board before you assume your new element is a dud.
Don’t fall for the part-swapping trap
Expert repair is about evidence, not guesswork. Before you start ordering every part in the catalog, remember that oven repair essentials always include a visual check of the ‘silent’ failure points. For instance, always check for a burnt terminal block on your electric oven; a loose nut there can mimic a dead element by interrupting the 240V flow. This isn’t just an oven problem either. Whether you are following a comprehensive guide to dishwasher diagnostics or trying to find the one part that stops your dishwasher from draining, the lesson is the same: the most obvious symptom is rarely the whole story. Have you ever fallen into this trap where you replaced a part only to find the problem persisted? Let me know in the comments below.I’ve spent years tinkering with everything from vintage ranges to high-tech dishwashers, and if there’s one thing I’ve learned, it’s that your diagnostics are only as good as your tools. I’ve seen people use those cheap five-dollar voltage pens to check an oven, but those things are liars. They’ll light up near a hot wire but won’t tell you if the voltage has dropped enough to cause a failure. I personally swear by the Fluke 101 Basic Digital Multimeter. It’s small, it’s rugged, and most importantly, its accuracy is legendary. When you are performing oven diagnostics, you need to know exactly how many ohms you’re looking at. If your manual says 30 ohms and you’re seeing 45, that part is on its way out. Don’t wait for the explosion; replace it while you have the control. Beyond the electrical side, I always keep a telescopic inspection mirror in my pocket. It’s the only way to see if a leak is coming from the motor seal or a pinhole in the tub without tearing the whole unit apart. This kind of preparation is part of the oven repair essentials that separate the pros from the ‘part-swapping’ amateurs.
How do I maintain my appliances over time?
Consistency is your best friend here. For the oven, I recommend testing your oven door seal with the dollar bill trick every six months. A loose seal doesn’t just waste energy; it forces your elements to work twice as hard, leading to the exact kind of burnout we discussed earlier. On the dishwasher side, you have to be proactive about the sump. I make it a habit to clean your dishwasher’s hidden sump filter monthly. If you let debris build up, the pump struggles, the water temperature drops, and you’ll eventually find that your dishwasher sounds like its grinding rocks. According to the GE Appliances Technical Service Manual for Electric Ranges, an element’s resistance should typically fall between 20 and 40 ohms; anything outside this range, even if it passes a basic continuity beep, indicates an internal degradation that will eventually lead to a short. I also tell everyone to rethink their chemicals. The truth about dishwasher pods and your drain hose is that the concentrated enzymes can actually corrode certain plastic fittings if you aren’t running high-heat cycles regularly.
Smart Tech is Changing How We See Repairs
Looking ahead, I predict we are moving toward an era of ‘Predictive DIY.’ We are already seeing high-end units with Wi-Fi modules that can send a push notification to your phone before a component fails. Imagine your oven telling you that the bake element’s resistance has drifted 10% from the factory spec—you could order the part before the sparks even fly. This shift in how to identify dishwasher faults quickly will make home maintenance less of a mystery and more of a managed task. For now, we still rely on our senses and our meters. I challenge you: don’t wait for the next error code. Go grab your multimeter and try replacing a faulty dishwasher turbidity sensor at home or at least testing its continuity today. It’s the best way to get familiar with your machine’s ‘pulse’ before a real emergency happens.
Lessons From a Thousand Stripped Screws
After years of reaching into the bellies of various appliances, I’ve realized that the most important oven repair essentials aren’t even tools—they are habits. First, never assume a part is perfect just because it came out of a sealed box; I’ve seen factory-defective elements that would have sent me on a wild goose chase if I hadn’t tested them for continuity first. Second, the ‘burnt’ smell immediately after a repair is usually just factory coatings or dust burning off, but you should never leave a new element unattended for its first thirty minutes of life. Lastly, remember that heat is the enemy of plastic; if you see any wire insulation that looks brittle or discolored near the terminals, replace that section of wire immediately. Ignoring ‘crunchy’ wires is how you end up with a repeat performance of the fireworks show.
The Repair Kit That Never Lets Me Down
If you want to move beyond basic part-swapping, you need a curated set of resources and tools. I personally rely on a high-quality digital multimeter—specifically one with a ‘Min/Max’ function—to catch intermittent voltage drops that a cheap pen-tester would miss. For those deep-dive sessions, I always keep a comprehensive guide to dishwasher diagnostics bookmarked on my phone for those moments when the oven isn’t the only thing acting up. I also recommend keeping a small tub of high-temperature anti-seize lubricant in your drawer; a tiny dab on your element screws today means you won’t be drilling them out five years from now. Finally, leverage the parts and diagnostics manuals specifically for your model number to avoid the ‘generic part’ trap that can lead to improper fitment.
Stop Watching the Sparks and Start the Fix
You now have the technical foundation to stop being a passive observer of your kitchen’s electrical health. Whether you are dealing with a glowing bake element or simply trying to figure out when to stop diying and call an oven repair expert, the power is literally in your hands. Taking that first step to pull the breaker and inspect the damage is what separates a homeowner from a true DIY master. Don’t let a few sparks intimidate you—let them be the catalyst for you to finally master your machine. Have you ever felt that surge of pride after hearing your oven click back to life for the first time? Let me know about your biggest DIY win in the comments below!