I was roasting a chicken last Sunday when a sound like a bag of marbles hitting a metal floor started coming from my kitchen. Every time the convection fan kicked in, it was a constant clank-clank-rattle that set my teeth on edge. I froze, honestly wondering if the front of my range was about to come apart. I have spent years mastering oven repair essentials, but that specific metallic vibration still makes my heart skip a beat. It is a visceral, unsettling sound that makes you feel like your appliance is failing you right when you need it most. Today, I am going to show you exactly how to quiet that noise and make sure your door is as solid as the day you bought it. [IMAGE_PLACEHOLDER]
Stop the Clatter Before the Glass Shivers
I will never forget the time I tried to ‘quick-fix’ a loose panel by wedging a piece of folded cardboard into the door gap. It was a massive mistake. Not only did it smell like a campfire within ten minutes, but it did absolutely nothing to address the actual culprit: the internal retaining clips that had vibrated loose over years of heat cycles. You have to be careful with these things. According to the Consumer Product Safety Commission, tempered glass is designed to crumble safely, but persistent mechanical stress from loose fittings can significantly increase the risk of a spontaneous shatter. If you have noticed that your oven door glass is scorching hot to the touch lately, it is a big red flag that your glass panels are misaligned, allowing heat to bypass the protective air gaps. Before you start diagnosing faults that might not even exist, we need to talk about the ‘glass sandwich’ that makes up your oven door and why those layers start to wiggle. Have you ever felt like you needed to hold the handle just to keep the noise down while baking?
Is it really worth the risk to fix this yourself?
Many folks are terrified of touching the glass, fearing they will end up with a thousand tiny shards on the linoleum. I get it. But honestly, as long as you are not using a hammer, securing the glass is one of the most rewarding DIY tasks you can tackle. It is usually just a matter of tightening the internal brackets or installing a new oven door handle correctly to provide the necessary tension. When you know what to look for, the mystery of the rattle disappears, and you can get back to cooking without the soundtrack of a construction site. Let’s look at the tools you will need to get this done safely.
Flip the Locks and Clear the Deck
First thing’s first: you cannot just yank the door off. Most modern ovens use a small flip-lock on the hinge itself. I remember the first time I ignored this; the hinge snapped back toward the oven frame with enough force to potentially take a finger off. You want to open the door fully, flip those little metal tabs up (or down, depending on your model), and then partially close the door until it catches on the locks. This keeps the high-tension springs engaged so the door slides right out of the oven door hinge receiver. Once it’s loose, lift it at a 45-degree angle. It’s heavier than it looks, so clear a spot on your kitchen table covered with a thick beach towel before you start.
Diving into the Glass Sandwich
Now that the door is on your “operating table,” you’re looking at the perimeter screws. These are usually Torx or Phillips head. This is where most people go wrong—they take out every screw they see. You only need to remove the ones holding the outer skin to the inner frame. Think of it like an Oreo; we just want to get to the cream in the middle. As you pull the panels apart, pay close attention to the oven door handle installation points. Often, the rattle isn’t the glass itself, but the long bolts connecting the handle to the frame that have stretched or loosened. If these are loose, the glass has room to dance, which is exactly what caused that marble-in-a-can sound I heard last Sunday.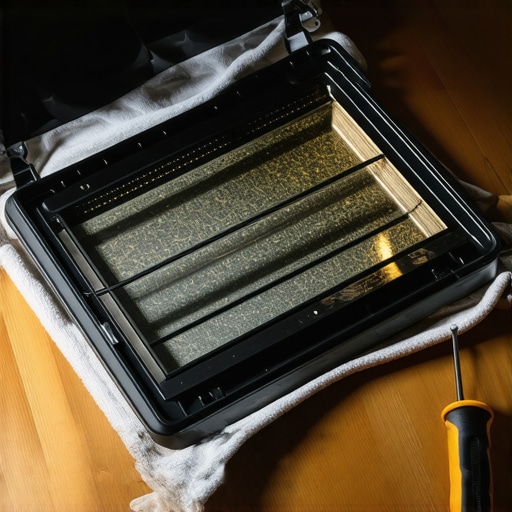
Track Down the Phantom Rattles
With the “sandwich” open, wiggle the inner glass panels. They are typically held in place by small metal clips or a secondary frame. If you find a panel that moves more than a millimeter, the retaining clips likely need a gentle squeeze with pliers to regain their tension. While you’re in there, this is a great time to perform some oven diagnostics on the door’s structure. Look for heat-warped metal or cracked plastic spacers. If the door feels suspiciously light when you’re moving it around, you might actually be dealing with a broken tension cable, which requires replacing a snapped oven door cable to restore the balance. Inspect every point where metal meets glass; even a tiny gap can cause a harmonic vibration when the convection fan reaches full speed.
Seal It Up Tight to Keep the Heat In
Before you button everything back up, check the perimeter. If your glass was loose, it’s likely your door wasn’t sealing properly against the oven cavity. You can use a simple trick: testing your oven door seal with the dollar bill trick once the door is back on. If the bill slides out easily, the glass alignment is still off. Re-tighten the frame screws in a “star” pattern—just like lug nuts on a car tire—to ensure even pressure across the entire surface of the tempered glass. This prevents “hot spots” where the oven door glass gets scorching hot because of internal air leaks. Avoid using power drills for this; the risk of over-torqueing and cracking the glass is too high. Hand-tight is the golden rule for appliance glass.Everyone tells you to tighten those screws until they don’t budge, but in my experience, that is exactly how you end up with a ‘shatter-gram’ on your floor. You see, oven glass needs a tiny bit of ‘float’ to survive the cooking process. If you lock it down too tight, the metal frame expands at a different rate than the tempered glass. According to the Association of Home Appliance Manufacturers (AHAM), structural integrity in high-heat environments relies on these specific thermal expansion gaps. If you ignore this, you aren’t just fixing a rattle; you’re creating a ticking time bomb. This is why mastering oven repair essentials always involves understanding finesse over force. I have seen countless DIYers assume their oven diagnostics are pointing to a failing convection fan, when in reality, they just overtightened the handle bolts during a previous deep clean. 
The dangerous myth of the ‘perfectly tight’ screw
If you feel like your door is a bit too rigid after a repair, you might be setting yourself up for failure. Heat makes things grow. When you are testing an oven bake element for invisible cracks, you are looking for thermal stress; the same logic applies to your door frame. If the glass has zero room to move, the pressure builds until the tempered layers reach their breaking point. Always leave about a quarter-turn of ‘breathing room’ on internal glass bracket screws. Have you ever fallen into this trap of over-tightening everything in sight? Let me know in the comments, because it’s a mistake almost every pro has made at least once.
Why does your oven wait until it’s hot to start complaining?
Many advanced hobbyists get frustrated because the rattle is silent when the oven is cold. This is because heat changes the physical dimensions of the internal clips and the glass itself. If you can’t find the source while the unit is off, start testing your oven temperature sensor to ensure the unit isn’t actually overheating and causing excessive metal expansion beyond its design. Sometimes the issue isn’t even the oven door at all. I have had clients convinced their stove was dying, only to realize the vibration was transferring from a nearby appliance through the cabinetry. It is remarkably similar to why your dishwasher is making a rattling noise; harmonic resonance can travel through common surfaces and make your oven door sing like a tuning fork. Before you assume the glass is loose, check if your dishwasher sounds like it’s grinding rocks—the vibration might be coming from the floor, not the fire.
Avoid the grease-trap lubrication mistake
Here is the ultimate ‘Oops’ factor for door repairs: using standard WD-40 or household oil on those hinges. It feels right in the moment to stop a squeak, but that oil will eventually bake into a sticky, gummy resin that can actually cause the hinges to seize or snap. You must learn how to lubricate sticky oven door hinges safely using high-temperature graphite or dry silicone-based lubricants. If you use the wrong stuff, you will find yourself replacing an oven door hinge receiver much sooner than you ever expected. If you’re still feeling unsure about the structural integrity of your appliance, feel free to contact us for a professional perspective before you start taking things apart.
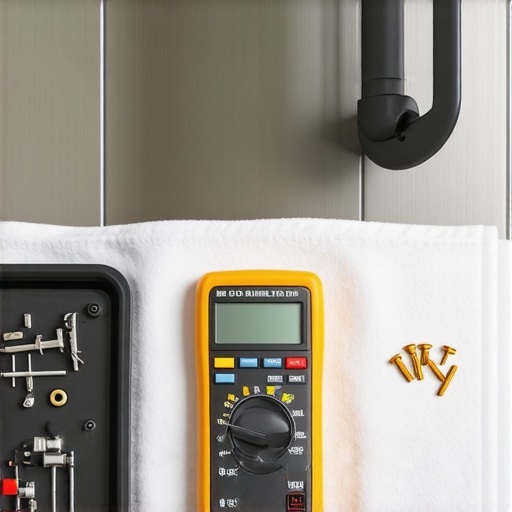
If you are going to commit to doing your own repairs, you need to stop using that rusted screwdriver you found in the junk drawer. I learned this the hard way after stripping a set of Torx-head screws on a high-end wall oven, which turned a twenty-minute fix into a three-hour nightmare of drilling out metal. When I am troubleshooting common issues with parts, my go-to is a dedicated 1/4-inch nut driver and a magnetic parts tray. The tray is vital because those tiny internal glass clips have a magical ability to vanish into the floor vents the moment you set them down. For anyone serious about oven diagnostics, a high-quality digital multimeter like the Fluke 117 is my personal gold standard. It provides the accuracy you need when testing the resistance on your oven’s broil element, ensuring you aren’t replacing expensive parts based on a ‘close enough’ reading from a five-dollar tool.
How can you stop these vibrations from coming back?
Maintenance isn’t just about fixing what’s broken; it’s about preventing the next symphony of rattles. According to the Technical Training Manuals from the Appliance Service Training Institute (ASTI), the primary cause of recurring mechanical noise is thermal fatigue in the fasteners. I make it a habit to do a ‘torque check’ every six months. Just a quick check of the handle and the hinges can save you from a major headache. This proactive approach is just as important for your other appliances. For instance, knowing how to perform DIY diagnostics on your dishwasher can prevent a small shake from turning into a situation where your dishwasher is shaking the whole kitchen island. It’s all about catching the harmonic imbalance before it wears down the bearings or the mounting brackets.
Forget the ‘Wait and See’ Approach
I predict that in the next few years, we are going to see a massive shift toward ‘smart diagnostics’ built directly into the glass and frames of our appliances. We are already seeing sensors that can detect when a seal is failing, but until that tech is standard in every home, you are the primary sensor. If you start hearing a high-pitched whistle, don’t ignore it. It could be a simple fix, or it could be your dishwasher making a high-pitched whistling noise due to a clogged intake. The same goes for the oven; if you notice the preheat light never turns off, it’s a sign that your door alignment might be letting too much heat escape, forcing the element to work overtime. My advanced tip for you today: Use a high-temp silicone sealant (rated for at least 500°F) to create tiny ‘buffer dots’ on the metal frame where the glass sits. This absorbs the micro-vibrations from the convection fan without putting any mechanical stress on the tempered panels. Give those hinges a quick once-over to see if you need to lubricate sticky oven door hinges safely, and you’ll find that your kitchen stays as quiet as a library even during a holiday bake-off.
Why Mechanical Sympathy Beats Raw Torque
After years of wrestling with appliances, I realized that most failures aren’t about parts wearing out—they are about how we interact with them. Here are a few things I wish I had known before I stripped my first set of threads. First, your oven is a breathing machine. It expands and contracts every time you preheat, and if you don’t allow for that movement, the glass will eventually protest. Second, the ‘feel’ of a screw is more important than a manual’s torque spec. When you are mastering oven repair essentials, you learn that ‘snug’ is a specific vibration you feel in your wrist, not a point where you can’t turn the driver anymore. Finally, always listen to the ‘echo’ of the appliance. A rattle in the door might actually be a warning sign that your dishwasher is shaking the whole kitchen island, transferring energy through the cabinets. Pay attention to the house as a whole, not just the part in front of you.
The Trusted Gear in My Repair Bag
I don’t believe in buying every gadget on the shelf, but three things have saved my sanity more than once. I always keep a digital multimeter handy for oven diagnostics because guessing at electrical continuity is a recipe for disaster. I also rely heavily on the technical guides from the Appliance Service Training Institute for the weird, model-specific quirks that generic tutorials usually miss. For the actual physical work, a simple set of magnetic nut drivers prevents those tiny clips from becoming permanent residents of your floorboards. If you find yourself needing to dive deeper into other machines, having a comprehensive guide to dishwasher diagnostics nearby ensures you aren’t just swapping parts blindly.
Reclaim the Quiet in Your Kitchen
There is a specific kind of satisfaction that comes from sliding a tray of cookies into an oven that doesn’t sound like a freight train. By taking the time to realign those glass panels and properly lubricate sticky oven door hinges safely, you are doing more than just fixing a noise; you are extending the life of your range. Don’t be afraid to get your hands a little dirty. Most of these ‘scary’ repairs are just a series of logical steps held together by a few screws. If you ever feel like a project is getting away from you, remember that knowing when to call an oven repair expert is the mark of a true professional. Now, go turn on that convection fan and enjoy the silence. Have you ever discovered a loose part that was surprisingly easy to fix once you actually opened the door? Let me know in the comments below!