It happened on a frantic Tuesday evening, right as I was sliding a heavy lemon tart into the center rack for my daughter’s birthday. I heard a sharp, metallic ping, followed by the sickening thud of the oven door dropping like a lead weight. I nearly lost the tart, my balance, and my cool all at once. If you have ever felt that sudden, terrifying lack of resistance when you let go of the handle, you know exactly the sinking feeling I am talking about. You immediately start calculating the cost of a professional repair and wondering if you can just live with a door that tries to crush your shins every time you bake. But let me tell you something from a neighbor who has been there: you do not need to call in the cavalry for this one. In my early DIY days, I made the bone-headed mistake of trying to prop up a failing door with a kitchen chair instead of fixing the underlying issue. That lazy shortcut led to me eventually [identifying a failed door hinge on a wall oven](https://appliancebargainz.com/identifying-a-failed-door-hinge-on-a-wall-oven) that had warped under the uneven pressure, turning a twenty-dollar fix into a two-hundred-dollar headache. Today, we are going to avoid that trap and get your kitchen back to peak performance.
That Heart-Sinking Sound of a Falling Oven Door
When that cable snaps, it is not just a nuisance; it is a genuine safety hazard. An oven door that lacks the proper tension from its springs and cables can drop unexpectedly, potentially causing burns or injury to anyone nearby—especially pets or toddlers. Beyond the physical danger, a door that does not close with a tight, crisp seal is an absolute energy hog. According to the National Fire Protection Association (NFPA), mechanical failures in cooking equipment are a leading contributor to home accidents, and keeping your appliances in top mechanical shape is the best way to prevent larger disasters. If you have noticed yours acting up, you might already be searching for [how to fix an oven door that drops open too fast](https://appliancebargainz.com/how-to-fix-an-oven-door-that-drops-open-too-fast). The good news is that the fix is mostly about access and a bit of patience. We are going to dive into the world of [oven-diagnostics-pinpointing-faults-before-calling-a-repair-expert](https://appliancebargainz.com/oven-diagnostics-pinpointing-faults-before-calling-a-repair-expert) so you can feel confident holding that screwdriver. Have you ever had a kitchen appliance fail right when you needed it most, or are you currently propping your door shut with a broomstick? [image_placeholder]
Is it really possible to fix this in under ten minutes?
I know what you are thinking. You are worried that you will pull the oven out and find a chaotic mess of wires and insulation that you will never get back together. I felt the same way the first time I peeked behind the side panels. But here is the reality: the cable and pulley system in most modern ovens is surprisingly elegant and accessible. It is a straightforward mechanical link. Once you see how the cable loops through the pulley and connects to the spring, the ‘mystery’ vanishes. You are essentially just replacing a heavy-duty string. While it might seem daunting, it is one of the most rewarding [oven repair essentials](https://appliancebargainz.com/oven-repair-essentials-troubleshooting-common-issues-with-parts) you can master. I have seen folks spend hours over-complicating this, but if you have the right part in hand, the actual swap is incredibly fast. The hardest part is usually just sliding the range out far enough to reach the side covers. Trust me, if I can do this with a toddler pulling at my pant leg, you can do it too.
Your Safety and Your Energy Bill Are on the Line
We often ignore these small mechanical failures because the oven still ‘heats up,’ but that is a dangerous game to play. A snapped cable often means the door isn’t pulling tight against the gasket, which allows heat to escape. This doesn’t just bake your cookies unevenly; it cooks your control knobs and internal electronics, too. I’ve seen many cases where a simple cable issue escalated because the escaping heat melted the plastic components on the front of the machine. Before you decide to just ‘handle the weight’ yourself, consider the long-term health of your appliance. Knowing [when to stop diying and call an oven repair expert](https://appliancebargainz.com/when-to-stop-diying-and-call-an-oven-repair-expert) is important, but for a snapped cable, you are more than capable of handling the task. Let’s get those tools ready and walk through the process of restoring that smooth, controlled glide to your oven door.
Clear the Deck Before You Start Tearing Things Apart
The biggest mistake most people make is trying to perform surgery in a cramped space. You need to pull that oven out far enough to get your elbows into the side panels. Before you even touch a screwdriver, flip the circuit breaker. Dealing with the mechanical tension is one thing, but touching a live terminal while you are reaching for a spring is a recipe for disaster. Once the power is dead, I like to lay down an old moving blanket or a couple of flattened cardboard boxes. This protects your flooring from the heavy metal feet of the range and gives you a soft spot to kneel. If your unit is a wall oven, the process is slightly different—you will likely need a second pair of hands to help you slide it out onto a sturdy cart or table. I once tried to ‘wing it’ by sliding a wall oven onto a stack of cookbooks, and let’s just say my copy of Joy of Cooking is still a little squashed. If you are dealing with a built-in unit, you might want to review [identifying a failed door hinge on a wall oven](https://appliancebargainz.com/identifying-a-failed-door-hinge-on-a-wall-oven) to ensure you are attacking the right part of the assembly.
Get Your Hands on the Side Panels
Most freestanding ranges have side panels secured by a few screws at the back. Remove those, and the panel should either slide backward or lift slightly to unhook from the front frame. This is where the magic happens. You will see a long, thin steel cable or a heavy-duty nylon cord threaded through a plastic pulley wheel. One end of this cable hooks into the door hinge, and the other end attaches to a large tension spring anchored to the rear of the oven frame. If the door is dropping like a rock, you will likely find the cable snapped in two or the spring dangling uselessly. It is remarkably similar to the tension systems in other appliances; in fact, the logic is almost identical to [fixing a dishwasher door that feels too light or heavy](https://appliancebargainz.com/fixing-a-dishwasher-door-that-feels-too-light-or-heavy) when those cables fray. Take a photo of the layout before you touch anything. Even though it looks simple, it is surprisingly easy to forget which way the cable loops around the pulley once you have the tension off. 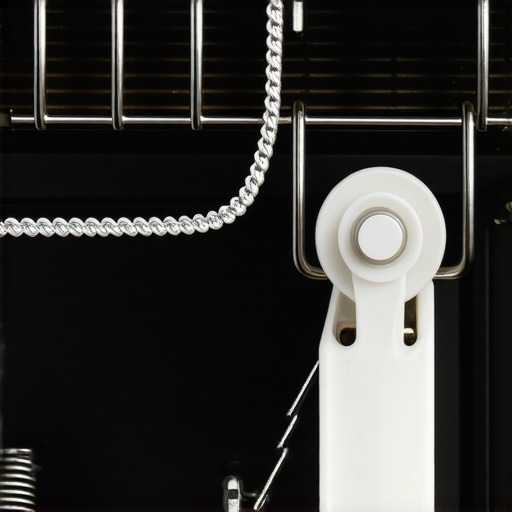
Lasso That Spring and Link the Cable
Now for the meat of the repair. You need to unhook the old, broken cable from the hinge and the spring. If the spring is still under tension, be extremely careful. I use a pair of locking pliers to hold the spring while I work the cable into the hook. It is like stringing a bow—the force is deceptively strong. I remember one specific job where I thought I could just pull the spring with my bare fingers. The spring slipped, snapped back, and nearly took a chunk out of my knuckle. Since then, I always use the pliers. Slide the new cable over the pulley wheel first, then hook it into the door hinge arm. Pull the other end toward the spring and clip it into place. This is a core part of [oven repair essentials](https://appliancebargainz.com/oven-repair-essentials-troubleshooting-common-issues-with-parts), as these cables are designed to wear out over thousands of cycles. While you have the side panels off, it is a great time to check if the hinges themselves are moving smoothly. If they feel crunchy or stiff, you can learn [how to lubricate sticky oven door hinges safely](https://appliancebargainz.com/how-to-lubricate-sticky-oven-door-hinges-safely) before you seal everything back up. A little high-temp grease now prevents a squeaky door for the next five years.
The Tension Test and Final Realignment
Before you screw the panels back on, do a manual test. Slowly lift and lower the oven door. It should feel balanced—neither pulling shut too hard nor falling under its own weight. If the door still feels slightly off, check the other side. These cables usually come in pairs, and if one snapped, the other is likely on its last legs. I always recommend replacing both at once. It is much like [how to fix an oven door that drops open too fast](https://appliancebargainz.com/how-to-fix-an-oven-door-that-drops-open-too-fast); symmetry is your best friend here. If the door isn’t seating perfectly flat against the frame, you might have a bent hinge arm or a worn-out [oven door hinge receiver](https://appliancebargainz.com/replacing-an-oven-door-hinge-receiver) that needs attention. Once the motion is smooth and the seal is tight, slide the oven back into its niche, making sure not to pinch the power cord or the gas line. Level the unit, turn the power back on, and you are ready for the next bake. You have just saved yourself a hundred-dollar service call and potentially prevented a much more expensive heat-related failure down the road.
Most DIYers start by swapping out the door gasket when they feel heat escaping, thinking the rubber has simply perished. In my years of tinkering, I have found that the gasket is rarely the primary villain. The real culprit is often the loss of ‘pull-in’ force from the springs. If your door does not have that satisfying thump when it closes, it is not a seal problem; it is a geometry problem. This is a nuance often missed in basic oven-diagnostics-pinpointing-faults-before-calling-a-repair-expert. If the hinges are not pulling the door square against the frame, no amount of fresh rubber will stop the heat from leaking. I have seen homeowners spend sixty dollars on a high-end gasket only to realize the door still had a visible gap at the top corner because the spring tension was uneven across the assembly.
Here is the ‘Oops’ factor you need to watch for: the ‘Good Side’ trap. When one cable snaps, the other side is suddenly bearing 100% of the load for every second that the door is open. It might look fine to the naked eye, but it is likely stretched beyond its elastic limit or has micro-frays hidden near the pulley. If you only replace the broken one, the uneven tension will cause the door to sit slightly askew—a subtle tilt you might not notice until your cakes are rising higher on one side than the other. Over time, this imbalance puts lateral stress on the hinges, which can eventually twist the door frame itself. It is the same logic used in parts-and-diagnostics-how-to-identify-dishwasher-faults-quickly—if one component in a balanced system fails, its partner is compromised. Professional technicians almost never sell or install a single cable for this exact reason.
Can a misaligned door actually fry your oven’s brain?
The answer is a resounding yes. According to the Association of Home Appliance Manufacturers (AHAM), even a minor 1/8-inch gap caused by mechanical misalignment can cause significant thermal bypass. This is not just about losing heat; it is about the path of least resistance. Heat rises, and if it escapes the door seal, it flows directly upward into the sensitive electronic housing. This is why you might find that your oven control knobs are getting too hot to touch or your digital display starts acting ‘glitchy’ during a long roast. Prolonged exposure to this concentrated ‘venting’ heat can delaminate your control boards and melt plastic wire harnesses. You think you are saving money by delaying a twenty-dollar cable fix, but you are actually gambling with a four-hundred-dollar control module. I have seen boards with literal scorch marks simply because a cable was ignored for six months.
Before you button everything up, take a hard look at the broader oven repair essentials and specifically the oven door hinge receiver. If the slot where the hinge inserts is wallowed out or bent, even a new cable will not fix the sag. This is where the pros separate themselves from the amateurs: they look at the whole system—the cables, the pulleys, the springs, and the receivers—not just the part that snapped. Have you ever fallen into this trap of fixing only the ‘obvious’ problem, only to have the appliance fail again a week later? Let me know in the comments.
Keep Your Kitchen Mechanics from Grinding to a Halt
Once you have finished the immediate repair, it is tempting to slide the unit back and forget about it for another decade. However, the future of appliance care is moving toward predictive maintenance. We are already seeing high-end manufacturers experiment with load-sensing hinges that can ping your phone when a cable begins to stretch. Until those smart springs become the standard in every kitchen, you have to be the sensor. I make it a habit to perform a resistance check every six months—not just on the electrical components, but on the mechanical ones too. When you are deep into oven repair essentials, you realize that the difference between a five-year appliance and a twenty-year appliance is almost always found in the moving parts.
The Essential Gear I Never Repair Without
I have a specific oven bag in my garage that never changes. It includes a high-quality magnetic nut driver—because dropping a screw into the insulation is a total nightmare—and a digital multimeter. Even if I am just fixing a door, I use the opportunity to check the vitals. For instance, I always take a second to learn how to test an oven broil element using a simple ohmmeter while the back panel is exposed. Why wait for it to fail on Thanksgiving? According to technical bulletins from the Professional Service Association (PSA), mechanical fatigue in door counterbalance systems is often accelerated by high ambient humidity. This means if your dishwasher is venting directly toward your oven side panels, those cables are going to rust and snap significantly faster than the manufacturer intended. I personally use a silicone-based high-temp lubricant on every pivot point because it stays viscous where standard WD-40 would just bake into a sticky lacquer.
How do I keep my appliance hinges and cables from snapping again?
The secret is simple: stop the friction before it starts. Every time you deep clean your kitchen, give the door hinges a quick inspection. If you hear a squeak, you are hearing metal-on-metal wear that is slowly eating away at the hinge arm. Learning how to lubricate sticky oven door hinges safely is probably the most underrated skill in the DIY world. Use a food-grade lubricant that can handle at least 500 degrees Fahrenheit. If you apply the wrong grease, it will smoke and smell like a tire fire the next time you roast a chicken. This proactive approach applies to your other heavy hitters too; I use the same logic when diving into dishwasher parts: a comprehensive guide to diy diagnostics. Whether it is a door cable or the one part that stops your dishwasher from draining completely, catching the vibration or the stiff movement early saves your wallet from the catastrophic failure price tag. My advanced tip for you today: before you tighten that last screw on your oven panel, use your multimeter to check for ground continuity. It takes thirty seconds and ensures that your repair hasn’t accidentally pinched a wire, keeping your family safe while you bake.
Why Replacing Only One Cable is a Trap
After years of wrestling with door assemblies, I have realized the most expensive mistake you can make is assuming the ‘working’ cable is still healthy. When one snaps, the remaining cable instantly takes on 100% of the weight, which often stretches it beyond its design limits. If you do not replace them as a pair, you will likely find yourself pulling the oven out again in a month because the door has started to hang crookedly. I also suggest checking the plastic pulley wheels for any ‘flat spots’ or grooving. If the pulley is damaged, it will act like a saw blade on your brand-new cable. These small observations are what separate a permanent fix from a temporary patch in your oven repair essentials routine.
My Go-To Kit for High-Heat Repairs
You do not need a professional workshop, but a few specific tools make this job significantly safer. A magnetic nut driver is my number one recommendation; dropping a screw into the fiberglass insulation is a nightmare that can add an hour to your repair time. I also keep a digital multimeter nearby. Since you already have the oven moved out, it is the perfect window for testing your ovens high-limit thermostat with ease to ensure your thermal fuses are still within spec. Lastly, only use food-grade, high-temp silicone grease on the pivot points. Standard lubricants will smoke and create a foul odor the moment you preheat to 400 degrees.
Reclaim Your Kitchen with Confidence
There is a genuine sense of pride that comes with feeling that smooth, controlled glide of an oven door you restored yourself. By taking the time to fix the cable and pulley system, you have protected your expensive digital components from escaping heat and ensured your bake cycles are as efficient as possible. You have effectively bypassed the need for how to inspect your oven control board for burn marks by stopping the thermal leak at the source. Your oven is now safer, more efficient, and ready for your next big family meal. [image_placeholder]
Have you ever successfully fixed an appliance only to find a ‘mystery screw’ left over on the floor when you were done? Let me know in the comments below!