Last Tuesday, I pulled my favorite set of wine glasses out of the dishwasher, ready to host a small dinner party, and I honestly thought my eyesight was failing. Every single glass was coated in a thick, gritty, white haze that made them look like they’d been sitting in a dusty attic for a decade. It is that specific, soul-crushing moment of betrayal when you realize you have to hand-wash everything you just paid a machine to clean. We have all been there—scrubbing at a stubborn plate with a thumbnail, wondering if the machine is actually making things worse. This isn’t just a cosmetic annoyance; it is a signal that something inside that metal box is struggling. Today, I am going to walk you through exactly why this happens and how I finally stopped the madness in my own kitchen after years of trial and error.
Don’t Toss Those Cloudy Glasses Just Yet
I’m going to level with you: when I first saw that film, I thought the solution was just dumping more ‘extra-strength’ detergent into the dispenser. I figured if the dishes weren’t clean, I clearly needed more soap. That was a huge mistake. All I did was waste money and create a sudsy mess that eventually required me to look into identifying dishwasher faults quickly before I ruined the motor. According to the American Cleaning Institute, using excessive detergent in certain water conditions can actually lead to ‘etching,’ which is permanent physical damage to the glass that no amount of scrubbing can fix. Fortunately, for most of us, that chalky film is just mineral buildup or undissolved soap, and I’ve spent enough weekends under my kitchen sink to tell you how to stop it without calling a pro.
Is this just an unavoidable part of living with hard water?
You might feel like you are destined to have ‘gray’ dishes forever if you live in an area with heavy minerals, but that is a myth. Often, the film is just a sign that you need to spend ten minutes removing hard water deposits from the tines and the interior walls. It is a maintenance task I used to skip until I realized that those minerals were recirculating through every single wash cycle. Have you ever opened your dishwasher and felt like you were looking at a limestone cave? If so, tell me—have you tried any of those ‘home remedies’ like vinegar bowls, or are you still stuck with the grit?
Your Soap Pod Might Be the Secret Villain
If you see a film, the first thing I want you to do is check the bottom of the tub after a cycle. Is there a half-melted glob of blue and green goo? I’ve found that the real reason your dishwasher soap pod won’t dissolve often comes down to water temperature. If your water doesn’t hit at least 120°F, that pod is just going to sit there, partially melt, and leave a filmy residue on your plates. Sometimes the problem is as simple as clearing hard water deposits from the interior walls so the sensors can actually read the water conditions correctly. We aren’t just looking for a clean shine; we are looking to make sure your machine isn’t working twice as hard for half the result.
Go Beyond the Surface and Scrub the Sump
The white film on your glasses isn’t just magic dust; it is often the result of a dishwasher that is recirculating dirty water because its filtration system is choked. Think of your dishwasher’s filter as the machine’s kidneys. If they are clogged, the whole system becomes toxic. Last summer, I noticed my plates felt slightly greasy even after a heavy cycle. When I finally pulled the filter out, I nearly gagged. It was covered in a gray, gelatinous sludge that smelled like a mix of old garlic and wet dog. I realized then that I wasn’t cleaning my dishes; I was just rinsing them in a ‘filter soup.’ To avoid this, you need to start with a deep dive into the base of the machine. If you find your components are jammed, you might need to learn how to remove a stuck dishwasher filter that wont turn without snapping the plastic housing. Once it is out, don’t stop at the mesh. You have to reach down into the dark abyss to clean the hidden debris under your dishwasher filter. I found a literal shard of a broken mug and three cherry pits in mine, which were shredding the water flow and preventing proper drainage. 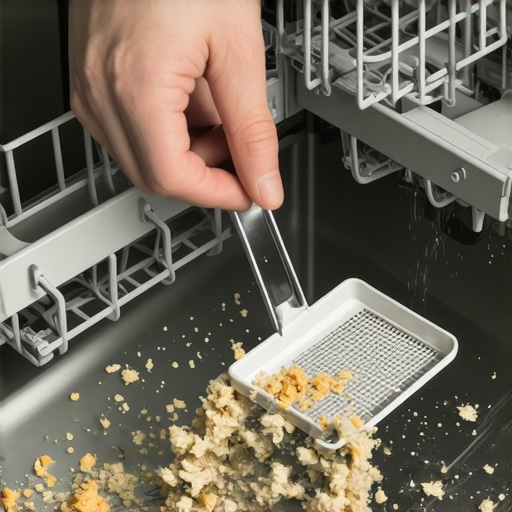
Clear the Spray Arms to Restore Water Pressure
If your filter is clean but the film remains, the problem is likely ‘low-flow.’ Your dishwasher arms work like a garden hose with a thumb over the end—if the holes are blocked, the pressure drops, and the soap can’t be blasted off the glass. I once spent an hour with a toothpick poking out tiny bits of plastic wrap and calcium deposits from the tiny nozzles. It is tedious, but it is the only way. If you live in a high-mineral area, you must regularly clean mineral buildup from dishwasher spray nozzles to keep the spray patterns precise. Think of it like a showerhead; when half the holes are plugged, you can’t get the shampoo out of your hair. The same logic applies to your wine glasses.
Test the Heat if Your Pods Won’t Melt
If you are still finding undissolved soap, your machine might be running cold. This is where we get into actual dishwasher parts: a comprehensive guide to diy diagnostics. A dishwasher is essentially a heated tank; if the element at the bottom isn’t glowing, the water won’t activate the enzymes in your detergent. I recommend testing the resistance on your dishwasher heating element with a multimeter. If that element is dead, your ‘clean’ cycle is just a cold bath. While you are checking the plumbing, don’t forget to look at the sink connection. A common culprit for filmy residue is backflow from the sink, which you can fix by learning how to unclog your dishwashers air gap in five minutes. Finally, listen to the machine. A weak, rhythmic surging sound rather than a steady roar can be one of the signs of a dying circulation pump in your dishwasher, meaning the water isn’t moving fast enough to keep the minerals from settling on your glassware. Just like when you’re troubleshooting common issues with oven parts, identifying the specific failing component early saves you from a total kitchen breakdown.I have spent years trying to figure out why my dishwasher was failing me, and I have learned that the most popular advice is often the most dangerous. For example, almost every ‘life hack’ blog tells you to run a bowl of vinegar through your machine to clear that white film. I did this religiously for months until a veteran technician told me I was slowly killing my machine.
Stop Pouring Vinegar Down Your Drain
While vinegar is a great descaler, it is still an acid. According to the Appliance Service Training Institute (ASTI), frequent exposure to high-acidity cleaners can prematurely degrade the nitrile rubber seals and gaskets inside your circulation pump. You think you are cleaning the tub, but you might actually be setting yourself up for a leak. If you have noticed your door isn’t closing quite right, it might be time to stop the vinegar and start deep cleaning the moldy gasket in your dishwasher door by hand with mild soap instead. If the damage is already done, you will need to know how to reseat a dishwasher door seal that keeps popping out before the next cycle floods your kitchen. 
Can a ‘Working’ Heating Element Still Ruin Your Dishes?
This is the nuance most people miss: just because your element gets hot doesn’t mean it’s getting hot enough. I once dealt with a dishwasher that left a gritty film on everything despite the water being warm. When I finally performed some dishwasher parts: a comprehensive guide to diy diagnostics, I found the element had ‘blistered.’ It was drawing enough current to stay warm, but not enough to reach the 140°F required to activate modern detergents. Always spend the time testing the resistance on your dishwasher heating element with a multimeter before you assume the soap is the problem. Have you ever fallen into this trap? Let me know in the comments.
Don’t Let a Blown Fuse Trick You into Buying a New Board
The biggest ‘oops’ factor in home repair is misdiagnosing a dead control board. I see so many people spend $200 on a new PCB when their machine won’t start, only to find the problem persists. Often, the issue is just a $15 safety component. You should always be checking the thermal fuse on your dishwasher before buying a new one. It is a tiny part designed to fail so your house doesn’t catch fire, and it’s much easier to replace than the brain of the machine. The same logic applies to your cooking appliances; before you panic about a dead oven, try oven diagnostics to pinpoint faults before calling a repair expert.
The Trap of Replacing Instead of Repairing
We live in a throwaway culture, but many of the issues causing that white film or poor performance are mechanical ‘wear items.’ If your rack is sticking and leaving rust spots on your plates, you don’t need a new dishwasher. You might just be replacing the roller wheels on a sticking dishwasher rack to restore its function. Even if the tines are looking rough, the best way to patch a small hole in a dishwasher rack is a ten-minute fix that saves you a hundred bucks. Before you head to the store, make sure you are identifying dishwasher faults quickly by looking at the small stuff first. Often, the ‘death’ of an appliance is just a cry for a $20 replacement part and an hour of your Saturday.
Grab a Multimeter and Stop Guessing
When I first started fixing my own appliances, I relied on my ears and my gut. That led to me replacing perfectly good pumps because they ‘sounded funny.’ Everything changed when I bought a basic digital multimeter. If you are serious about keeping your machines out of the landfill, you need to learn 5 multimeter tricks for diagnosing a dead control board. It is the only way to move from guessing to knowing. For instance, when I’m dealing with a stove that won’t get hot, I’m immediately testing the gas oven solenoid when the clicking stops to see if it’s getting the right voltage. I personally use a Fluke 101 because it’s nearly indestructible, but even a $20 model from the hardware store will tell you if you’re testing a gas oven safety valve for proper voltage correctly. Without data, you’re just throwing parts at a problem and hoping for a miracle.
How can I keep these machines running for a decade?
The secret to longevity isn’t a special chemical; it is regular inspections. Every six months, I pull the kickplate off my dishwasher to look for the ‘white crust of death.’ This is the tell-tale sign of a slow leak. I’ve caught several disasters early by replacing a leaky dishwasher inlet valve before it floods my hardwood floors. According to the Association of Home Appliance Manufacturers (AHAM), the average life of a dishwasher is about 9 to 10 years, but poor maintenance of the filtration system and inlet valves often cuts that short by half. You have to be proactive about choosing the correct thermal fuse for your dishwasher model before a minor overheat turns into a melted control panel.
The Hidden Danger of Your Oven’s Self-Clean Mode
I’m going to share a bit of hard-earned wisdom that most manuals won’t tell you: stop using your oven’s self-clean feature. It sounds convenient, but it cranks the heat up to nearly 900°F, which is a recipe for fried electronics. I have seen countless homeowners end up how to tell if your oven control board is actually fried immediately after a clean cycle. The heat is simply too much for the delicate solder joints. Instead, I recommend a manual scrub or, at the very least, testing your ovens high-limit thermostat with ease before you commit to a high-heat cycle. If you smell something off, don’t ignore it. I’ve learned that why your gas oven smells like fuel but wont ignite usually points to a weak igniter that isn’t pulling enough amps to open the safety valve.
Get Ready for Smart Sensors to Take Over
Looking ahead, I predict we are entering an era where ‘dumb’ mechanical parts are almost entirely gone. We are already seeing dishwashers with turbidity sensors that ‘see’ how dirty your water is and adjust the cycle on the fly. This is great for efficiency, but it means you’ll spend more time oven diagnostics to pinpoint faults before calling a repair expert because the sensors are more sensitive than ever. My advice? Get comfortable with the tech now. I want you to try one advanced tip this weekend: pull your dishwasher out just a few inches and check the tension on the door ropes. If they feel frayed, you are days away from a door that crashes to the floor. Being your own technician isn’t just about saving money; it’s about the peace of mind that comes from knowing exactly how your home works.
Three Game-Changing Truths from My Repair Journey
After years of battling cloudy glassware and lukewarm wash cycles, I have walked away with a few realizations that changed how I approach my kitchen entirely. First, I stopped assuming that ‘more’ meant ‘cleaner.’ In modern high-efficiency machines, adding extra detergent to fight mineral film is like trying to put out a fire with gasoline; you are only adding to the residue. Second, I learned to listen to the machine’s rhythm. That faint grinding sound I used to ignore was actually the first indicator of the signs of a dying circulation pump in your dishwasher, which meant water wasn’t hitting the glasses with enough force to rinse away the soap. Finally, I realized that regular maintenance is non-negotiable. Mastering the art of identifying dishwasher faults quickly has saved me thousands of dollars in premature replacement costs and service calls.
The Survival Kit for a High-Efficiency Kitchen
If you want to move from frustrated homeowner to a confident DIYer, you need more than just a screwdriver. My personal toolkit always includes a reliable digital multimeter—the only way to be certain you are testing the resistance on your dishwasher heating element correctly rather than just guessing. I also keep a printed copy of dishwasher parts: a comprehensive guide to diy diagnostics taped to the inside of my utility cabinet for quick reference. For the physical cleaning, a simple soft-bristled nylon brush is far better for delicate components than harsh chemicals. I also recommend keeping a small supply of universal components, like knowing how to choose the correct thermal fuse for your dishwasher model, so you aren’t stuck waiting for shipping while your dishes pile up in the sink. #IMAGE_PLACEHOLDER_E#
Reclaim Your Time and Sparkling Clean Results
Don’t let a bit of white film or a stubborn soap pod convince you that your machine is destined for the landfill. We live in an age where the information and the parts are more accessible than ever before. Whether you are deep-cleaning a filter, checking an air gap, or even transitioning your skills to oven repair essentials: troubleshooting common issues with parts, the logic remains the same: understand the symptom, test the component, and perform the fix. You have the ability to keep your appliances running at peak performance for years to come without the stress of constant service fees. Have you ever found a weird object—like a stray Lego or a coin—stuck in your dishwasher filter that was causing all your problems? Let me know your funniest discovery in the comments below!