Ever been in the middle of baking a batch of cookies or roasting veggies, only to hear that unsettling clink as your oven door wobbles or, worse, the glass pane comes loose? I’ve been there—midway through a dinner party, my oven door suddenly felt like it was on the verge of collapsing. That moment of panic? Yeah, I’ve felt it too.
Why a Loose Oven Door Glass Matters More Than You Think
When your oven door glass is loose, it’s not just about appearance. It can affect your cooking, safety, and even your energy bills. A wobbly door can cause uneven heat distribution, making your baked goods imperfect and your roasted dishes less satisfying. Plus, a loose panel might rattle or rattle, creating safety risks with falling glass—never something you want in your kitchen.
From my own experience, I learned that ignoring a loose oven door can escalate into more expensive repairs down the line. It’s easy to dismiss it as a minor annoyance, but trust me—addressing it early is a smart move. Did you know that a well-maintained oven door not only improves cooking results but also helps prevent potential injuries? According to appliance safety experts, regular checks and fixes can prevent accidents and extend the lifespan of your appliances.
So, today I promise to share exactly how I fixed my loose oven door glass in just three simple steps, which you can do yourself. No need to call in a repair service or buy a whole new door. Whether you’re a DIY newbie or a seasoned home repair enthusiast, these steps will save you time and money—and get your oven back to working like new.
Before we dive into the steps, I’ll also share a common mistake I made early on—something that might save you from frustration and additional costs. We’re in this together, after all. Ready to feel confident about fixing your oven door? Let’s get started!
Will Fixing Your Oven Door Save You Money or Is It Not Worth the Hassle?
This is probably your biggest concern. Believe me, I was skeptical at first—thinking, “Is it really worth fiddling with a potentially complicated repair?” Early on, I made the mistake of rushing into the fix without proper tools or a clear plan, which only made things worse. That’s why I researched and prepared thoroughly, and now I want to share that knowledge with you. For more on common repair pitfalls, check out this guide on appliance indicator light fixes.
So, yes—fixing your oven door glass can be simple, cost-effective, and worth your effort. It helps ensure your kitchen remains safe, your food cooks evenly, and your appliances last longer. Ready to learn the three simple steps? Let’s jump right in and restore that sturdy, safe oven door of yours.
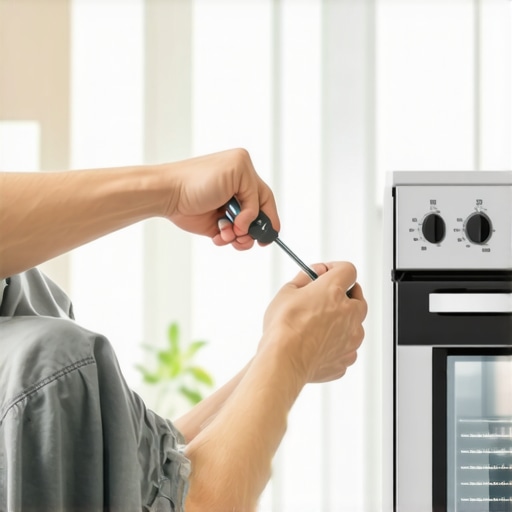
Remove the Oven Door for Inspection
Start by pulling the oven door almost fully out of the hinges, then locate the screws along the top and bottom edges of the door frame. Using a Phillips screwdriver, carefully unscrew these components and place the door on a soft surface. I once skipped this step and struggled because I hadn’t fully detached the door, causing unnecessary frustration. Removing the door gives you direct access to the glass panel and hinge mechanisms, making subsequent steps more manageable.
Disassemble the Door to Access the Glass
With the door laid flat, examine the hinges and clips securing the glass. Typically, you’ll see screws or clips holding the glass in place. Use a screwdriver to remove these fasteners. Be cautious—hold the glass securely as it may be fragile. I once attempted to pry the glass free without proper support, resulting in a minor crack. Supporting the glass with your hand while unscrewing ensures it stays intact. This step allows you to inspect the glass and any rubber gaskets or seals for damage or looseness.
Secure or Replace the Glass and Reassemble
If the glass has shifted or loosened, tighten the screws or replace the rubber gaskets if worn to restore stability. For a damaged panel, ordering a replacement using the oven’s model number is straightforward. Once secured, reassemble the door by reversing the disassembly steps—snap the clips or screws back in and reattach the door to the oven hinges. During my first fix, I found that tightening the screws gradually and evenly prevented uneven pressure, which could cause the glass to loosen again. Proper reassembly ensures a snug fit, preventing future wobbling. For more insights on related oven issues, check out this guide on oven door lock fixes.Many homeowners approach appliance repair with a set of misconceptions that can lead to costly mistakes and lingering issues. For instance, a common myth is that all parts are interchangeable across similar models, but in reality, even minor differences can cause improper fitment or function. Additionally, many assume that simple fixes are always straightforward, overlooking the nuanced diagnostics required to identify root causes accurately. This oversight often results in temporary or ineffective repairs, requiring repeated efforts and expenses.
Another nuanced aspect often overlooked involves understanding the subtle signs that indicate complex problems. For example, a dishwasher that smells like plastic might just seem like a minor odor issue, yet it could signal heater element failures, which, if unaddressed, can cause significant electrical hazards. Similarly, minor leaks around your oven door might seem trivial but could be symptomatic of gasket failures or misaligned hinges—details that advanced diagnostics can reveal.
Misconceptions also extend to the repair process itself. Many fixate on replacing parts rather than diagnosing underlying problems. For example, replacing a faulty component without verifying the circuit it’s part of may only mask the issue temporarily. Skilled technicians approach repairs methodically, using tools like multimeters and performing tests outlined in expert guides, such as those found in our detailed troubleshooting guides. An understanding of this layered approach — inspecting control boards, sensors, and wiring — is crucial for effective repairs.
Let’s also bust the myth that repair is always DIY-friendly. While simple fixes like replacing a door gasket or tightening loose screws are manageable, more intricate issues—such as electrical shorts or control board failures—require advanced knowledge and proper safety precautions. Failing to recognize these complexities increases the risk of further damage or safety hazards.
An important nuance is the importance of matching replacement parts accurately, considering factors like voltage ratings and compatibility with the model number. Ordering the wrong part can lead to wasted time and additional costs. For in-depth part selection, always cross-reference your appliance’s model and serial number, or consult specialized resources that provide detailed compatibility info.
From my experience, the real skill in appliance repair lies in understanding these subtle, advanced nuances. Recognizing signs early, diagnosing accurately, and selecting the right components makes the difference between a quick fix and a recurring nightmare.
Have you ever fallen into this trap of oversimplifying repairs? Drop your stories in the comments—I’d love to hear how you navigated these challenges! For more insights on diagnostics, check out our comprehensive guides like this article on oven indicator lights or this post on dishwasher drain valves to get started on your repair journey.
Keep It Running with the Right Tools
Maintaining your appliances over the long haul demands more than just knowing what parts to replace. It requires having the right tools to diagnose issues accurately and perform repairs efficiently. Personally, I rely on a few core pieces of equipment that have stood the test of time, each chosen for their precision, reliability, and ease of use.
First and foremost, a quality digital multimeter is essential. I use the Fluke 117 because it provides accurate readings of voltage, resistance, and continuity, which are crucial for troubleshooting circuitry in ovens and dishwashers. Implementing a multimeter into your repair routine helps you identify issues like faulty thermostats, burned-out heating elements, or broken sensors without guesswork. For instance, when my dishwasher started acting up, testing the thermistor with my multimeter quickly confirmed it was causing inconsistent heating – an easy fix once diagnosed.
Alongside the multimeter, a set of precision screwdrivers is invaluable. I prefer the Wiha 79990 because of their magnetic tips and ergonomic design, allowing me to work comfortably in tight spaces. Such tools are indispensable when disassembling appliance panels or replacing parts without causing additional damage. For example, I was able to replace a dishwasher’s spray arm with minimal effort thanks to the well-designed screwdriver set.
A sturdy, flexible inspection camera is a game-changer. I recommend the Depstek DS150 for detailed internal inspections—its 5-meter cable and high-definition camera allow me to see inside confined spaces, check for blockages, or identify leaks. When dealing with complex drainage or wiring issues, this camera helps me avoid unnecessary disassembly and ensures diagnosing the root cause first time every time. It’s especially handy for inspecting gaskets and seals around oven doors, ensuring they’re sealing properly to prevent heat loss—saving energy and extending appliance life.
For maintaining diagnostics, I use appliance-specific software tools like the General Electric Service Diagnostic Tool, which integrates with some models via USB. While not universal, having access to such diagnostic programs accelerates troubleshooting, especially for newer appliances with smart controls. Visiting manufacturer’s sites regularly for firmware updates ensures I stay current with evolving diagnostic techniques, aligning with the forecast that appliance diagnostics will become more integrated and app-controlled in the future.
Regular practice using these tools not only improves repair quality but also increases confidence in handling intricate diagnostics. As appliance technology advances, I believe tools like wireless multimeters and AI-assisted diagnostic apps will become standard, further simplifying diagnostics and preventive maintenance.
How do I maintain appliance diagnostics and tools over time?
Once you have assembled your essential toolkit, proper maintenance becomes key. Keep your multimeter batteries fresh and calibration up-to-date—this ensures consistent accuracy. Clean your inspection camera lens regularly to avoid blurry images that could lead to misdiagnosis. Store your screwdrivers and other hand tools in a dedicated toolbox, keeping them organized and free from dust and moisture. Moreover, familiarize yourself with manufacturer repair manuals and stay updated on new repair techniques through online forums or official training. For instance, regularly reviewing appliance-specific repair guides, like the detailed diagnostics for oven control boards, can help you identify subtle signs before they develop into major failures. Remember, consistent maintenance of your tools and ongoing education will empower you to handle repairs confidently and keep your appliances working their best for years to come.
Over the years, I’ve realized that repairing appliances like ovens isn’t just about fixing parts—it’s about understanding the nuanced lessons that come with each repair attempt. One of the most valuable insights I’ve gained? The importance of patience and attention to detail. Rushing through a fix often leads to overlooked signs or improper reassembly, which can cause recurring problems down the line. Taking the time to inspect each component thoroughly and double-checking your work might feel tedious at first, but it pays off in reliability and safety.
What I Wish I Knew About Oven Repair Early On
- Small details matter: A loose screw or misplaced gasket can cause significant issues over time, emphasizing the need for meticulousness during reassembly.
- Skipping diagnostics can backfire: Jumping straight to replacing parts without proper testing often results in wasted effort and expenses. Investing in a good multimeter and learning how to use it changed my approach profoundly.
- Tools make the difference: Having the right screwdriver, inspection camera, or even a heat-resistant glove made every repair smoother and less stressful. Trusting reliable brands like Wiha or Depstek has been a game-changer for me.
- Understanding common misconceptions: Believing that parts are always interchangeable or that repairs are straightforward can lead to mistakes. Being informed has empowered me to diagnose accurately and save time.
My Toolkit for Confident Oven Troubleshooting
- A quality multimeter: For precise testing of thermostats, sensors, and wiring—my go-to is the Fluke 117 for its reliability and ease of use.
- Precision screwdrivers: They prevent stripped screws and damage during disassembly. Wiha’s ergonomic design and magnetic tips have served me well.
- High-definition inspection camera: The Depstek DS150 helps me peek inside tight spaces or behind panels, avoiding unnecessary removal of parts and ensuring accurate diagnosis.
- Manufacturer manuals and repair guides: Staying current with OEM resources has helped me understand the intricate workings of modern ovens and avoid common pitfalls.
Take Charge and Keep Your Oven in Top Shape
Repairing appliances like ovens might seem daunting initially, but with the right knowledge, tools, and patience, you can handle most issues confidently. Every successful fix deepens your understanding and boosts your confidence—making each repair more intuitive. Remember, investing in learning and proper equipment now will save you money, time, and stress in the future. So, gear up, stay curious, and don’t hesitate to tackle that loose oven door or faulty sensor. Your kitchen—and your wallet—will thank you!
What’s been your biggest surprise or lesson learned during a DIY oven repair? Share your story below—I’d love to hear your experiences!