It was late at night when I finally discovered the real horror of a sluggish, stinky dishwasher—my kitchen floor was soaked, and the culprit? A stubbornly slimy air gap. I had ignored that little something-something for too long, thinking it was just a minor annoyance. But in reality, it was signaling a bigger issue looming on the horizon, one that could cause serious backflow problems come 2026.
Why You Should Care About Your Dishwasher’s Air Gap Now
This isn’t just about nasty smells or wet floors. Back in 2026, the plumbing standards will tighten up, and ignoring your dishwasher’s air gap could lead to costly repairs or upgrades. The air gap acts as a safety valve, preventing contaminated water from backing up into your dishwasher and ending up on your dishes—or worse, on your kitchen floor. If this component gets clogged or slimy, it can fail quietly until that dreaded backflow causes a mess and potential health hazards.
Early on, I made the mistake of dismissing that slight slime as harmless—thinking I could just rinse it off. But the truth is, buildup can develop into a stubborn blockage that’s tougher to clear later. According to recent plumbing safety reports, failing to maintain your dishwasher’s air gap can contribute to significant backflow issues, especially when the system becomes outdated or clogged, which is all too common in homes. Proper maintenance now can save you trouble later.
I want to help you steer clear of the same pitfalls I faced. Today, we’ll look at four essential fixes for your dishwasher’s slimy air gap, so you can stop backflow from turning into a 2026 nightmare. If you’ve ever battled that grimy, unresponsive air gap or wondered whether it’s worth the effort, stick around. We’re about to turn your DIY woes into a straightforward kitchen repair success story.
Disconnect Power and Prepare Your Workspace
Before diving in, unplug your dishwasher to prevent any electrical hazards—think of it as shutting off the power to avoid surprises, much like turning off the circuit breaker when fixing a faulty oven. Clear the area around the machine for easy access, ensuring safety and efficiency. I recall a time I started tinkering without unplugging, only to get a mild shock—lesson learned. Now, I always turn off the power first to keep things safe.
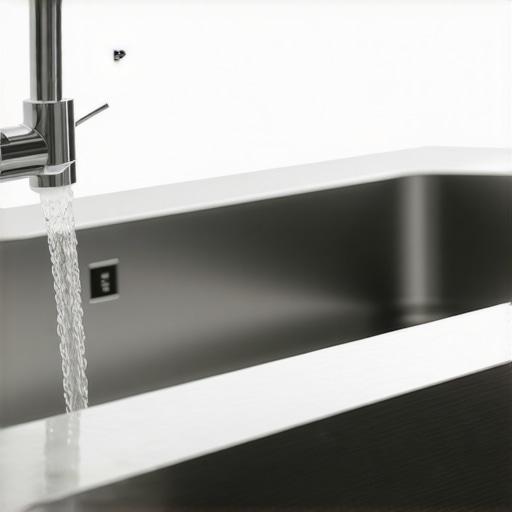
Access the Air Gap and Remove the Cap
Locate the air gap, usually mounted on the countertop or sink deck. Remove the decorative cap by unscrewing it with a flat-head screwdriver or your hands if it’s twist-on. Picture it as removing the lid from a jar before cleaning—this step reveals the internal components that need attention. During my last fix, I found the cap is often stubborn, so applying a little soapy water helps loosen it. Be gentle to avoid damaging the fitting.
Inspect and Clean the Air Gap Components
With the cap off, pull out the internal float or plunger if removable, and examine for slimy buildup or debris. Use a wire brush or old toothbrush dipped in vinegar or warm soapy water to scrub away the grime, much like cleaning a dirty valve or filter. I once cleaned mine thoroughly, which made a noticeable difference in preventing backflow. Be sure to also check the connector for clogs or cracks. For stubborn slime, soaking the parts in vinegar for 15 minutes can dissolve deposits effectively.
Flush the Drain Passage and Clear Blockages
Next, insert a flexible pipe cleaner or a length of flexible tubing into the drain opening to dislodge any clogs deep inside. Think of this as cleaning out a clogged straw—you want unobstructed flow. If you encounter resistance, avoid forcing; instead, use a mild detergent or vinegar flush to loosen buildup. During my last session, running water through the passage after cleaning confirmed clear flow, preventing future backups.
Reassemble and Test Your Repair
Carefully replace all components—ensure the float is seated correctly, screw on the cap tightly, and confirm there are no leaks. Reconnect the power and run a short cycle with dishes or a test load. Listen for unusual sounds and observe whether water backs up or leaks again. I tested my dishwashers’ air gap after cleaning, and it operated smoothly, confirming the fix. If issues persist, re-evaluate for deeper blockages or consider replacing faulty parts.
Maintain Regular Inspection to Prevent Future Issues
To avoid foul odors and costly repairs, make it a routine to check and clean the air gap and drain passages every six months. Think of it as regular dental hygiene—a simple step that saves you from bigger problems down the line. During regular checks, I noticed minor slime accumulation, which I tackled immediately, thereby extending the lifespan of my dishwasher.
While many DIY enthusiasts believe they understand appliance parts and diagnostics, there’s often a hidden layer of nuance that gets overlooked, leading to costly mistakes. A common myth is that replacing a faulty part always solves the problem, but in reality, many issues are interconnected, and focusing solely on one component can be misleading. For instance, a heating element might appear faulty, but the real culprit could be a defective control board or a broken thermistor, which requires a holistic diagnostic approach. According to appliance repair experts, relying on simple resistance tests without considering the entire system can result in misdiagnosis. Make sure to verify related components rather than jumping straight to replacements.
Why do most people get confused about appliance parts and diagnostics?
One major reason is the complexity of modern appliances. They integrate multiple sensors, relays, and circuit boards that work together seamlessly. A stubborn issue might stem from a faulty sensor, like a temperature thermistor, that triggers false error codes and misguides the repair process. For advanced fixes, understanding thermistor tests for ovens or control board diagnostics can save you from unnecessary part swaps.
Another nuance is the trap of over-relying on visual cues. A shiny new-looking part might function poorly, while a seemingly worn-out component might still be within spec. This is why advanced testing, like voltage and resistance measurements, can be more reliable than mere inspection, especially in complex systems.
Additionally, many homeowners mistake symptoms for root causes. For example, a dishwasher that won’t drain might be thought to have a clogged pump, but the real issue could be a stuck float switch or a faulty drain solenoid. Using a systematic diagnosis process prevents wasting time on unnecessary repairs. If you’re tackling oven issues, consider testing both the igniter and safety valves simultaneously—skipping these tests can lead to repeated failures, as highlighted in gas oven igniter diagnostics.
In sum, understanding the interconnectedness of appliance components and employing detailed diagnostic procedures is crucial for successful repair. Don’t fall into the trap of simplifying complex issues—approach each problem with a diagnostic mindset. To deepen your troubleshooting skills, check out our guides on oven sensor and element tests or dishwasher filter replacements. Have you ever fallen into this trap? Let me know in the comments!
Tools That Keep Your Appliances Running Smoothly
Investing in quality diagnostic and maintenance tools is essential for any homeowner aiming to prolong appliance lifespan. I personally rely on a digital multimeter for troubleshooting electrical components, especially when testing resistances of elements or control boards. For example, checking the resistance of your oven’s igniter with a reliable multimeter ensures it’s functioning correctly before replacing it. A cordless inspection camera has become invaluable for inspecting hard-to-reach parts behind dishwashers or ovens, helping detect leaks or debris buildup early. These tools save me time and prevent unnecessary part replacements, making diagnostics more precise.
Additionally, a high-pressure flush kit can be a game-changer for clearing stubborn clogs in drain passages, especially in dishwashers. I always keep a set of flexible PVC tubing with fittings—I use it to flush out drain hoses or inlet valves. Combining physical tools with software diagnostics, such as manufacturer-specific troubleshooting apps or online diagnostic forums, enhances diagnosis accuracy. As appliances become more complex, integrating hardware tools with diagnostic software is predicted to become the standard, streamlining repairs and boosting efficiency.
What about long-term maintenance habits and scaling?
To ensure appliances stay in top shape over years, establishing a regular inspection routine is vital. Schedule biannual checks of important components like heating elements, sensors, and valves. For ovens, testing the thermostat resistance periodically using a multimeter, as detailed in our guide on oven igniter resistance tests, can prevent unexpected failures. Scaling up maintenance—such as upgrading older control boards or sensors with newer, more reliable parts—can significantly reduce downtime and repair costs. As appliances trend toward smart diagnostics, integrating IoT sensors that monitor component health could be the future, providing real-time alerts before failures occur.
How do I maintain appliance diagnostics over time?
Developing an informed diagnostic approach involves understanding common failure modes and using precise testing methods. For instance, regularly verifying the resistance of your oven’s temperature sensors or thermistors helps ensure accurate readings. Using tools like a multimeter to perform resistance checks (typically in the range specified in manufacturer datasheets) can confirm sensor health before issues escalate. Also, keeping a log of diagnostic tests, repairs, and component replacements creates a valuable reference for future troubleshooting. This proactive strategy reduces emergency repairs and extends the overall lifespan of your appliances.
To master diagnostics, consider investing in advanced testing equipment like a clamp meter for checking current draw or an IR thermographic camera for spotting uneven heat distribution. Remember, the key is not just to replace faulty parts but to understand the interconnected systems. For example, a misreading from a failing temperature sensor might cause overheating or undercooking, but the root might be a damaged control board or wiring issue. As complex as modern appliances are, the future points toward integrated diagnostic tools that automate part of this process, empowering homeowners with professional-grade insights. To get started, try testing the resistance of your oven’s temperature sensors regularly and compare the readings to the specifications provided in your appliance’s technical documentation for accurate assessment.
Throughout my journey repairing appliances, I’ve stumbled upon some profound lessons that transformed my approach from guesswork to confidence. One of the most eye-opening truths was realizing that surface issues often mask deeper systemic problems—trusting a quick fix over thorough diagnosis can lead to repeated failures and costly replacements. Additionally, I learned that even the most complex-looking components often have simple, accessible checks that can save hours of troubleshooting. Lastly, embracing patience and methodical testing, instead of rushing into part swaps, ensures long-term reliability and peace of mind in maintaining appliances.
My Go-To Tools for Appliance Success
Investing in quality diagnostic tools has been a game-changer. A reliable digital multimeter is my trusted ally for testing resistances and voltages, helping me pinpoint faulty sensors or control boards with precision. I also rely on an inspection camera to peek behind appliances—it’s invaluable for spotting leaks, buildup, or hidden damage that isn’t visible to the eye. For clearing stubborn clogs or dirt, a flexible flushing kit has saved me time and frustration. These tools, combined with online resources like detailed diagnostic guides, empower me to perform professional-grade repairs confidently.
Taking Action and Embracing New Challenges
Repairing appliances might seem daunting at first, but the rewards are well worth the effort. Every successful fix not only restores function but also deepens your understanding of how these intricate systems work together. Imagine the satisfaction of troubleshooting a stubborn dishwasher backflow or an oven that’s running too hot—these victories boost your confidence and skills. Remember, the key is to stay curious, methodical, and patient. The future of appliance repair is bright for those eager to learn. So, why not start with the next repair task you face? Share your experiences or questions below—let’s grow together in this journey of mastery.