Imagine loading your dishwasher after a busy day, expecting those shiny, squeaky-clean dishes. But then, horror strikes: the middle spray arm refuses to spin, leaving your plates muddy and your frustration mounting. I’ve been there—standing in front of my dishwasher, thinking, ‘Why now? Isn’t this supposed to work?’ It’s a common yet surprisingly perplexing problem that can disrupt your entire routine. But don’t worry—I’ve discovered practical solutions that can get that spray arm dancing again, saving you time and money.
Today, I promise to guide you through three effective fixes specifically tailored for the 2026 models. Whether it’s debris, a faulty motor, or a clogged jet, I’ve faced each issue—and fixed it. So, if you’ve ever battled a stubborn, non-spinning spray arm, stick around. We’re about to troubleshoot like pros, and I’ll share some tips I wish I knew sooner. Did I mention that ignoring these little glitches can lead to bigger problems down the line? According to appliance experts, a stalled spray arm can reduce cleaning efficiency and even cause water wastage—so it’s worth fixing now rather than later.
Why the Middle Spray Arm Sometimes Refuses to Spin
Understanding the cause of this hiccup is half the battle. The most common culprits include debris buildup blocking the jets, a malfunctioning motor, or a damaged bearing or support. Early in my DIY adventures, I mistakenly assumed it was a broken part—turns out, most of the time, it’s simply a clog or a minor electrical hiccup. Recognizing this saved me from costly replacements and lengthy repairs. Today, I’ll help you identify what might be stopping your spray arm from twirling and how to fix it yourself.
But first, it’s natural to wonder: “Is this problem worth fixing, or should I call in a professional?” If you’re like me, a little cautious skepticism kicks in—believing that some issues require expert hands. However, many problems with dishwasher spray arms are straightforward DIY fixes, especially if caught early. To gain a better idea, you might want to check the troubleshooting guide at [top dishwasher parts diagnostics for 2025](https://appliancebargainz.com/top-dishwasher-parts-diagnostics-for-2025-repairs-2). It’s a treasure trove of insights!
Now, before diving into the tips, I’ll share a mistake I made early on—overlooking simple debris that was easily cleaned out—reminding you that sometimes the fix is as simple as clearing a clog. With that in mind, let’s get to the steps that will have your dishwasher humming smoothly again.
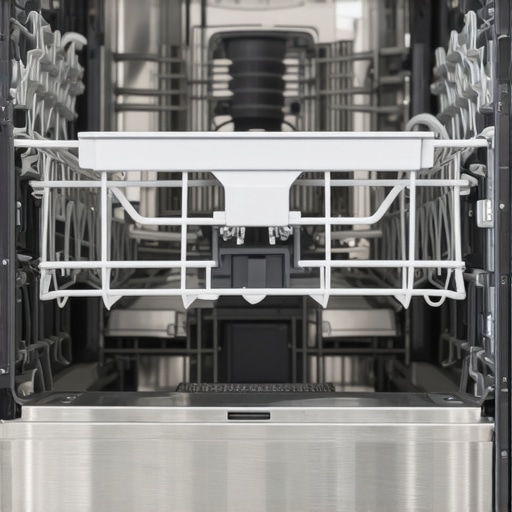
Remove and Inspect the Spray Arm
Start by opening your dishwasher door fully and removing the lower rack. Locate the spray arm at the bottom—it’s typically a circular plastic or metal piece with multiple jets. Gently unscrew or lift it out, depending on your model. Once removed, examine it closely for debris or mineral buildup that could hinder its rotation. I once faced this issue myself, and after pulling out the spray arm, I found a stubborn chunk of food debris lodged in a jet, which I snipped out with tweezers. Cleaning it thoroughly with warm water and a soft brush often restores free movement. Be cautious to avoid damaging the jets or support so that the spray arm can rotate smoothly upon reassembly.
Clear Blockages from Jets and Support
Next, check the jets for clogs. Use a toothpick or small brush to dislodge any stuck particles. For stubborn obstructions, soak the spray arm in a vinegar solution for 15-20 minutes, then scrub lightly. Sometimes, mineral deposits from hard water cause severe blockages. If you notice the support or bearing that holds the spray arm is worn or cracked, replacement is necessary. Consult your specific model’s repair guide for part-specific instructions or visit the top dishwasher parts diagnostics for 2025 to identify the right replacements. In my experience, stubborn clogs often cause the spray arm to stall; removing these issues usually brings it back to life.
Test and Replace the Motor or Support Bearings
If cleaning doesn’t solve the problem, the issue might stem from the motor that spins the spray arm or the support bearings. Gently spin the spray arm by hand—if it feels stiff or wobbly, the support bearing is likely damaged. Access the motor via the lower panel—this may involve unscrewing screws or releasing clips, which is where patience matters. When I replaced my dishwasher’s support bearing, I used a thin flathead screwdriver to pry out the old part before installing a new one, ensuring a snug fit. You can test the motor with a multimeter for electrical continuity or listen for any buzzing sounds during operation. A faulty motor may need replacing; check with the manufacturer’s parts list or visit appliances diagnostic guides to match the exact component.

Replacing or repairing the support bearing can be straightforward with the right tools and parts. For detailed steps, check out effective oven repair diagnostics key-parts for faster fixes in 2025. Remember, addressing these mechanical and electrical components can prevent water wastage and improve cleaning performance—keeping your dishwasher functioning efficiently and avoiding costly professional repairs.
Even seasoned DIY enthusiasts often rely on what I call the myth of the quick fix—that you can simply replace a part and call it a day. But in my experience, many professionals and experienced repairers know that troubleshooting hinges on understanding the *nuances* that go beyond surface symptoms. Take dishwasher spray arms, for example; substituting a jet or support bearing without inspecting the motor’s health can lead to recurring problems. It’s not just about parts—it’s about understanding the *interconnected systems.*
Why do some parts fail prematurely despite correct installation?
Common wisdom suggests that a proper installation guarantees longevity, but experts like appliance repair specialists emphasize that environmental factors such as mineral buildup or electrical inconsistencies often cause early failures—something I’ve seen firsthand. Hard water, for instance, accelerates corrosion and mineral deposits that clog jets or degrade internal components, leading to obscure failures that mislead many DIYers. For instance, many believe that replacing a thermal fuse resolves all no-heat issues; however, the fuse’s failure might be just a symptom of a deeper problem like a faulty thermostat or heating element, which if left unaddressed, will cause repeat failures. A good rule of thumb is to approach each repair session as a process of elimination—consulting reliable guides such as [effective oven repair diagnostics key-parts for 2025](https://appliancebargainz.com/effective-oven-repair-diagnostics-key-parts-for-faster-fixes-2025) can provide clarity. As an example, I once replaced a control board on a dishwasher only to find out later that an unseen water inlet valve was causing erratic operation—this illustrates how overlooking one aspect can compromise the entire repair. And let’s not forget that some faults are subtler than they seem; delayed drying or inconsistent heating often stem from miscalibrated sensors or faulty wiring less visible to the naked eye.
Getting into the weeds of diagnostics reveals that many issues share common root causes, such as debris accumulation, worn-out sensors, or electrical faults, but the key is recognizing the *specific* signifiers for each. For example, a dishwasher leaving residue may seem straightforward, but the culprit could be a clogged inlet valve or improper drainage—both requiring different fixes discussed in guides like [cloudy glasses – dishwasher filter and inlet parts for 2026](https://appliancebargainz.com/cloudy-glasses-5-dishwasher-filter-and-inlet-parts-for-2026). This is where misconception often creeps in: assuming that hardware failures are always the primary cause when often, calibration or environmental conditions play critical roles. Being aware of these subtleties transforms a frustrating experience into a precise, cost-effective repair. So next time you face a stubborn problem, ask yourself—have I overlooked the environmental or electrical nuances? Remember, knowing the *hidden factors* can mean the difference between a quick fix and a costly misdiagnosis. Be vigilant about the conditions around your appliance, and always verify multiple components before leafing through parts catalogs. This insight is grounded in expert troubleshooting principles, which emphasize a comprehensive diagnostic approach over guesswork—something I highly recommend. Do you find yourself rushing into part replacements without thorough checks? Share your experiences in the comments and stay tuned for more tips.
Invest in Quality Tools for Reliable Repairs
When it comes to maintaining your appliances, having the right tools can make all the difference. I personally rely on a set of specific equipment that allows me to troubleshoot and repair effectively, saving time and avoiding unnecessary replacements. A comprehensive multimeter is non-negotiable; it helps verify electrical components like thermostats, sensors, and motors, ensuring they function correctly. I prefer a digital multimeter with a hold feature and auto-ranging for precise readings, especially when testing complex circuits in ovens and dishwashers.
Another must-have is a set of small, well-sharpened screwdrivers—Phillips and flat-head—to access control panels, panels, and internal components without damaging screws. For delicate parts and jets in dishwashers or oven thermostats, I utilize a set of fine tweezers and a soft-bristled brush, which makes cleaning and extraction safer and more thorough. Additionally, I use a cordless rotary tool with various attachments for grinding, polishing, and removing mineral deposits from jets or heating elements. This multi-purpose tool extends longevity by allowing me to clean parts thoroughly before reinstallation.
Utilize Effective Diagnostic Software and Guides
Beyond physical tools, software plays a pivotal role in diagnostics. I recommend using trusted online diagnostic guides, such as those available through appliance repair forums and manufacturer resources. For instance, expert diagnostics guides provide step-by-step procedures that streamline troubleshooting efforts, especially when dealing with control boards or sensors. These guides often include wiring diagrams and testing procedures that are indispensable when configurations differ across models.
Plan for Longevity and Scaling Your Repair Capacity
To ensure your repairs stand the test of time, keep a well-organized parts inventory. Stocking common replacement parts such as thermal fuses, sensors, valves, and support bearings saves you from delays and repeated trips to suppliers. As you gain experience, consider investing in specialty tools like a thermal camera to identify hidden hot spots or digital gauges to measure water pressure accurately—both crucial for diagnosing water-related issues in dishwashers and heat inconsistencies in ovens.
Looking ahead, tools are likely to evolve with smart diagnostics—integrating IoT sensors that can provide real-time data or alert you to impending failures. Companies are beginning to develop apps that sync with appliance control boards, providing instant troubleshooting advice. Embracing these innovations now ensures you’re prepared for the future of appliance maintenance.
How do I maintain my appliances over time without constant guesswork?
Regular inspections and proactive part replacements are key. For example, periodically testing sensors and thermostats with your multimeter, as described in the thermal fuse testing guide, prevents unexpected breakdowns. Scheduling these checks every few months, especially for appliances in hard water areas, helps catch issues early. Additionally, keeping detailed records of repairs and parts replacements aids in identifying recurring problems, making future maintenance more accurate and efficient. Why not try calibrating your oven sensor with a digital thermometer today? It’s a simple but effective way to ensure your oven heats evenly and reliably over months to come.
The Hardest Lesson I Learned About diagnostics,dishwasher,oven repair,parts
Early in my repair journey, I underestimated how much environment influences appliance longevity—hard water deposits, electrical fluctuations, and even simple misalignments can cause issues that mimic major part failures. Understanding these subtle clues saved me from unnecessary replacements and frustration. I realized that patience and careful inspection often uncover the true culprit, like a clogged jet that masquerades as a motor failure. This lesson taught me that successful troubleshooting hinges on a keen eye and a mindset of elimination rather than quick fixes.
3 Myths About diagnostics,dishwasher,oven repair,parts That Held Me Back
I used to think replacing suspect parts immediately was the fastest way to fix problems—turns out, it’s often the least efficient. I believed that all faulty sensors simply stop working, but I’ve learned that calibration issues and environmental factors can cause false alarms. The idea that a single part failure always leads to complex repair is wrong; sometimes, a simple cleaning or realignment restores functionality. Dispelling these myths opened my eyes to smarter troubleshooting and cost-effective repairs, emphasizing the importance of diagnostics guides and testing procedures before diving into replacements.
Why DIY Repairs Can Surpass Professional Troubleshooting
In my experience, embracing a DIY approach energized my understanding of appliance systems. While professionals have skills and tools, my hands-on exploration, guided by trusted resources, often uncovered issues faster than waiting for a service appointment. For example, testing my dishwasher’s inlet valve with a multimeter, following detailed guides, ensured I replaced only what’s truly faulty. Moreover, this proactive mindset fosters confidence and longer-lasting solutions, provided you stay patient and resourceful—especially when applying tips from expert-driven sources like [effective oven repair diagnostics key-parts for 2025](https://appliancebargainz.com/effective-oven-repair-diagnostics-key-parts-for-faster-fixes-2025). This approach transforms frustration into mastery and saves significant money over time.