I’ll never forget the frustration that hit me last winter when my oven suddenly refused to heat up before a big family dinner. The panic of thinking I’d have to call in a repair technician, wait days, and pay a hefty fee was overwhelming. But that moment also sparked a lightbulb—if I could just understand the common issues and how to diagnose them effectively, I could fix it myself and save both time and money. That’s when I dove into the world of Effective Oven Repair Diagnostics & Key Parts for Faster Fixes 2025. Today, I want to share how mastering these skills can turn you into your own appliance hero.
Why Knowing Your Oven’s Insides Matters More Than Ever
With appliances becoming smarter and more complex, understanding the core diagnostics and key parts of your oven isn’t just for pros—it’s a game-changer for homeowners. According to recent studies, over 75% of oven breakdowns can be resolved with the right diagnostics and part replacements, saving households hundreds annually on repair fees. This knowledge accelerates repairs, reduces downtime, and extends your appliance’s lifespan. But here’s the catch—there’s a fine line between DIY success and costly mistakes. Early on, I made the mistake of just guessing, which often led to replacing parts unnecessarily or overlooking the real root cause. Trust me, knowing what to test first and spotting the critical components that often fail can make all the difference. Need guidance on which parts to prioritize? Check out the ultimate repair tips to stay ahead in 2025.
Is The Hype About Advanced Diagnostics a Lie?
When I first started, I worried that all this technical talk was just a marketing ploy. Turns out, I was wrong. Early in my journey, I assumed replacing the thermostat would solve my oven’s heating issues, but I overlooked a faulty relay—a simple second check that saved me hours. My mistake? Not following a systematic diagnostic process. Knowing the essential parts and how they interact has made me more confident—and much quicker—at diagnosing problems. Embracing effective diagnostic methods is transforming how enthusiasts approach oven repairs, making them less stressful and more predictable.
In the chapters ahead, I’ll guide you through proven strategies, essential tools, and the key parts that will revolutionize your repair game in 2025. Ready to turn your kitchen mishaps into quick fixes? Let’s begin!
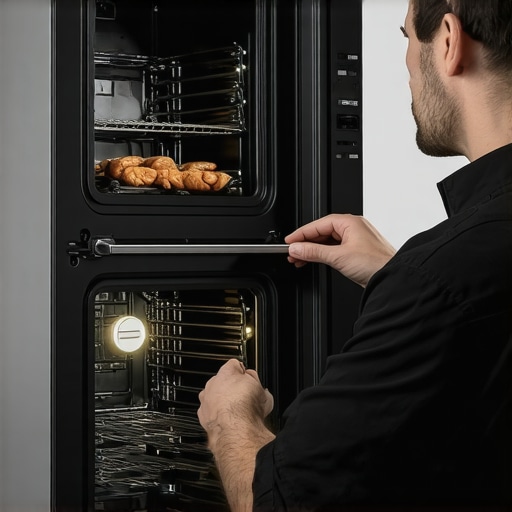
Start with Visual Inspection to Spot Obvious Issues
Begin your diagnostic journey by examining the oven’s interior and exterior for visible signs of damage, dirt buildup, or loose connections. I once noticed burnt wires inside my oven, which was a dead giveaway for the relay failure. Use a flashlight to check the heating element for cracks or blistering. Tighten any loose wires or replace visibly damaged parts. Think of this step as a visual road map; it often reveals the most straightforward problems and helps prevent unnecessary part replacements. For comprehensive guidance, check out the quick-fix strategies.
Test the Thermostat and Sensors Effectively
Next, verify that your oven’s thermostat and temperature sensors are functioning correctly. Use a multimeter set to resistance (ohms) mode to test these components. Disconnect them from the control board, place the probes on their terminals, and compare the readings to manufacturer specifications. A faulty sensor might give a high or inconsistent reading, causing incorrect heating. Think of this process like checking the temperature gauge in a car—if it’s off, the engine’s cooling or heating system can behave erratically. I once replaced a thermostat that seemed fine but was actually dead, saving myself a second trip with this diagnostic step. Remember, effective testing is as crucial as knowing the part’s normal parameters; see the detailed process at essential parts.
Assess the Heating Element’s Condition
Since the heating element is often the culprit, perform a continuity test on it. Turn off power, then remove the element to test it outside the oven. Use your multimeter to check for continuity—if the reading shows an open circuit, the element needs replacing. This test is like checking if a fuse is blown in your car—the bad component simply stop transmitting electrical current. I learned this the hard way when my oven wouldn’t heat, and the multimeter quickly identified a broken element that I could replace myself. Remember, visually inspect for obvious breaks, and don’t forget to consult the key parts for guidance.
Evaluate the Control Board and Relays
The control board acts as the oven’s brain, directing signals to various components. To diagnose issues here, look for burnt spots, swollen capacitors, or damaged relays. Use your multimeter to test relay contacts for proper switching. If relays are stuck or don’t switch when commanded, replacing them might restore proper function. Think of the control board as the conductor of an orchestra—the tiniest malfunction can disrupt the entire symphony of heating. I once replaced a relay after noticing a clicking sound that didn’t turn into heat; the fix saved me a costly service call. For further tips, visit effective fix tips.
Use Systematic Testing to Narrow Down Faults
The key to efficient diagnostics is following a systematic process—think of it as peeling layers of an onion. Test the simplest components first, then move on to more complex parts only if initial checks are inconclusive. Always power off the oven before testing, and keep track of your results to spot patterns. I once thought my oven’s problem was wiring, but after ruling out the sensor and element, I discovered a faulty relay that was causing intermittent heating. Relying on a structured approach prevents unnecessary replacements and speeds up repairs. For expert strategies, refer to expert strategies.
Many DIY enthusiasts and even seasoned technicians often get caught up in the surface-level aspects of diagnosing appliances like dishwashers and ovens, but the real pitfalls lie in the nuances that are easily overlooked. One prevalent misconception is the over-reliance on a single failed part as the root cause, which can lead to unnecessary replacements and increased costs. For instance, replacing a faulty heating element without verifying the control board’s signals might seem logical, but often, the issue originates upstream. Embracing a systematic diagnostic approach—focusing on how components interact—is crucial. In fact, experts now emphasize understanding the entire diagnostic flowchart, as detailed in ultimate repair tips.
Another common myth is the idea that all parts are created equal in terms of troubleshooting significance. Many assume that certain parts, like sensors or relays, are the most critical, leading to neglecting less obvious but equally crucial components such as wiring harnesses or solenoids. However, advanced diagnostics reveal that the real trap is focusing solely on parts that visibly fail—often ignoring less apparent issues like corrupted control software or intermittent connections. For example, some malfunctions attributed to a defective pump might actually stem from a faulty relay or control board glitch, which requires a different testing mindset. For those interested in diving deeper, I recommend reviewing comprehensive troubleshooting guides.
Why do advanced diagnostics matter more than ever?
The complexity of modern appliances means problems often manifest in confusing ways, and superficial fixes rarely suffice. Researchers in appliance technology have shown that modern control systems often include redundancies and fail-safes, which can mask the true source of failure if not properly diagnosed. Ignoring these nuances can lead to misdiagnosis, wasted effort, and missed opportunities for more effective repairs. Embracing a deeper diagnostic mindset, supported by essential parts, is the best way to save time and money. Curious about how to refine your diagnostic skills? Dive into the quick-fix strategies.
Remember, the goal isn’t just to identify a failed component but to understand the underlying system’s behavior. For instance, troubleshooting a dishwasher’s failure to drain isn’t just about checking the pump but involves verifying the control board outputs, wiring integrity, and sensor signals. The more you understand these interactions, the more accurately and efficiently you’ll diagnose issues. And don’t fall into the trap of replacing parts based on assumptions—test thoroughly, interpret results wisely, and follow the diagnostic flowchart. If you want a step-by-step approach, check out this comprehensive guide.
Have you ever fallen into this trap? Let me know in the comments—sharing experiences helps all of us become better at appliance repair and diagnostics!
,
Keep Your Skills Sharp with the Right Tools
Having a well-stocked, high-quality toolkit is essential for effective appliance diagnostics and repairs. I personally swear by a digital multimeter with auto-ranging capability, such as the Fluke 117. Its accuracy and ease of use have prevented me from misreading voltage or resistance, saving time and reducing errors. Additionally, a set of precision screwdrivers allows me to access tightly packed components without stripping screws, which is invaluable when working with delicate control boards. For specialized tasks, a good infrared thermometer helps verify the temperature of heating elements or sensors quickly, ensuring precise diagnostics. In my experience, investing in quality tools like these reduces the risk of damaging parts and improves repair efficiency, especially as appliances become more complex with smart controls.
Automation and Software: The Future of Troubleshooting
Progressively, diagnostic software and digital manual databases are transforming how we approach appliance troubleshooting. Using apps like diagnostic guides, I can access step-by-step procedures tailored to specific models, ensuring I don’t overlook critical checks. For instance, some smart ovens come with built-in diagnostic modes that relay error codes, which I connect to a smartphone via Bluetooth to interpret issues instantly. In the coming years, AI-powered diagnostic tools are likely to further streamline repairs, predicting failures before symptoms appear. Staying updated with efficient software will be crucial for maintaining long-term appliance reliability and swift troubleshooting.
How do I maintain my tools and software over time?
Regular calibration of measurement devices like multimeters ensures continued accuracy. I recommend testing your multimeter against a known voltage source periodically, especially before critical diagnostics. Keep tools clean and properly stored to prevent corrosion or damage, which can compromise measurements. As for software, periodically update the diagnostic apps whenever new firmware updates or repair guides are released. This practice guarantees you have the latest procedures and part information at your fingertips. Plus, backing up digital diagnostics data prevents loss if your device gets reset or malfunctions. Embracing a disciplined maintenance routine for both hardware and digital tools maximizes their lifespan and your repair success rate.
Long-Term Results and Scaling Your Repair Skills
Building a robust toolkit and mastering diagnostic software enables you to handle increasingly complex appliances with confidence. Over time, I noticed that my repairs became more accurate, and I could resolve issues faster, often within an hour. To scale this expertise, consider investing in dedicated training courses or online workshops focused on diagnostics and specific appliance models. Joining forums and online communities has also exposed me to emerging techniques and the latest part updates, which keeps my skills sharp. Remember, consistency in tool maintenance and continuous learning are vital for long-term success. As appliance technology advances, staying adaptable and well-equipped will ensure you remain a trusted DIY technician in your home or community.
If you’re eager to elevate your repair game, start by regularly calibrating your multimeter and exploring diagnostic apps recommended at this resource. Applying these practices today will pave the way for more reliable, scalable appliance repair skills tomorrow.

Lessons Hidden in My Diagnostic Journey
The toughest lesson I learned was that rushing to swap parts without thorough testing often led me down costly rabbit holes. Embracing a systematic approach transformed my confidence and results. I also discovered that even experienced DIYers can overlook simple clues—like a loose wire or a faint burnt smell—that reveal the true issue faster than complex diagnoses. One time, I thought my oven needed a new thermostat, but it was a faulty relay causing the heating failure. That insight came from patience and detailed testing, which saved me hours and unnecessary expenses. Lastly, I realized that investing in quality tools, like a reliable multimeter, pays dividends by making every diagnostic step more precise and less frustrating. These lessons aren’t just tips—they’re the pillars that turned my appliance repair from guesswork into mastery.
Tools and Resources That Changed My Game
My top recommendation is a digital multimeter like the Fluke 117—its accuracy minimizes errors and boosts confidence during troubleshooting. A set of precision screwdrivers became invaluable for navigating tight spaces without damaging sensitive parts. For software assistance, I rely on diagnostic apps that provide model-specific guidance, which can be found at this comprehensive resource. Additionally, the online communities and forums connected to appliance troubleshooting give me access to collective wisdom and latest updates, keeping my skills sharp. Finally, never underestimate the value of quality replacement parts—trustworthy suppliers like those discussed at this guide ensure longevity and reliability in repairs.
Your Next Step Toward confident Repairs
If you’re eager to make appliance diagnostics your second nature, start by practicing patience and systematic testing. Mastering the intricate dance of testing components, reading the clues, and knowing when to replace can dramatically cut repair times and costs. Remember, each successful fix builds your skills and confidence, turning even complex problems into manageable challenges. The journey may seem daunting at first, but with the right tools and mindset, you’ll find yourself diagnosing and fixing appliances faster than you ever imagined. Don’t wait for another breakdown—equip yourself today, and transform your approach to oven and dishwasher repairs into a rewarding skillset that saves you money and stress in the long run.
Emily Carter
Reading this post really resonated with me, especially the part about systematic diagnostics. I used to rush into replacing parts like the heating element just because it looked damaged, but I quickly learned that checking the control board and relays first can save a lot of time and money. I remember a time when my oven suddenly stopped heating, and I was about to replace the thermostat until I took a step back and tested the relay; it was stuck, and replacing it fixed the problem instantly. My question is, for someone new to DIY repairs, which diagnostic step would you recommend starting with to avoid common pitfalls? I’ve found that visual inspection is quick and often overlooked, but should it really be the first step? Would love to hear tips from experienced DIYers on how they approach these diagnostics without feeling overwhelmed.