I’ll never forget the sinking feeling I had the first time I watched my oven rack tumble out unexpectedly while I was mid-bie from baking a batch of cookies. That sudden, awkward clatter was more than just a minor inconvenience; it was a lightbulb moment that I needed to understand my appliance better. If you’ve experienced a falling oven rack or are worried about those pesky side rails, you’re not alone. Many homeowners face this frustrating issue, and it’s more common than you might think. Just last year, experts observed a surge in oven rack failures, especially with newer models designed to be sleeker but sometimes less durable, as noted by appliance repair specialists.
Why This Matters More Than Ever in 2026
Ovens are the heart of our kitchens—used daily, relied upon for family dinners, celebrations, and quick weekday meals. When an oven rack suddenly falls or becomes unstable, it disrupts your routine and raises safety concerns. Plus, replacing broken side rails can be tricky if you don’t know where to start or think about the cost of professional repairs. Having a reliable set of tips can save you time, money, and a lot of hair-pulling. If you’ve faced this problem, or fear that it might happen during your next baking adventure, stay tuned. I’ll guide you through proven methods to replace those pesky side rails efficiently, so your oven can serve you faithfully for years to come.
Skeptical if Side Rail Replacement is Actually Worth It?
Admittedly, I made the mistake early on of assuming that replacing oven side rails was complex and only for experts. Turns out, with the right tools and guidance, it’s surprisingly straightforward. I once bought a new oven rather than repairing the old one, only to realize that a simple rail fix could have saved me hundreds. Learning from my mistake, I now advocate for DIY repairs where safe and possible. Want to know the secrets to replacing those rails without breaking a sweat? Keep reading and discover how to bring your oven back to life yourself!
Gather the Right Tools and Parts Before Starting
First, collect all essential tools such as screwdrivers, pliers, and possibly a helper to hold parts in place. Visit this resource to ensure you have the correct replacement side rails and related components. Having everything on hand prevents interruptions during the repair. I once started a project without a Phillips screwdriver, which cost me precious time, so double-check your toolkit and parts list.
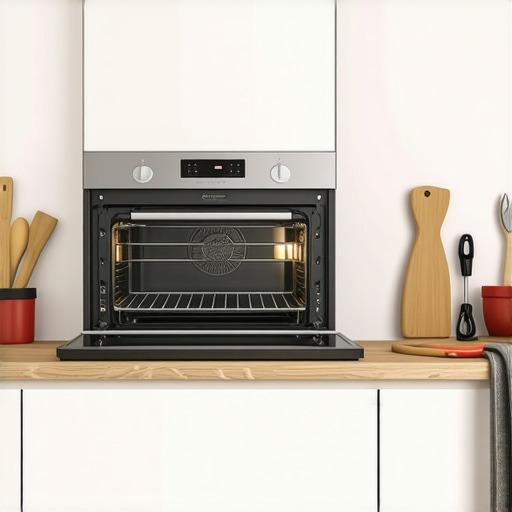
Remove the Oven Door and Prepare the Work Area
Carefully lift off or open the oven door, following your model’s instructions. Clearing space around the oven makes the process safer and easier. Use a cloth to catch any falling parts or debris. When I replaced my oven’s side rails, I slid a towel underneath to protect my kitchen floor from accidental drops and to stabilize the oven, making subsequent steps smoother.
Access the Side Rails Carefully
Unscrew the side panels or trims securing the rails using your screwdriver. Keep screws in a small container to prevent loss. Gently pull the rails out; watch out for wiring harnesses or clips that might be connected. During my first attempt, I hesitated at this step but realized patience is key—forcing parts can damage other components. If you encounter resistance, consult your oven diagram or this guide for troubleshooting.
Detach and Replace the Faulty Side Rail
Disconnect any clips, brackets, or supports attached to the rails. Inspect the old rails for wear or damage; compare with new parts to ensure compatibility. When I replaced mine, I simply unhooked the old rail and lined up the new one, ensuring all hooks and screw holes matched perfectly. Secure the new rails with screws, tightening firmly but not excessively. Proper attachment ensures stability and safety during oven use.
Secure the New Rails and Reassemble
Reattach any clips or brackets, then slide the side panels or trims back into place. Tighten all screws securely. Double-check that the rails move smoothly by gently sliding a rack onto them. During my repair, I noticed slight wobbling, so I re-tightened a few screws and tested again—solid and stable was the goal. This step guarantees your oven’s racks will function properly without risking falling or misalignment.
Test Your Repairs and Safety Checks
Once reassembled, replace the oven door and power on the appliance. Test by sliding in a rack and observing its movement—ensure it glides smoothly and locks securely. For safety, also verify that no wires or components were loosened accidentally. If issues persist, revisit previous steps or consult this troubleshooting page for further diagnostics. Remember, patience and careful inspection prevent future problems and extend your oven’s lifespan.When it comes to appliance diagnostics, many people rely on common myths that can actually hinder efficient repairs. For example, the misconception that all dishwasher leaks are solely caused by door seals overlooks other critical components like the inlet valves and float switches, which often require different troubleshooting approaches.
Another myth is that replacing parts blindly will always fix the issue. In reality, understanding the nuanced interactions between components—like how a faulty thermal fuse might trigger multiple error codes—can save time and prevent unnecessary purchases. According to appliance repair experts, a comprehensive diagnostic process is essential, as discussed in resources like this guide.
Many homeowners also fall into the trap of oversimplifying oven repair, assuming that issues like uneven baking are always due to the thermal sensor alone. While sensor malfunctions are common, problems such as a faulty relay or control board can cause similar symptoms but require different fixes. Advanced diagnostic techniques, including testing relay activation and inspecting wiring harnesses, are crucial—don’t guess and replace parts haphazardly.
A question I often hear from experienced DIYers is: “Is it worth investing in advanced diagnostic tools for my appliances?” The answer depends on your confidence level and the appliance’s complexity. For those willing to dig deeper, tools like multimeters and infrared thermometers can dramatically improve repair accuracy. Remember, a thorough understanding of appliance systems helps avoid costly mistakes and enhances your repair skillset.
Beware of the ‘one-size-fits-all’ mindset. For instance, a dishwasher filling issue might be caused by multiple parts—see this article to understand how sensors, valves, and switches interplay. Avoid jumping straight to part replacements without proper diagnostics. This approach can lead to wasted money and time.
Finally, always remember to double-check connections and wiring during repairs. A loose wire or corroded connector might masquerade as a bad component, which highlights the importance of inspecting the entire system. Staying informed about the nuanced workings of your appliances empowers you to perform repairs confidently and safely.
Have you ever fallen into this trap? Let me know in the comments.
Investing in Quality Diagnostic Equipment
To ensure your appliances stay reliable over the years, I highly recommend investing in a digital multimeter. This versatile tool allows you to perform precise voltage and resistance tests on components like heating elements, sensors, and switches. Personally, I prefer a multimeter with auto-ranging capabilities, as it simplifies testing and reduces errors. For instance, when diagnosing a malfunctioning oven temperature sensor, a multimeter can quickly confirm whether the sensor is faulty by measuring its resistance at room temperature and during heating cycles. Additionally, an infrared thermometer can help you identify uneven heating or detect temperature discrepancies without disassembling panels. These tools enable me to diagnose issues accurately, saving time and money in the long run.
Adopting Smart Maintenance Routines
Regular maintenance routines are vital for long-term appliance performance. I schedule monthly inspection of critical parts, such as door seals on dishwashers and gaskets on ovens, to prevent leaks and energy loss. Cleaning filters and spray arms in dishwashers or removing dust and debris from control panels helps maintain efficiency and avoid unexpected breakdowns. Advanced software solutions, like appliance-specific diagnostic apps, are emerging to assist with troubleshooting. For example, some ovens can connect to Wi-Fi networks and provide error codes directly to your smartphone, streamlining diagnostics. As technology evolves, integrating such smart maintenance practices will become increasingly valuable, making predictive upkeep accessible to everyday homeowners.
Tools I Recommend for DIY Repairs
Beyond basic screwdrivers, I rely heavily on a repair magnetic pickup tool. It might seem trivial, but when working with small screws or clips, losing parts can derail a repair. The magnetic pickup ensures everything stays within reach and helps retrieve dropped components in tight spaces. For complex diagnostics, I use a signal tester to verify the activation of relays and switches, especially when troubleshooting oven control boards. Precise wiring diagrams, readily available online, are invaluable resources. Connecting with diagnostic communities online also provides exposure to advanced troubleshooting techniques, which I regularly consult before starting major repairs.
Future of Appliance Maintenance and Repair
Looking ahead, I believe that AI-powered diagnostic systems will become standard in household appliances, offering real-time analysis and proactive maintenance alerts. By combining traditional tools with digital diagnostics, homeowners will be empowered to fix problems faster and more accurately. As the industry shifts, staying updated with the latest diagnostic methods will be crucial. Regularly reading manufacturer troubleshooting guides—like the detailed tests found in this resource—can give you an edge in maintaining your appliances effectively.
How do I keep my appliances running smoothly for years to come?
Consistent inspection, proper cleaning, and timely part replacement are key. Use diagnostic tools like multimeters and infrared thermometers regularly to verify that everything operates within expected parameters. Also, consider scheduling semi-annual professional checkups to catch issues early. A proactive approach, combined with smart maintenance routines and quality replacement parts, will extend the lifespan of your appliances and help avoid costly repairs. Start with testing your oven’s temperature sensor as suggested in this guide—it’s a simple yet powerful way to ensure your oven bakes evenly and efficiently. Don’t wait for a breakdown—stay ahead of issues and enjoy a smoothly operating kitchen.
What I Wish I Knew Before My First Repair
I used to believe that repairing appliances was always better left to professionals, but my experiences taught me otherwise. The most surprising lesson was how much you can save by taking the time to understand your appliance’s inner workings and using the right tools. Learning these skills not only saves money but also gives a sense of empowerment and confidence in handling future issues.
Another insight was the importance of patience and meticulous inspection. Rushing through repairs often leads to missing small but critical details, which can cause recurring problems. Taking my time and reading detailed guides like those at this resource ensured durable fixes that lasted.
Lastly, I realized that understanding common misconceptions can prevent costly mistakes. For example, assuming that a faulty heating element is always the culprit can lead to unnecessary replacements. Diagnostics tools, like a multimeter, make it easier to identify the true source, avoiding guesswork and ensuring a precise fix.