It was a quiet Sunday afternoon when my dishwasher decided to give up on me mid-cycle. Water pooled on the floor, dishes remained dirty, and I felt that sinking frustration spiral in my gut. That moment was a wake-up call; I realized I had been neglecting the importance of understanding my appliance’s inner workings. Since then, I’ve committed to mastering the essential diagnostic and parts guide, especially with the rapid tech advancements coming in 2025.
Why Knowing Your Dishwasher Matters More Than Ever
In today’s fast-paced world, our appliances are the unsung heroes keeping our households running smoothly. But when one breaks down, it can throw your entire day into chaos. Knowing how to identify and troubleshoot issues with the right parts can save you a hefty service bill and extend the life of your machine. Plus, the latest innovations in dishwasher technology mean that staying updated on which parts are essential could be the difference between a quick fix and a costly replacement.
Early on, I made a common mistake—assuming that all parts are interchangeable or that professional repairs are the only option. That mistake cost me time and money. Realizing this, I dived into comprehensive guides and diagnostic procedures tailored for 2025. Interestingly, according to a recent report, appliance repair costs have risen by nearly 30% over the past five years, making DIY diagnostics an appealing alternative.
Will This Guide Really Help Me Fix My Dishwasher?
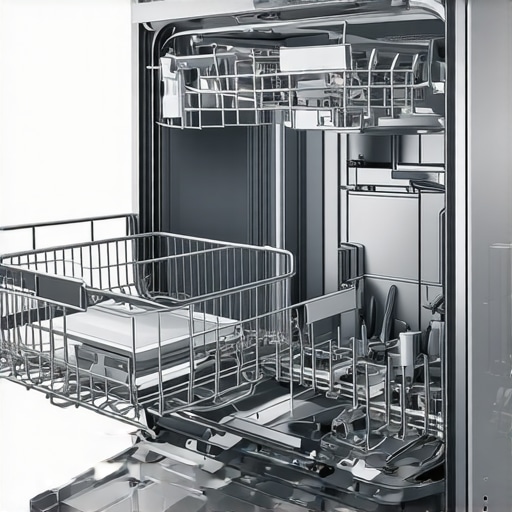
If you’ve ever felt overwhelmed by the sheer number of parts—think pumps, control boards, seals, and motors—you’re not alone. The good news is that understanding which parts are crucial can streamline your troubleshooting process. Whether you’re dealing with leaks, poor cleaning, or error codes, knowing the right diagnostics can make all the difference.
My mistake early on was overlooking the significance of certain diagnostic steps, which led to unnecessary part replacements. To avoid the same pitfalls, I turned to expert guides that focus on diagnostic strategies for 2025, like those found at Expert Diagnostics & Parts for Fast Dishwasher Repairs. With the right knowledge, you’ll be empowered to fix common issues faster and more efficiently.
In the upcoming sections, I’ll share practical steps on identifying key parts and conducting diagnostics, leveraging the latest tools and tips to make your repair journey smoother. Ready to become your own repair hero? Let’s get started!
Start with Power and Water Flow Checks
My first action was to ensure the dishwasher was properly receiving power. I opened the control panel and checked if the circuit breaker was tripped, then tested the power cord with a multimeter. If you’re unsure how to do this, consult the expert diagnostics guide. Next, I verified water supply; I checked the inlet valve for clogs or kinks by disconnecting it and testing water flow manually. Clearing any blockages here can solve leaks or fill issues quickly.
Identify Error Codes and Listen for Unusual Noises
If your dishwasher displays an error code, reference the manufacturer manual or visit this troubleshooting guide for specific diagnostics. Pay attention to strange sounds; grinding or buzzing may hint at motor or pump failures. For example, I once heard a rattling during a cycle, which pointed me toward inspecting the pump assembly I learned about in the top diagnostics article.
Test Key Functional Parts
Next, I moved to assess the core components: the door latch, spray arms, and filters. I manually rotated the spray arms to ensure they moved freely, removing any debris blocking their rotation. I also checked the door latch with a multimeter—an open circuit meant replacing the latch assembly. These parts are crucial; if they fail, the entire cycle might halt, which you can verify with diagnostic procedures found at this quick repair guide.
Inspect and Rejuvenate the Drain System
I then examined the drain pump and hose for clogs. Removing the filter and checking for debris saved me from future flooding issues. If water isn’t draining properly, faulty drain pumps or blocked hoses are often the cause. Testing the pump with a multimeter to check continuity can confirm if it’s functioning. Details on these diagnostics are well-covered at this technical resource.
Check Electrical Connections and Control Boards
Once mechanical parts seemed fine, I inspected wiring connections behind the panel for corrosion or loose contacts. A faulty control board can cause multiple issues but diagnosing it involves checking voltage outputs and signals, often best left to experts. For complex cases, the diagnostic strategies can be invaluable.
Record Findings and Prepare for Parts Replacement
After testing each component, I documented which parts showed signs of failure. Keep a checklist of tested parts like the inlet valve, pump, motor, and control module. Replacing only the faulty parts reduces costs and downtime. If you need to identify the correct parts, referring to the top parts recommendations simplifies the process.
Many DIY enthusiasts and homeowners alike often believe that all appliance parts are interchangeable or that diagnosing dishwasher issues is straightforward, but in reality, this is a misconception that can lead to costly mistakes. One widespread myth is that replacing the most visible or accessible parts, such as filters or spray arms, will resolve most problems. While these components are vital, faulty control boards or sensors often lie beneath the surface and require more in-depth diagnostics, which I emphasize in my comprehensive diagnostics guide. Relying solely on visual inspection or assuming parts are universal can trap you into unnecessary replacements; instead, understanding the specific function and compatibility of each component is critical, especially with the innovations coming in 2025. A common trap is neglecting the importance of testing electrical continuity and voltage levels within the control system—mistakes here often lead to replacing entire control modules prematurely. Advanced diagnostics involve using multimeters effectively and interpreting error codes properly, which many overlook, causing unnecessary expenses.
How can understanding circuit diagrams improve your repair accuracy?
By studying circuit diagrams tailored for your dishwasher model, you can pinpoint the exact location of faulty signals or broken connections, saving both time and money. Experts agree that the proper diagnostic approach, including checking components like the water inlet valve, drain pump, and relay switches, is essential for a thorough repair. Skipping these steps in favor of guesswork often results in repeat failures. Additionally, the evolving nature of dishwasher tech, including smart sensors and feedback systems, requires a nuanced understanding beyond traditional parts replacement. Staying updated with the latest diagnostic strategies found at this resource can help you avoid common pitfalls and make your repairs more efficient. Remember, mastering diagnostics isn’t just about fixing a single issue; it’s about developing an expert mindset that approaches each problem systematically. Have you ever fallen into this trap? Let me know in the comments.
Tools That Make Long-Term Maintenance Easier and Smarter
If you want to ensure your dishwasher, oven, or other appliances stay in top shape, investing in the right diagnostic tools is crucial. Personally, I rely heavily on a high-quality digital multimeter because it allows me to quickly test electrical continuity and voltage levels, streamlining troubleshooting. For example, when diagnosing control boards, accurate voltage readings help me pinpoint issues without unnecessary part replacements. Additionally, a reliable infrared thermometer helps monitor temperatures during oven repairs, ensuring components operate within optimal ranges. These tools have saved me hours of work and prevented costly misdiagnoses.
Beyond hardware, I utilize diagnostic software compatible with newer appliances. Modern dishwashers and ovens often include internal sensors that output error codes; having software to interpret these codes saves valuable time. I recommend researching models that support such diagnostic interfaces and ensuring your devices are compatible, which future-proofs your toolkit for the advancing tech landscape, especially in 2025 where smart diagnostics are becoming standard. To deepen your understanding, check out the comprehensive expert diagnostics guide.
How do I keep appliances performing without constant repairs?
One effective strategy is regular preventive maintenance. This includes scheduled thorough cleaning of filters, spray arms, and drainage systems, and inspecting seals and hoses for signs of wear. For mechanical parts like pumps or motors, I set reminders to check their operation periodically using your multimeter or diagnostic tools. This proactive approach helps catch small issues before they escalate, extending the lifespan of your appliances significantly.
Another essential tip is to stay updated with firmware and software updates where applicable. Appliance manufacturers often release updates to improve efficiency and fix bugs, which can prevent future breakdowns. Incorporating these updates can be as simple as running a quick software check via your appliance’s app or control panel. As we look ahead to 2025, the trend leans towards smarter appliances that self-diagnose and alert homeowners of potential problems early, reducing downtime and repair costs.
Ready to elevate your maintenance game?
Try incorporating a combination of diagnostic tools and scheduled preventive checks into your routine. For instance, using an infrared thermometer during oven inspections can reveal hidden temperature inconsistencies that might indicate sensor issues. Developing this habit not only minimizes unexpected failures but also sharpens your troubleshooting skills. For more comprehensive insights, exploring in-depth guides like the repair tips and diagnostics will give you the edge you need for long-term appliance health. Start today—your future self will thank you!
Lessons That Changed My Approach to Repairs
One of the most eye-opening lessons I learned was that not every issue is solved by simply replacing the most visible part. Sometimes, a faulty control board or an electrical hiccup causes the problem, and discovering this required patience and detailed diagnostics. I also found that understanding the interplay between water flow, electrical systems, and mechanical parts prevents unnecessary replacements and saves both time and money. Lastly, I realized that staying updated with the latest tech advancements—from smart sensors to diagnostic tools—makes troubleshooting more efficient and less intimidating, especially as appliance technology continues to advance in 2025.
Gifts That Keep on Giving: Tools and Resources I Trust
Having the right toolkit is essential. I rely on a high-quality digital multimeter because it helps me quickly test electrical connections—something that’s invaluable when diagnosing control board issues. An infrared thermometer has become my sidekick in detecting temperature inconsistencies that could signal sensor problems. For in-depth guides, I turn to expert resources like this diagnostic guide, which provides step-by-step procedures tailored for 2025’s evolving appliance tech. Additionally, I keep a well-organized parts database, ensuring I know exactly which components are compatible with my model, streamlining the replacement process whenever needed.
The Power of Taking Action Today
Your ability to diagnose and fix dishwasher issues empowers you to extend the life of your appliances and save money. By embracing modern diagnostic techniques and leveraging trusted resources, you’re not just repairing—you’re actually future-proofing your household. Remember, each small repair skill builds your confidence and reduces dependence on costly professionals. So, why wait? Start applying these insights now, and watch your home become more resilient and self-sufficient every day. What’s the first appliance repair task you’re excited to tackle? Share your thoughts below—your journey begins now.