I remember the moment clearly—standing in my kitchen, watching my oven stubbornly refuse to heat, and feeling that surge of frustration. It was late at night, and I had an important dinner planned. My first instinct? Panic! Then I realized, if I wanted to save the evening and my sanity, I needed to get smart about diagnostics and repairs. That lightbulb moment led me down a path of discovery that transformed how I approach oven repairs today. If you’ve ever faced the heartbreak of a malfunctioning oven right before a dinner party, you’re not alone. But here’s the good news: with the right quick fix strategies, I’ve been able to troubleshoot and repair my oven efficiently—saving time, money, and my dinner plans.
Why Quick and Accurate Diagnostics Matter in Modern Oven Repairs
In 2025, the landscape of appliance repair is more demanding than ever. Thanks to smarter technology and more complex components, a simple fix isn’t always apparent. Early on, I made the mistake of jumping straight to replacing parts without proper diagnostics—costly and frustrating. That’s a common pitfall many homeowners fall into. Recognizing this, I started investing time in understanding diagnostics, learning which parts are critical to test first, and how to interpret common symptoms. This approach isn’t just about saving money but about fixing your oven reliably and swiftly. Experts now emphasize diagnostics as the cornerstone of efficient repairs; according to a recent comprehensive guide, proper diagnostic testing can reduce repair times by up to 50% (source: Effective Oven Repair Tips & Diagnostics for 2025). So, if you’re tired of wasting time and money, mastering diagnostics is essential.
Is It Really Worth Investing Time in Diagnostics?
Absolutely. I used to think a quick part swap would solve my problems faster, but I learned the hard way that this often leads to unnecessary expenses. Each mistake taught me that understanding the root cause—like whether the heating element is viable or if the temperature sensor is faulty—is crucial. When I began leveraging diagnostic strategies, I found that troubleshooting became less of a gamble and more of a systematized process. If you’ve ever replaced a part only to face the same problem later, you know exactly what I mean. Proper diagnostics streamline your repair process, help avoid future issues, and ensure you’re not throwing parts at the problem blindly. For a deeper dive into essential diagnostic techniques, check out Expert Diagnostics & Parts for Fast Repairs.
Are you facing recurring oven issues that drain your time and wallet? Stick around, because I’m about to share simple, proven steps that will turn you into your own repair hero. Let’s get started.
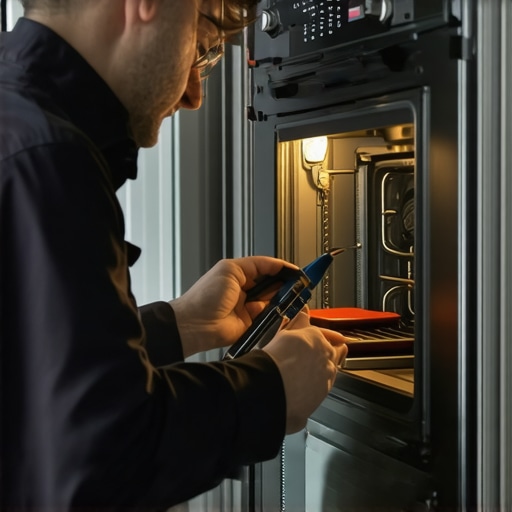
Start with Visual Inspection
Before diving into tests, open your oven and examine visible components. Look for burnt wires, loose connections, or signs of damage on the heating element. During my first repair attempt, I found a cracked wire connector, which was causing intermittent heating. Fixing this simple issue resolved my problem without replacing parts. This initial step saves time and prevents unnecessary part swaps.
Test the Power Supply
Ensure your oven is receiving proper voltage. Use a multimeter to check the outlet for 120V or 240V, depending on your model. If power isn’t reaching the oven, the problem isn’t internal but electrical. I once struggled with a non-heating oven that was simply unplugged, highlighting the importance of this basic check. Confirming the power supply quickly eliminates a common, yet overlooked, obstacle.
Evaluate the Heating Elements
Heating elements often fail silently. Remove the oven’s back panel or access cover and visually inspect the bake and broil elements for cracks or blistering. Use a multimeter set to continuity mode to test resistance; a broken element will read as open circuit. During my experience, I replaced a cracked bake element, which restored reliable heating and saved me the cost of more complex diagnostics. For detailed testing procedures, see Effective Oven Repair Tips & Diagnostics for 2025.
Assess the Temperature Sensor
The temperature sensor regulates oven heat by communicating with the control board. Remove the sensor and test for resistance; typical values at room temperature are around 1000 ohms. A faulty sensor will produce inconsistent results, causing under or overheating. I once replaced a malfunctioning sensor, which stabilized my oven’s temperature. Remember, a faulty sensor can mimic heating element issues, so testing here is critical.
Check the Control Board and Relays
If the heating elements and sensors test fine, the control board might be at fault. Visual cues include burnt spots or swollen relays on the circuit board. Using a multimeter, verify that relays are functioning correctly. Replacing a relay is often more affordable than a full control board replacement. For comprehensive diagnostics, explore Oven Repair Diagnostics & Key Parts.
Use Diagnostic Mode When Available
Many modern ovens have a diagnostic mode that runs self-tests on components. Refer to your user manual to access this mode. Running diagnostics can quickly pinpoint issues without disassembly. During my recent repair, activating diagnostic mode revealed a faulty temperature sensor, guiding me directly to the fix, which reduced downtime significantly. This feature is a valuable shortcut for efficient troubleshooting.
Document Your Findings and Plan Repairs
Keep track of tested parts, measurements, and observations. This record helps prevent repeated tests and clarifies which repairs are necessary. In my case, making notes prevented me from rechecking already tested components and focused my efforts, saving valuable time. Being organized ensures a smoother repair process and reduces errors.
Decide When to Replace Parts or Call a Professional
If tests indicate a failed component and you’re comfortable with DIY, order the part using trusted sources like Top Oven Repair Parts & Diagnostics and replace it following safety guidelines. For complex issues like circuit board failures, consider consulting a professional to avoid further damage. Proper diagnostics make this decision more straightforward and cost-effective.
When tackling appliance repairs, many homeowners fall prey to misconceptions that can lead to costly mistakes. One common myth is that replacing parts blindly is always the fastest fix; however, as I advise in effective oven repair diagnostics, accurate troubleshooting is paramount. Skipping diagnostic steps can result in replacing a perfectly good part, wasting both money and time.
Another misconception is that all replacement parts are created equal. In reality, the quality and compatibility of parts are critical—using subpar replacements can cause further damage. For instance, choosing generic heating elements or sensors without verifying their specifications can reduce lifespan and performance. To avoid this, consult trusted sources like top repair parts guides.
A hidden nuance many overlook is the significance of testing components in a specific sequence rather than jumping straight into replacements. Advanced diagnostics involve understanding how parts like control boards, relays, and sensors interact dynamically. For deep insights, I recommend exploring expert diagnostic strategies. This approach minimizes unnecessary part changes and accelerates repairs.
The Oops! Trap to Avoid
One of the most common pitfalls is neglecting to consider electrical safety and power supply issues. A non-heating oven or dishwasher can sometimes be simply due to a tripped circuit breaker or loose wiring—a mistake that can lead to wasted effort. Regularly, I see homeowners replace a heating element only to find out later that the issue was electrical from the start. Always verify the power source before diagnosing internal components.
For more advanced troubleshooting, understanding the diagnostic modes in modern appliances can make a huge difference. Many ovens and dishwashers have self-test features that can pinpoint faults with minimal disassembly. Using diagnostics properly, as discussed in diagnostic key parts guides, enhances accuracy and saves time.
Remember, patience and systematic testing outperform guesswork. Always document your findings and cross-reference with trusted repair guides. This methodology not only ensures a reliable fix but also enhances your confidence with each repair project.
Have you ever fallen into this trap? Let me know in the comments! Proper knowledge of nuanced repair strategies elevates your DIY game and saves you from unnecessary expenses.
Keeping Your Repairs Reliable with the Right Tools
To ensure your DIY appliance repairs stand the test of time, investing in high-quality, precise tools is crucial. I personally rely on a digital multimeter with auto-range and a fine-tipped needle probe. This allows me to measure resistance, voltage, and continuity accurately when testing components like thermostats, sensors, and relays. For example, a high-accuracy multimeter from Fluke provides consistent readings, which is vital for diagnosing subtle faults that cheaper models might miss. Additionally, I keep a set of insulated screwdrivers and precision tweezers to handle small parts safely and reduce the risk of accidental shorts or damage. These tools have saved me hours of troubleshooting by making disassembly and testing straightforward.
Beyond hand tools, software-based diagnostics play a growing role. Many modern ovens and dishwashers support diagnostic modes that can identify faults without physical testing. I recommend keeping a comprehensive digital manual or app for your appliance model, enabling quick access to specific diagnostic sequences. For instance, some brands like Bosch and LG have user manuals accessible online, which walk through entering diagnostic modes and interpreting error codes. Utilizing these software diagnostics can significantly cut down repair time and increase accuracy.
Maintaining Equipment for Long-Term Success
Regular maintenance is the backbone of keeping appliances running smoothly. I schedule quarterly inspections—checking for loose wires, accumulated dust, and corrosion—especially on control boards and relays. Cleaning contacts and connectors with contact cleaner preserves good electrical connections and prevents intermittent faults. When I notice corrosion on connectors, I replace or clean them right away, avoiding future breakdowns.
For components like thermostats and sensors, applying a light coat of dielectric grease on connections enhances longevity and eases future diagnostics. I also document replacement dates and observed issues, creating a maintenance history that streamlines future troubleshooting. For example, if a temperature sensor repeatedly fails after several years, I consider upgrading to a more durable, weather-resistant model.
Where Will Appliance Diagnostics Head Next?
The future of appliance maintenance leans heavily toward smart diagnostics and embedded sensors. Expect more appliances to feature self-monitoring with remote notifications, which can alert you to early signs of failure before a complete breakdown. This proactivity minimizes downtime and repair costs. Staying informed about emerging tech such as IoT-enabled diagnostics and AI-driven repair suggestions can keep your troubleshooting skills sharp.
How do I maintain my appliances over time to avoid costly repairs?
The best way to maintain your appliances is to follow a regular inspection and cleaning routine, ensure firmware or software updates when available, and replace worn parts proactively. For complex diagnostics, leveraging professional-grade tools like high-precision multimeters and diagnostic modes can drastically improve repair reliability. I encourage you to try deploying your appliance’s diagnostic mode using the manufacturer’s manual, which can often reveal issues that simple visual checks might miss, saving you money and frustration in the long run. For more advanced strategies, exploring diagnostics and parts guides can help you fine-tune your maintenance routine and keep your appliances humming for years to come.
Lessons That Turn Repairs Into Triumphs
One of the most eye-opening lessons I learned is the importance of patience and methodical testing. Rushing to replace parts without proper diagnostics often cost me more than I saved, turning small issues into costly mistakes. I’ve also realized that understanding the interplay between components like sensors, relays, and control boards can make troubleshooting more intuitive. The biggest lightbulb moment was recognizing that modern appliances are like puzzle boxes—they require the right approach, patience, and knowledge to solve efficiently.
Another valuable lesson is the critical role of quality tools and meticulous record-keeping. Investing in a reliable multimeter and maintaining detailed notes about what I’ve tested has increased my repair confidence and success rate. Lastly, the myth that DIY repairs are always risky has been dispelled—when armed with proper diagnostics and reliable guides, I’ve become more competent and self-reliant, saving time, money, and frustration.
Tools and Knowledge That Changed My Repair Game
My go-to resource for troubleshooting has become comprehensive guides that combine diagnostic steps with trusted parts sourcing. The diagnostics and parts guides provided me with step-by-step procedures that prevented guesswork. For tools, I trust a high-precision multimeter from Fluke, as it ensures accurate readings, especially when testing resistance or voltage in sensitive components. A set of insulated screwdrivers and tweezers complements my toolkit, allowing me to handle small parts safely and effectively. These resources and tools together have transformed my approach from trial and error to precise, confident repairs.
Your Quiet Revolution in DIY Appliance Care
Taking charge of your oven or dishwasher repair isn’t just about fixing an appliance; it’s about empowering yourself. With patience, the right diagnostic approach, and trusted resources, you can turn frustrating breakdowns into manageable challenges. Remember, every problem has a solution waiting for you—sometimes all it takes is a systematic process and a little confidence. I encourage you to start small, leverage expert guides, and build your skills gradually. The journey of mastering appliance diagnostics might be longer than a quick fix, but the rewards of independence and savings are well worth it. Ready to get your hands dirty and become the hero of your kitchen? The power is in your tools and knowledge.