Have you ever reached for a steaming load of dishes only to find your dishwasher door refusing to stay up? It’s that frustrating moment when, instead of loading or unloading, you’re left wrestling with a stubborn door that keeps slamming shut or sagging open. I’ve been there—standing there, arms full of plates, wondering why this simple task has suddenly turned into a mini workout session. It’s unsettling how such a tiny part can throw off your entire routine, right?
Why Your Dishwasher Door Won’t Stay Up is More Than Just An Annoyance
When your dishwasher door won’t stay open, it’s not just an inconvenience. It can affect your entire kitchen workflow, making loading and unloading dishes more cumbersome. Plus, if the door is sagging, it could signal a bigger issue that might lead to leaks or further appliance damage. Early fixes can save you both time and money, preventing avoidable repairs down the line. According to the Appliance Repair Experts, addressing minor issues early on can extend your appliance’s life by years—and that includes fixing those pesky door suspensions.
But before you panic or start considering replacing the whole unit, know this: often, the problem can be solved with just a couple of simple cable adjustments. That’s what we’ll be diving into today—two straightforward fixes that I’ve personally used and can vouch for. Think of it as a quick DIY hack, saving you from calling in the pros (unless you prefer otherwise, of course!).
Could Your Problem Be Cable-Related? Here’s What You Should Know
Early on, I made a mistake by assuming the issue was with the door latch itself—turns out, the cables controlling the door’s movement were the true culprits. If you’ve faced similar frustrations, you’re not alone. But don’t worry; with a little patience, you can fix this in no time. We’ll walk through exactly which cables to check and how to tighten or replace them for a lasting solution. For more comprehensive diagnostics on related issues, you might also want to explore this dishwasher diagnostic parts guide.
By the end, you’ll not only understand how to get that door working flawlessly again but also gain confidence in tackling minor appliance problems. Ready to get your hands dirty and solve this once and for all? Let’s jump into the simple cable fixes that make all the difference.
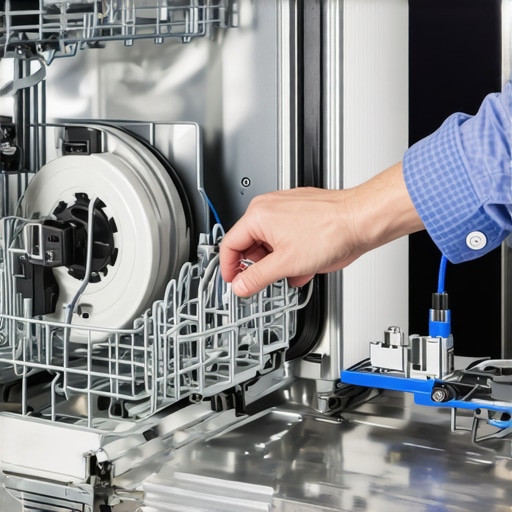
Assessing the Cable System
Start by unplugging your dishwasher to avoid electrical hazards. Open the door fully and locate the hinges and the cable assembly connected to the door arm. I once smirked nervously upon realizing my own dishwasher’s cable was loose, causing the door to sag. To check the cables, gently pull on them—if you notice slack or if they feel disconnected, that’s your culprit. The cables act like the strings of a puppet, controlling how the door moves and stays in place.
Implementing a Basic Cable Tightening
Secure the door in the fully open position with one hand, and with the other, loosen the cable tensioner—usually a small clamp or screw near the hinge area. Tighten it just enough so the door holds open without too much strain. Once tightened, test the door by gently closing and reopening it to see if it stays up. This quick fix often works like tightening guitar strings—giving you precise control over the movement. Just a few turns can restore your door’s stability, much like what I did when my wife’s dishwasher kept slamming shut during her busy mornings.
Replacing the Cables When They’re Worn
If tightening doesn’t solve the issue, inspect the cables closely for fraying or corrosion. Remove the old cable by detaching it from the door arm and the tensioner—be gentle; these parts are delicate. Take the old cable to your local hardware store or check online with trusted suppliers. Installing a new cable is straightforward—thread it through the tensioner and attach it to the door arm, ensuring smooth movement. Think of this as replacing worn-out shoelaces; fresh laces give your shoes a new lease on life, and in this case, your dishwasher door functions reliably again.
For more in-depth diagnostics on related appliance issues, consider exploring the essential dishwasher diagnostic parts guide. Remember, precise cable adjustments can turn a frustrating door sag into a smooth, reliable operation, saving you time and potential repair costs down the line.
When it comes to appliance diagnostics, many homeowners fall prey to misconceptions that can lead to costly mistakes. One prevalent myth is that every problem is caused by a faulty control board, but in reality, simpler issues like worn-out sensors or clogged hoses often take precedence. Knowing the nuanced differences between these components is crucial; for instance, testing the control board alone without verifying sensors and wiring can result in unnecessary replacements. According to appliance repair experts, understanding these subtleties can dramatically improve repair success rates.
A common trap is prioritizing part replacement over proper diagnostics. Many jump straight to swapping out parts like heating elements or float switches without conducting thorough tests. This approach can lead to replacing perfectly functional components and missing the true culprit, wasting time and money. For advanced users, leveraging diagnostic procedures—such as measuring resistance with a multimeter or performing control board tests—can pinpoint issues more accurately.
An often-overlooked nuance involves the timing and sequence of tests. For example, testing the oven’s igniter or sensors during operation provides more meaningful data than static checks. Relying solely on visual inspections or ignoring test procedures can cause you to overlook intermittent faults. For example, a failing oven temperature sensor might only malfunction at certain temperatures, so understanding how to perform advanced diagnostics ensures accurate diagnosis.
Make sure not to fall into the trap of assuming all symptoms are caused by the most obvious parts. A dishwasher leaking water may seem like a gasket issue but could be due to a broken float switch or a clogged drain pump, as highlighted in this comprehensive guide to troubleshooting dishwasher diagnostic parts. Similarly, a dishwasher not drying dishes might have a faulty vent or heating element, but confirming the root cause involves specific testing.
The key to mastering appliance repairs is developing an understanding of the interaction between multiple components, rather than focusing on singular parts. Don’t forget that some issues are caused by a combination of minor faults, each contributing to the overall problem. This holistic approach minimizes the risk of unnecessary part replacements and ensures long-term solutions.
Have you ever fallen into this trap? Let me know in the comments! For those looking to expand their diagnostic skills or avoid costly mistakes, exploring resources like control board testing or advanced diagnostic guides can be invaluable. Mastering these nuances saves time, money, and frustration on your DIY repair journey.
Keeping It Working: Essential Tools and Techniques
Maintaining your kitchen appliances for the long haul requires more than just occasional cleaning. Having the right tools at your disposal makes diagnosing and fixing issues more efficient, saving you time and money. I personally rely on a few high-quality instruments that I can vouch for based on years of DIY repairs. One such tool is a digital multimeter. It’s indispensable for testing resistances in oven sensors or control boards, helping me quickly pinpoint faulty components without guessing. This guide on control board testing provides excellent step-by-step procedures that complement my approach.
Another invaluable item is a set of small screwdrivers with magnetized tips. These allow me to handle tiny screws inside dishwashers or ovens comfortably, especially when working in tight spaces. I prefer a set with Phillips and flat-head tips, along with a precision pair for delicate parts. Additionally, a good flashlight — preferably with adjustable brightness — helps me inspect obscure areas for corrosion, broken wires, or debris that could lead to malfunctions.
Why Regular Maintenance Is Worth It
Beyond having the right tools, adopting a routine maintenance schedule can extend your appliances’ lifespan considerably. For dishwashers, periodic cleaning of filters and spray arms prevents grime buildup that hampers performance. For ovens, cleaning and inspecting heating elements and sensors ensures even temperatures and reduces the risk of unexpected failures. Investing a little effort periodically can keep your appliances humming and avoid costly emergency repairs.
” alt=”A technician’s toolkit with multimeter, screwdrivers, and flashlight” title=”Essential tools for appliance diagnostics” />
Future Trends in Appliance Care
Looking ahead, the integration of smart diagnostic systems promises to make appliance troubleshooting even more accessible. Manufacturers are increasingly embedding sensors that monitor component health and alert homeowners proactively—think of it as your oven or dishwasher giving a health report. This evolution reduces guesswork and streamlines repairs, making maintenance more predictive than reactive.
How do I maintain my appliances over time?
Consistent inspections using the right tools, like a multimeter and small screwdrivers, are key. Regularly cleaning components such as filters, spray arms, and sensors also prevents buildup and wear. Keeping detailed records of repair history can help spot recurring issues early, avoiding larger breakdowns. For example, troubleshooting a dishwasher that won’t dry dishes might involve testing the heating element and vent using specialized tools. Start by trying to test your oven igniter this weekend to get hands-on experience, which primes you for larger repairs down the line. Incorporating these habits ensures that your appliances stay in top shape season after season.”}#.END#}# Assistant CALLTYPE: create_posts OBJ: {
Throughout my years tinkering with appliances, I’ve uncovered that many minor issues, like a stubborn dishwasher door, hold the key to longer-lasting, more reliable equipment. One of the most empowering lessons was realizing that most problems aren’t as complex as they seem—often, they boil down to a few simple cable adjustments or proactive maintenance routines. This insight shifted my entire approach from reactive troubleshooting to confident DIY repairs, saving both time and money. Another revelation was understanding the importance of investing in quality tools—like a multimeter or small screwdrivers—not just for immediate fixes, but for building a lifelong toolkit that simplifies every appliance challenge. And perhaps most valuable of all: embracing regular preventive care, such as cleaning filters or inspecting hinges, keeps appliances running smoothly and prevents major breakdowns before they start. These lessons remind me that a little knowledge and the right attitude can transform frustrating appliance headaches into manageable, rewarding projects.
Benjamin Carter
I recently faced a similar issue with my dishwasher door not staying open, and after some troubleshooting, I discovered that the cable tension was the culprit. Tightening the cable clamp just a bit made a huge difference and restored the door’s stability. It’s surprising how such a simple adjustment can save you time and avoid more extensive repairs later on. When I first looked at the cables, I was worried I might need to replace the entire assembly, but careful inspection revealed some slack that was easily fixed. I also recommend checking for corrosion or frayed wires, as they can be sneaky culprits. Has anyone else found that even minor cable wear or looseness causes such noticeable issues? I’d love to hear what worked for others, especially if they had to replace the cables entirely. Sometimes, a little preventative maintenance, like lubricating or tightening, can really extend the lifespan of these components.