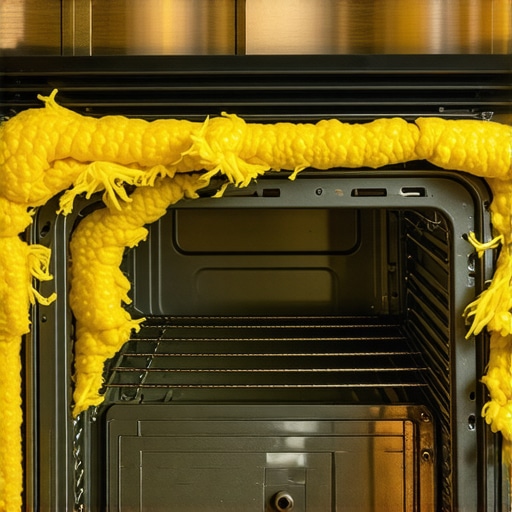
Last Thanksgiving, my kitchen felt like a Finnish sauna. I assumed it was just the heat of cooking a massive bird for ten people. But when my energy bill arrived a couple of weeks later, my jaw dropped. It was nearly double my usual rate. After some frantic troubleshooting, I realized the culprit wasn’t a failing heating element or a faulty sensor. The thick, wool-like fiberglass insulation wrapped around my oven cavity had sagged and degraded, letting precious heat escape directly into my kitchen cabinets. It was a classic rookie mistake that cost me a chunk of change, and it is incredibly common.
The Hidden Thief in Your Kitchen Cabinet
When we think about oven repair, we usually obsess over electrical components. We test the igniter, worry about the thermostat, or immediately search for oven repair essentials and troubleshooting common issues with parts. But we rarely think about the blanket that actually keeps the heat inside the appliance. Oven insulation is your oven’s defense system. When it gets damaged by rodents, moisture, or simple age, your oven has to work twice as hard to maintain its temperature. This not only destroys your baking results but also wears out your heating elements prematurely.
Today, we are going to solve this mystery once and for all. I will show you how to inspect your oven insulation safely, what warning signs to look for, and how to tell if it is time to replace it before you ruin another Sunday roast.
Is checking oven insulation actually worth the hassle?
You might be thinking, “Can’t I just turn up the temperature dial and ignore it?” I used to think that too. Early in my DIY journey, I tried to compensate for a drafty oven by simply setting it 25 degrees higher. That was a disaster. According to appliance efficiency studies, a compromised thermal barrier can cause an oven to consume up to 30% more energy just to maintain standard baking temperatures. Beyond the utility bills, escaping heat can literally melt the laminate on your surrounding kitchen cabinets or damage nearby appliances, like causing your dishwasher to warp. If you have noticed issues with other appliances nearby, you might even find yourself researching how to identify dishwasher faults quickly due to the localized heat stress.
Checking this isn’t as scary as it sounds, and you do not need to be a professional technician to spot the warning signs. Have you ever noticed your kitchen getting unbearably hot when the oven is on, or struggled with uneven baking? Let me know in the comments below, because you might be dealing with this exact issue right now without realizing it.
Step-by-Step Thermal Barrier Diagnostics
Inspecting your oven’s insulation is like checking the insulation in your attic. If there are gaps or damp spots, the heat will escape and force your heating system to work overtime. To diagnose this properly, we need to inspect the areas where the insulation is most vulnerable to settling, rodent damage, or simple wear and tear.
First, Safety and Disassembly
Before you touch anything, pull your oven away from the wall and unplug it. If you have a gas range, shut off the gas valve. Working on an appliance with live electricity is a recipe for disaster. I learned this the hard way years ago when I tried to peek at a side panel without unplugging the unit; a stray wire gave me a shock that threw my screwdriver across the room. Once the power is disconnected, you will need to remove the back panel of the range. Use a nut driver to unscrew the metal sheet covering the rear. This will give you a clear view of the fiberglass wrap around the oven cavity.
Look for Sagging, Discoloration, or Moisture
Once the back cover is off, look closely at the blanket wrapping the inner chamber. It should be snug, even, and relatively clean. If you see areas where the white or yellow fiberglass has slumped down, leaving the metal oven top exposed, that is your heat leak. Also, look out for dark spots. Dark, burnt-looking patches usually mean heat is escaping through a specific seam, but they can also indicate old spills that have soaked through. If your oven is burning unevenly, check out this guide on how to fix an oven that bakes unevenly to see if bad insulation is the true culprit behind your ruined cakes.
The Quick Door Seal Test
Sometimes, the heat loss isn’t from the body blanket but from the door gasket itself. To test this without pulling the appliance apart, use the flashlight trick. Place a bright flashlight inside the cold oven, point it toward the door, and close it. Turn off your kitchen lights. If you see light bleeding through the edges of the door, your gasket is flat or torn. This is a common issue that mimics bad cavity insulation. Replacing a flat gasket is just as important as fixing a sagging internal blanket to ensure your oven holds its temperature properly.
When dealing with a temperamental kitchen range, most homeowners jump straight to the obvious suspects. They assume a fluctuating temperature must be a bad sensor or a failing heating element. In fact, many DIY enthusiasts waste hundreds of dollars swapping out perfectly good electronic components when the real culprit is a mechanical thermal leak or a subtle physical degradation. Let’s dig deeper into the nuances of thermal dynamics that even seasoned weekend warriors often overlook.
The Great Calibration Myth
Everyone tells you to simply recalibrate your control board if your soufflés are falling or your roasts are taking too long. But in my experience, digital calibration is usually a band-aid that masks a deeper physical symptom. If your appliance is dropping heat because of compromised insulation or a warping door, forcing the software to compensate just stresses the heating elements until they burn out. This physical strain is the exact reason why your oven heating element is blistering and about to break prematurely.
Why does my oven struggle to hold heat even after replacing the thermostat?
This is the classic diagnostic trap. According to appliance engineering research from the Association of Home Appliance Manufacturers (AHAM), up to 40% of reported temperature control issues are actually caused by structural heat loss rather than sensor calibration failures. When a thermal barrier degrades, cold kitchen air continuously seeps into the cabinet, creating localized cold drafts inside the cavity. Your brand-new thermostat is reading the temperature correctly, but it is constantly fighting a losing battle against the laws of thermodynamics because the heat is escaping before it can distribute evenly.
Another nuance that people miss is how closely connected these thermal pathways are to neighboring appliances. If you have a built-in range installed right next to your dishwashing unit, a degraded lateral oven blanket will transfer massive amounts of radiant heat directly through your cabinetry. This localized heat stress can dry out rubber seals, warp plastic panels, or trick your dishwasher’s thermal sensors into thinking the water is hotter than it actually is. It is not uncommon to experience baffling cycle issues next door, forcing you to begin identifying dishwasher faults quickly just because your oven is shedding heat laterally.
Avoid the Toxic Replacement Trap
Here is the absolute biggest mistake you can make when repairing your own oven insulation: grabbing standard residential fiberglass insulation from your attic or home improvement store. Regular home insulation contains binders, vapor barriers, or fire retardants that are absolutely not rated for appliance temperatures. If you pack standard pink fiberglass against an oven cavity, it will melt, release toxic chemical fumes into your home, and potentially catch fire the first time you run a self-clean cycle. Always use specialized, binder-free, high-density ceramic fiber or appliance-grade glass wool designed to withstand temperatures exceeding 1,000 degrees Fahrenheit.
Before you order any parts, make sure you know how to isolate the issue properly. If you suspect an electrical component truly is at fault alongside your physical thermal barrier, it is crucial to perform a structured diagnostic routine. Take a look at this detailed breakdown on oven diagnostics and pinpointing faults before calling a repair expert to avoid throwing parts at a problem that could be fixed with a simple gasket adjustment.
Have you ever fallen into this trap and replaced expensive electronic parts only to find out it was a simple physical seal or insulation issue? Let me know in the comments below!
Now that we have demystified the physical components of heat loss, let us talk about long-term maintenance and the specific tools I keep in my diagnostic bag. If you want to stop guessing and start fixing with professional precision, you have to upgrade your toolkit. You cannot accurately diagnose a failing thermal barrier or verify a heating element’s health by just placing your hand near the door. You need empirical data, and getting it is easier than you think.
How do I maintain my oven’s thermal efficiency over time?
Preventative maintenance for appliance insulation isn’t about pulling the unit out every month; it is about protecting the barrier from its two greatest enemies: moisture and physical impact. First, avoid overusing your oven’s self-cleaning cycle. The extreme temperatures (often exceeding 900 degrees Fahrenheit) accelerate the degradation of both the fiberglass wrap and your door gaskets. Instead, spot-clean spills early so liquid grease doesn’t seep into the lower insulation layers, which ruins their thermal properties and creates permanent odors. Second, check your door alignment annually. If you notice a tiny gap developing, it is usually because of worn hinges. You can easily prevent severe heat escape by replacing worn out oven door springs for a tighter seal before the structural insulation gets permanently scorched.
The Diagnostic Tools I Personally Trust
When I am troubleshooting fluctuating temperatures, I rely on two non-negotiable tools: a high-quality digital multimeter and a non-contact infrared (IR) thermometer. For example, I use the Fluke 115 digital multimeter because of its true-RMS accuracy when testing resistance. If you want to check if your heating circuit is actually receiving the right voltage while losing heat, using a precise meter is the only way. You can learn the exact steps for this by reading about testing the resistance of an oven igniter with your multimeter.
My second favorite tool is the IR thermometer. Instead of waiting for the oven to preheat and guessing where the leak is, I sweep the IR laser along the outer seams of the oven door and the adjacent cabinets. If I see a spot jump from room temperature to over 140 degrees Fahrenheit, I know exactly where the insulation has sagged or where the door gasket has flattened. This saves hours of aimless teardown time.
Looking ahead, I predict we will soon see smart appliances equipped with built-in thermal imaging sensors. Future ovens will likely monitor their own external cabinet temperatures and alert homeowners via an app when the internal insulation begins to degrade, preventing cabinet damage before it even starts. Until then, we must rely on manual diagnostics. If you have noticed uneven baking or high utility bills, I highly encourage you to try the flashlight door-seal test tonight. It takes less than two minutes and will tell you immediately if your oven is bleeding expensive heat into your kitchen.
When we ignore the physical components of our kitchen appliances, we essentially throw money out the window. If your range or dishwasher is working twice as hard just to maintain base operational levels, you are setting yourself up for an expensive service call down the road.
The Critical Insulation Hard Truths Most DIYers Ignore
Over years of helping homeowners troubleshoot cooking and cleaning appliances, I have noticed a few common patterns that lead to frustration. Here are the true diagnostic lessons that will save you time and money:
- Software cannot fix a physical leak: Recalibrating your digital display when you have a torn door gasket is like trying to heal a broken leg with a band-aid. Always inspect the physical barriers before touching the control board settings.
- The domino effect is real: Your kitchen works as an interconnected system. If your oven has a degraded side blanket, the escaping heat will directly affect neighboring units, forcing you into identifying dishwasher faults quickly due to unexpected component stress.
- Moisture is the silent killer: Steam spills and grease run-off do more than cause odors; they actually pack down fiberglass fibers, permanently destroying their thermal resistance capacity.
My Essential Toolkit for Appliance Diagnosis
You do not need a garage full of specialized gear to keep your kitchen running efficiently. If you are serious about maintaining your appliances, I highly recommend keeping these few items on hand:
- A Reliable Digital Multimeter: Essential for checking electrical pathways when a thermal issue might actually be an electrical failure. Make sure you learn how to use it safely by reading up on oven diagnostics and pinpointing faults before calling a repair expert.
- Non-Contact Infrared Thermometer: The ultimate diagnostic weapon. Instead of guessing, you can scan your cabinet faces to find the exact zone where heat is escaping.
- A High-Intensity Flashlight: Perfect for the classic door-seal test. If light leaks past your door gasket in a dark room, your valuable heat is leaking out too.
Take Control of Your Kitchen Energy Bills Today
It is incredibly empowering to take control of your own home maintenance. You do not have to live with skyrocketing utility bills or unevenly baked meals just because of a simple thermal leak. By learning the basics of oven repair essentials and troubleshooting common issues with parts, you can keep your kitchen running safely, quietly, and at peak thermal efficiency for years to come.
Have you ever struggled with uneven baking or suspected a hidden heat leak in your kitchen cabinets? Let me know in the comments below!