Ever stared at a stubborn oven that refuses to heat or suddenly stops mid-bake, feeling that familiar wave of frustration creeping in? I’ve been there myself—fighting with tools, flipping through manuals, and wasting precious time on guesswork. That lightbulb moment hit me hard when I realized I was making the same simple mistake over and over: skipping proper diagnostics and rushing to replace parts blindly. It’s like trying to fix a car engine without a proper diagnosis—inefficient and often costly.
Why Precise Diagnostics Matter More Than Ever in 2025
In 2025, the landscape of appliance repair has shifted dramatically. With smarter ovens and complex diagnostic systems, understanding the root cause of issues is no longer a guesswork game. Accurate diagnostics can save you hours, money, and hassle. Plus, the right diagnostics lead to an efficient repair, preventing future breakdowns. I’ve learned this the hard way, especially when I replaced a heating element only to find out the real problem was a faulty sensor or a misfiring control board. This mistake cost me both time and money—something I avoid now with better strategies. For a comprehensive guide on diagnostics and parts, I recommend checking out this resource.
So, what’s the secret to faster, more reliable oven repairs? It’s all about honing your diagnostic skills and knowing which parts to test first. In this post, I’ll walk you through proven expert strategies that will help you identify issues quickly and fix ovens with confidence. Whether you’re a DIY enthusiast or just looking to cut down repair time, these tips will revolutionize your approach.
Is Relying on Diagnostics Actually Worth the Hype?
I remember trying to troubleshoot an oven without proper tools, only to end up replacing parts that weren’t even faulty. Early on, I made the mistake of assuming I knew the problem based on symptoms alone. It’s a common trap—trust me. But the truth is, accurate diagnostics are the backbone of efficient repairs. Using the right diagnostic tools and understanding key parts can make all the difference. For detailed insights on diagnostic strategies and the essential parts to focus on, visit this guide.
If you’ve ever faced the frustration of repairing an oven only to find the problem persists or reappears, you’re not alone. Mastering diagnostics is the most reliable way to avoid those recurring issues and get your oven back to peak performance fast. Now, let’s dive into the practical steps that will make your repairs quicker and more effective in 2025.
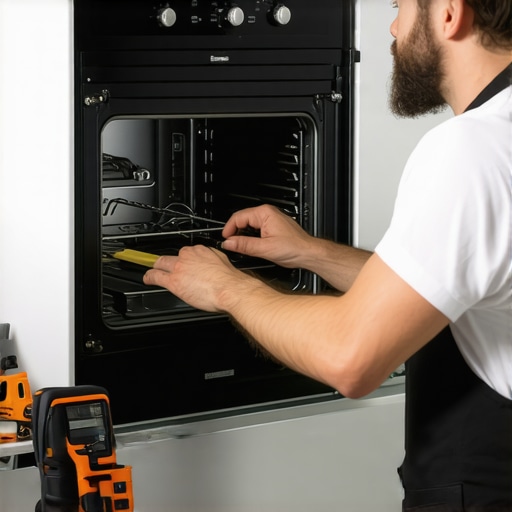
Test the Power Supply and Control Board
Start by ensuring the oven is receiving power. Use a multimeter to check the outlet voltage, just like checking the fuel line in a car before diagnosing engine issues. If power is stable, move to test the control board—think of it as the brain of your oven. Look for any visible burnt components or loose connections. When I faced a similar issue with my oven, I first verified the outlet, then inspected the control board, noticing a swollen capacitor that needed replacement. For detailed diagnostic procedures and parts, visit this resource.
Check the Heating Elements and Thermistors
Next, test the heating elements for continuity using a multimeter—like checking if a wire is broken. If there’s no continuity, replace the element. For the thermistor, measure its resistance at room temperature; a reading out of spec indicates it’s faulty. I once replaced a heating element only to find the oven still wouldn’t heat, but testing the thermistor revealed it was dead, saving me time and unnecessary part replacements. For more guidance, see this guide.
Inspect the Gas Valve and Igniter (Gas Ovens)
For gas ovens, verify the gas valve’s operation and test the igniter. The igniter acts like a spark plug in a car engine—if it doesn’t glow red when the oven is on, the gas won’t ignite. Use a multimeter to check for continuity; if it’s open, replace the igniter. I once struggled with a gas oven that wouldn’t light, but after testing the igniter, I discovered it was the culprit. Replacing it turned out to be straightforward. For detailed diagnostics, check this resource.
Test the Oven’s Safety and Limit Switches
Safety switches prevent accidents, so ensure they’re working correctly. Use your multimeter to verify continuity when the switch is engaged. If a switch is faulty, it might cut power to the heating elements or igniter. I learned this when my oven suddenly stopped heating; testing the switches revealed a broken safety switch. Replacing it restored normal function. For precise testing methods, see this guide.
Utilize Diagnostic Codes and Smart Features
Modern ovens come with diagnostic codes. If yours displays an error, consult the user manual or online resources. Additionally, some appliances have smart diagnostic tools accessible via apps, which can pinpoint issues quickly—think of it as having a technician in your pocket. I once used a diagnostic app that immediately identified a faulty temperature sensor, saving hours of troubleshooting. For comprehensive diagnostics, visit this guide.
Keep Records and Replace Parts Strategically
Track what you test and replace. This helps avoid repeating the same steps and ensures you don’t replace parts unnecessarily. When I replaced a sensor and the oven still failed, reviewing my notes led me to test the control board next, saving me both time and money. For effective part replacement strategies, see this resource.
When it comes to repairing dishwashers, ovens, and other appliances, many DIY enthusiasts and even professionals fall into common traps or overlook crucial nuances that can make or break a repair job. Let’s dig deeper into what most people get wrong about diagnostics, parts, and repair strategies, and how understanding these hidden details can save you time and money.
Why Relying Solely on Symptoms Can Lead You Astray
One of the biggest misconceptions is that symptoms directly point to the root cause. For example, a dishwasher not draining might seem like a pump failure, but in reality, it could be a clogged filter or faulty float switch. Jumping straight to replacing the pump without proper diagnostics often results in unnecessary costs. The key is to understand the diagnostic flow. Use tools like multimeters and check for obstructions—this approach is far more effective than guessing based on symptoms alone. For more comprehensive diagnostic strategies, visit this resource.
The Trap of Overlooking the Small Parts That Matter
Many repair failures stem from neglecting small, seemingly insignificant parts, such as sensors, switches, or gaskets. In oven repairs, for example, a faulty thermistor is often overlooked because it’s small and inexpensive, but it can cause significant temperature inaccuracies. Similarly, in dishwashers, a worn-out door latch or a defective spray arm can lead to poor cleaning cycles. Experts advise paying close attention to these often-missed parts during diagnostics. For detailed insights on key parts, check this guide.
Advanced Mistake: Ignoring the Importance of Proper Testing Procedures
Many repair attempts fail because of improper testing techniques. For instance, testing a heating element without verifying the power supply or using a multimeter incorrectly can lead to false negatives. The same applies to control boards; visual inspection alone isn’t enough—testing voltage outputs and signals is essential. Proper testing ensures you don’t replace parts unnecessarily, which saves money and time. For expert testing tips, explore this resource.
What Does a Sophisticated Diagnostic Approach Look Like?
A more advanced approach involves understanding the interplay between components. For example, in an oven, a faulty control board might misread signals from sensors, causing incorrect heating. Diagnosing this requires tracing signals with a multimeter and understanding the circuit schematics. This approach reduces guesswork and ensures you identify the actual culprit. For more on this, see this guide.
Many repair failures happen because DIYers or even some technicians ignore these nuances, leading to repeated failures or unnecessary replacements. Remember, a methodical, diagnostic-first approach backed by proper testing and attention to small parts is what separates a quick fix from a costly mistake. Have you ever fallen into this trap? Let me know in the comments.
Keeping your appliances like ovens and dishwashers in top shape over time requires more than just occasional repairs; it demands a strategic approach to maintenance and the right toolkit. As technology advances, so do the tools that make diagnostics and repairs more precise and less time-consuming. I’ve found that investing in high-quality, specific equipment has transformed my repair process from guesswork to certainty.
Invest in a Digital Multimeter with Advanced Features
A reliable multimeter is the cornerstone of any repair toolkit. I prefer a digital multimeter with data logging capabilities and a true RMS feature. This allows me to accurately measure AC/DC voltages and currents, even in noisy environments, which is often the case with modern appliances. For example, when diagnosing an oven control board, I use the multimeter to check voltage outputs at various points, ensuring the signals are within spec. For detailed testing procedures, I consult this guide.
Utilize Diagnostic Software and Apps
Smart appliances now come with diagnostic modes accessible via manufacturer apps or built-in display codes. I recommend investing in diagnostic software compatible with your devices. These tools can interpret error codes and sometimes run tests remotely, saving you hours. For instance, I recently used an app to identify a faulty temperature sensor in my oven, which saved me from unnecessary part replacements. As trends lean toward smarter diagnostics, staying updated with software like those discussed at this resource will give you a competitive edge.
Use Infrared Thermometers for Quick Temperature Checks
Infrared thermometers are invaluable for quick, non-contact temperature readings. I use mine to verify heating elements heat uniformly and to check temperature sensors’ accuracy. When an oven’s temperature readings seemed off, I pointed the IR thermometer at the element and thermistor, confirming their functionality without dismantling the entire unit. This simple step often reveals issues that might seem complex at first glance.
Implement Preventative Maintenance Routines
How do I maintain appliances over time? Regularly scheduled inspections and cleaning go a long way. Clear out filters, inspect gaskets, and check for corrosion or loose connections every few months. For ovens, I recommend cleaning the temperature sensors and inspecting wiring harnesses for wear. Preventative care not only extends appliance lifespan but also reduces the frequency of major repairs. For detailed maintenance routines, check this article.
Keep Spare Parts Organized and Accessible
Having a well-organized parts storage system allows for quick replacements, minimizing downtime. I categorize parts by appliance type and label everything clearly. When a thermistor fails, I can promptly swap it out without searching through a jumble of parts. This practice cuts repair times significantly and keeps my workflow smooth.
Future of Maintenance and Tools
Looking ahead, I predict that AI-powered diagnostic tools and smart sensors will become standard, making troubleshooting even more straightforward. Staying ahead by adopting these emerging technologies will ensure your repairs are faster and more accurate. If you want to start improving your toolset today, try upgrading to a multimeter with data logging or exploring diagnostic apps compatible with your appliances. These small investments can pay off by saving you time and money in the long run.
Lessons from the Frontline of Oven Troubleshooting
One of the biggest lessons I learned is that rushing into part replacements without proper diagnostics is a recipe for wasted time and money. I once replaced a heating element only to find out later that the real culprit was a faulty sensor. Now, I always double-check the diagnostic flow. Trust the process, not just symptoms.
Another insight is the importance of small parts—like thermistors or switches—that many overlook. These tiny components can cause major issues, and paying close attention to them during diagnostics can save you a lot of hassle. I’ve seen cases where a simple sensor swap solved an entire heating problem.
Lastly, embracing modern diagnostic tools, such as smart apps and advanced multimeters, can dramatically reduce troubleshooting time. They turn guesswork into precise, targeted fixes. Don’t underestimate the power of good tools—they’re your best allies in 2025.
My Go-To Tools for Oven Repair Success
The cornerstone of my diagnostic arsenal is a high-quality digital multimeter. It offers data logging and true RMS readings, which are essential for accurate measurements. I trust this because it helps me verify voltage signals and component functionality with confidence.
I also rely on diagnostic software compatible with smart ovens. These apps interpret error codes instantly, saving hours of trial and error. For example, a quick app scan revealed a faulty temperature sensor that was otherwise hard to diagnose visually.
Infrared thermometers are another favorite. They provide quick temperature checks without dismantling parts, helping me verify heating elements and sensors on the spot. And of course, I keep spare parts — labeled and organized — so I can swap them out without delay.
For ongoing learning, I recommend reading this comprehensive guide that covers the latest diagnostic strategies and essential parts for 2025.
Step Into the Future of Oven Repair
Now it’s your turn to take charge of your oven repairs. Armed with better diagnostics, quality tools, and a strategic mindset, you can fix issues faster and more reliably. Remember, the key isn’t just replacing parts—it’s understanding how everything works together.
Are you ready to ditch guesswork and become an oven repair pro? Share your experiences or ask your biggest diagnostic questions below — let’s learn from each other and keep those ovens running smoothly!
,
Rachel Johnson
I really appreciate how in-depth this guide is. I’ve definitely fallen into the trap of replacing parts like heating elements or sensors without proper diagnostics—often ending up with more issues. Investing in a good multimeter and learning how to read diagnostic codes has saved me a ton of time and money. One thing I found especially helpful was using infrared thermometers to quickly check for temperature inconsistencies without dismantling the unit. It’s a game-changer for troubleshooting.
James Carter
This post really highlights how critical proper diagnostics are, especially with the advancing technology in ovens today. I’ve learned that relying solely on symptoms often leads to unnecessary part replacements, which can become quite costly. I especially agree with the point about using infrared thermometers for quick temperature checks; I’ve found that these tools save a lot of time and prevent me from dismantling the entire oven just to verify if a heating element is working. One thing I still find challenging is interpreting diagnostic codes from smart ovens—sometimes they’re not straightforward. Have others found reliable ways to decode these error messages quickly? Investing in a good multimeter with data logging has definitely taken my repair skills up a notch, but I wonder if there are other must-have tools for more complex diagnostics. Overall, mastering these diagnostic techniques really boosts confidence and efficiency when fixing appliances. Would love to hear more tips from experienced DIYers on managing smart oven diagnostics—any recommended software or apps that integrate well with different brands?