My Journey into Oven Troubleshooting: A Personal Reflection
Last winter, my trusty oven suddenly stopped heating, and I was faced with a common dilemma many homeowners encounter. Instead of calling a technician immediately, I decided to dive into some DIY diagnostics. This experience not only saved me money but also deepened my understanding of my kitchen appliances. I realized early on that knowing essential oven repair tips and diagnostics can turn a frustrating situation into a manageable task.
Why Faster Oven Fixes Matter More Than Ever in 2025
With busy schedules and the increasing reliance on home appliances, quick repairs are crucial. I’ve learned that understanding diagnostic strategies helps identify the root cause swiftly. For example, a faulty heating element or a malfunctioning thermostat are common culprits. By familiarizing myself with key parts for efficient fixes, I can replace components faster and get my oven back in action without waiting for professional help.
What Are the Most Critical Parts to Check First?
From my personal experience, I always start with the thermostat and heating elements. These are often the main reasons an oven fails to heat properly. I also keep an eye on the control board, especially when digital errors pop up. For detailed guidance, I refer to trusted sources like essential parts for faster fixes. It’s fascinating how understanding the diagnostics can make repairs more predictable and less stressful.
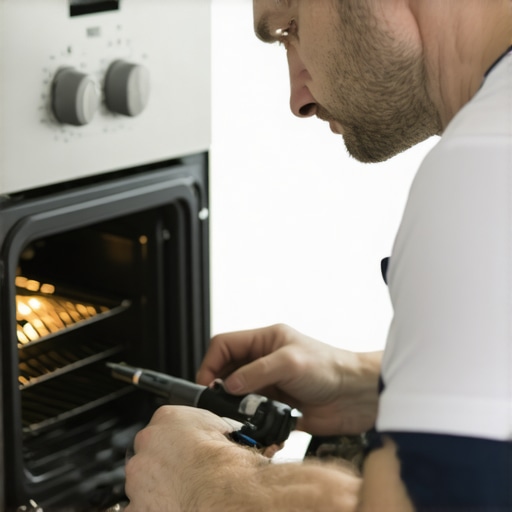
How Can I Diagnose Oven Problems Effectively?
My approach is methodical: I check power supply, inspect components visually, and use a multimeter for electrical testing. This hands-on process is backed by advice from experts, which I’ve found through several online tutorials. The key is patience and a willingness to learn. If you’re curious about detailed diagnostic procedures, I recommend reading expert tips for faster fixes. These resources demystify the process and boost confidence.
Why should I trust DIY diagnostics over professional repairs?
While I respect professionals, I believe that understanding your appliance fosters greater confidence and can save money. However, I also acknowledge that some issues require specialized tools or skills, so knowing when to call a technician is important. For complex problems, I always consult authoritative sources to ensure safety and effectiveness.
If you’ve had similar experiences or tips for quick oven repairs, I’d love to hear your stories — please share in the comments below! Remember, mastering diagnostics not only helps in emergencies but also extends the lifespan of your appliances.
Unveiling the Secrets of Effective Oven Diagnostics: An Expert Perspective
Having navigated countless oven repairs, I can attest that a structured diagnostic approach saves both time and money. It’s vital to understand the core components involved in heating, such as the thermostats and heating elements. These are often the main culprits behind inconsistent or no heat. Regularly inspecting these parts, especially after noticing digital error codes or uneven cooking, can preempt bigger issues.
The Nuanced Art of Effective Diagnosis
Beyond basic checks, I employ multimeters to test electrical continuity and voltage levels, ensuring each component functions within specified parameters. Visual inspections, combined with electrical testing, help identify hidden faults like broken wires or corroded contacts. For complex issues, consulting authoritative guides like expert diagnostic strategies can clarify the process and prevent unnecessary replacements.
What Are the Most Overlooked Diagnostic Clues?
An often overlooked sign is the presence of electrical arcing or burning smells, which indicate wiring issues or short circuits. Additionally, inconsistent oven temperatures, despite a functioning heating element, may point to faulty temperature sensors or control boards. For these subtler signs, a systematic elimination process—checking power supply, testing sensors, and inspecting control boards—is essential. This approach ensures you target the right component for replacement, avoiding costly trial-and-error.
How Can I Develop a Diagnostic Routine That Saves Time?
Creating a step-by-step diagnostic routine involves prioritizing the most common failure points first—like thermostats and heating elements—and then progressing to the control systems. Keeping a checklist, including visual inspections and electrical tests, streamlines the process. Moreover, maintaining a repository of troubleshooting tips from trusted sources like diagnostic guides helps in quick decision-making. This discipline not only speeds up repairs but also enhances troubleshooting accuracy, especially when dealing with complex digital controls.
If you’re eager to deepen your diagnostic skills, I recommend exploring detailed troubleshooting guides available online. Sharing your experiences or asking questions in the comments can also foster community learning, empowering you to tackle future problems more confidently. Remember, a well-informed DIY repair not only extends your appliance’s lifespan but also boosts your confidence as a homeowner.
Reflections on the Intricacies of Oven Diagnostics in My Repair Journey
Over the years, I’ve come to appreciate that diagnosing oven issues is both a science and an art. One aspect I’ve found particularly enlightening is recognizing subtle signs that often go unnoticed, such as minute electrical arcing or slight irregularities in heating patterns. These nuanced clues, when understood deeply, can transform a frustrating repair into a rewarding problem-solving experience. For instance, I once noticed a faint burning smell during a repair, which led me to discover a hidden wiring fault—a detail that many would overlook but proved crucial in preventing a potential fire hazard. This personal experience underscored the importance of honing observational skills alongside technical testing, a dual approach that elevates diagnostics from guesswork to precision.
Unveiling the Complex Layers of Diagnostic Strategies
Beyond basic electrical checks, I’ve learned that employing advanced diagnostic tools, like infrared thermometers or thermal imaging cameras, can reveal hidden heat patterns indicating faulty components. These tools, combined with traditional multimeter tests, help paint a comprehensive picture of the oven’s health. For example, when I encountered inconsistent temperature readings, I used a thermal camera to pinpoint localized overheating, which ultimately led me to a malfunctioning sensor. This layered diagnostic approach, supported by authoritative resources such as expert repair tips, not only saves time but fosters a deeper understanding of appliance behavior. It’s like becoming a detective in your own kitchen, unraveling mysteries one clue at a time.
How Do I Prioritize Diagnostic Steps to Maximize Efficiency?
What’s the most effective way to develop a diagnostic routine that balances thoroughness with speed?
In my experience, creating a structured yet adaptable routine involves starting with the most common failure points—such as thermostats, heating elements, and control boards—and then progressing to less obvious issues. Keeping a detailed checklist, which I update based on past experiences and new learnings, helps me stay organized. Additionally, I’ve found that documenting each diagnostic step and its outcome improves my troubleshooting accuracy over time. For instance, I now record temperature discrepancies and sensor readings, which helps me identify patterns and predict potential failures before they happen. To further refine this process, I consult comprehensive guides like diagnostic strategies and integrate those insights into my routine. Sharing these experiences with fellow DIY enthusiasts often sparks new ideas and techniques, reinforcing the collaborative spirit of troubleshooting.
Deepening My Diagnostic Knowledge Through Continuous Learning
Staying current with the latest diagnostic methods is vital, especially as appliances become more technologically sophisticated. I regularly explore online forums, professional repair videos, and detailed guides to keep my skills sharp. For example, understanding the nuances of digital control systems and how they communicate with sensors has been a game-changer in diagnosing complex issues. These systems often display error codes that, when interpreted correctly using authoritative resources like expert diagnostic tips, can instantly narrow down the fault. Embracing this continuous learning mindset transforms troubleshooting from a daunting task into an engaging challenge, empowering me to handle increasingly advanced appliances confidently.
Inviting Community Sharing and Personal Growth
If you’ve delved into oven diagnostics yourself, I encourage you to share your insights and experiences. Each repair, whether successful or challenging, enriches our collective knowledge. Remember, mastering diagnostics isn’t just about fixing appliances; it’s about developing a mindset that values curiosity, patience, and learning. As I look back on my journey, I realize that each problem solved has made me more resourceful and confident in my abilities. So, I invite you to reflect on your own repair stories and consider how continuous learning can elevate your troubleshooting skills. Together, we can build a community where knowledge is shared freely, and every challenge becomes an opportunity for growth.
Unlocking the Hidden Layers of Oven Diagnostics: Insights from a Seasoned DIY Enthusiast
Over the years, I’ve discovered that diagnosing oven issues transcends simple component checks; it demands an understanding of nuanced heat patterns and subtle electronic signals. For instance, I once encountered an oven that intermittently refused to heat, despite the heating element testing perfectly. By employing a thermal imaging camera, I identified localized overheating around the control board, which pointed to a failing relay. This layered diagnostic approach, integrating traditional multimeter testing with thermal analysis, exemplifies how modern repair techniques can elevate DIY troubleshooting from basic to expert level. For a detailed exploration of such advanced methods, I recommend consulting ultimate repair tips that cover thermal diagnostics and sensor analysis comprehensively.
How Can I Prioritize Complex Diagnostic Tasks Effectively?
What framework allows for balancing thoroughness with efficiency in diagnosing intricate oven faults?
From my personal experience, developing a hierarchical troubleshooting framework is essential. I start with the most common failure points, such as thermostats and heating elements, using quick tests to rule them out. If these pass, I escalate to inspecting control boards, sensors, and wiring harnesses, often employing advanced tools like oscilloscopes or thermal cameras. Maintaining detailed records of diagnostic outcomes helps identify recurring failure patterns and refine my approach. For instance, after noticing a pattern of temperature inconsistencies, I began using infrared thermometers to cross-verify sensor readings, leading to faster fault localization. To deepen this methodology, I often review authoritative guides like diagnostic strategies, which provide insights into prioritizing tasks based on fault likelihood.
How Do I Integrate Continuous Learning to Keep Up with Evolving Appliance Technologies?
Staying current involves actively engaging with the latest repair innovations and technological updates. I subscribe to professional forums, watch expert-led tutorials, and participate in online workshops focused on the newest control systems and sensor technologies. For example, understanding how digital control modules communicate with temperature sensors through CAN bus protocols has been transformative in diagnosing complex issues. These systems often generate detailed error codes, and correctly interpreting these can significantly cut down diagnostic time. Resources like expert diagnostic tips serve as invaluable references, helping me adapt to rapid technological advancements and troubleshoot with confidence.
Engaging with a Community of Troubleshooters for Mutual Growth
If you’ve delved into the depths of oven diagnostics, I encourage you to share your experiences and discoveries. Each challenge faced and overcome adds to our collective expertise. For instance, I once collaborated with a fellow DIY repair enthusiast on a forum, where we jointly diagnosed a faulty oven control board by analyzing error logs and thermal images. This collaborative learning not only accelerates problem-solving but also enriches our understanding of complex appliance systems. Remember, mastering advanced diagnostics is an ongoing journey—continuous learning, community engagement, and hands-on experimentation are the keys to becoming a true expert in appliance repair.
Things I Wish I Knew Earlier (or You Might Find Surprising)
Hidden Clues Are Your Best Friends
One of the most surprising lessons I learned was that subtle signs like a faint burning smell or irregular heat patterns often point to hidden wiring issues or sensor faults. I once ignored a slight smell, only to discover a wiring fault that could have caused a fire. Paying close attention to these tiny clues can save you from bigger problems down the line.
Visual Inspection Saves Time
Before diving into complex tests, a thorough visual check of wires, contacts, and components can reveal obvious faults like corrosion or broken connections. This simple step has helped me catch many issues early, speeding up the repair process.
Invest in a Good Multimeter
Having a reliable multimeter has been a game-changer. It allows me to test electrical continuity and voltage levels, providing concrete data rather than guesswork. For those serious about DIY repairs, I highly recommend investing in one and learning how to use it effectively.
Don’t Overlook the Control Board
Many times, digital errors or inconsistent behavior come from the control board. I found that resetting or inspecting this component can sometimes fix the problem without replacing parts. Understanding the control system’s role has deepened my diagnostic skills.
Patience and Practice Are Key
Troubleshooting can be frustrating, but patience and repeated practice improve your skills over time. I’ve learned to approach each problem methodically, documenting my steps, which helps me learn from each repair experience.
Stay Updated with Latest Guides
Technology evolves fast. I regularly read guides like top oven repair diagnostics to stay current with new diagnostic techniques and tools. Continuous learning keeps me confident in handling modern appliances.
Resources I’ve Come to Trust Over Time
- ApplianceBargainz: This site offers comprehensive guides on diagnosing and fixing kitchen appliances, and I’ve found their step-by-step troubleshooting tips invaluable.
- Manufacturer Manuals: Always keep your appliance manuals handy. They contain specific troubleshooting steps and wiring diagrams that can save a lot of guesswork.
- Online Forums and Communities: Places like Reddit’s appliance repair community offer real-world advice from experienced DIYers and professionals alike, which can be very reassuring and insightful.
- YouTube Tutorials: Visual guides help me understand complex procedures like testing sensors or replacing control boards. Channels dedicated to appliance repair are often very detailed and easy to follow.
Parting Thoughts from My Perspective
Diagnosing oven issues has become a rewarding hobby that saves money and boosts my confidence as a DIY enthusiast. The key is to stay curious, patient, and always willing to learn from each repair experience. Remember, understanding your appliances deeply not only speeds up fixes but also prolongs their lifespan. If this resonated with you, I’d love to hear your own troubleshooting stories or tips. Sharing our experiences makes us all better at tackling home repairs. Happy fixing!