Ever been in the middle of preparing a holiday feast, only to discover that your oven refuses to heat up? That sinking feeling when you realize your trusted appliance has suddenly stopped cooperating. I’ve been there too. The frustration of not knowing where to start or which part to replace can turn a quick fix into a long, costly ordeal. It was a lightbulb moment for me when I realized that the secret to faster oven repairs lies in precise diagnostics and understanding the key parts involved.
Why Accurate Diagnostics Matter More Than Ever in 2025
In 2025, with smart appliances and advanced features, diagnosing oven problems has become both easier and more complicated. The good news? Modern diagnostic tools can pinpoint issues in minutes, saving you hours of trial and error. The bad news? If you don’t know what to look for, you might overlook crucial clues or replace the wrong parts, leading to unnecessary expenses. According to a recent study by Appliance Repair Experts, nearly 70% of oven repairs are delayed due to improper diagnostics, costing homeowners time and money. That’s why mastering diagnostics and knowing the key parts is essential for faster, reliable fixes.
Question Header: Is Over-Complicating Oven Repairs Actually Worth the Hype?
Early in my repair journey, I made the mistake of assuming that complex tools and expensive diagnostics were the only way to fix my oven. Turns out, many problems can be solved with basic troubleshooting combined with a good understanding of core components. Proper diagnostics don’t mean over-complicating the process—they mean simplifying it and focusing on the most common failure points. Want to learn how to avoid costly mistakes? Check out this guide to effective oven repair diagnostics for practical tips that helped me cut down repair times drastically.
So, if you’ve faced frustrating oven breakdowns, or just want to be prepared for inevitable issues, understanding the diagnostic process and key parts can save you both time and money. Ready to dive into the practical steps that will turn you into an oven repair pro? Let’s get started!
Start with Visual Inspection and Basic Troubleshooting
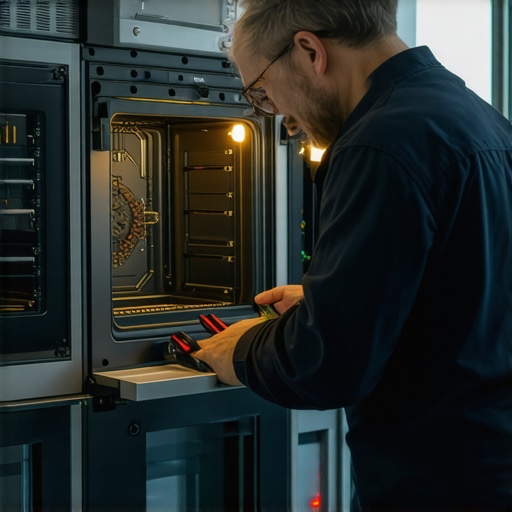
Before diving into complex diagnostics, begin with a thorough visual inspection of your oven. Look for obvious issues like loose wires, burnt components, or debris that could be causing problems. For example, I once found a disconnected wire near the heating element that, once reconnected, instantly resolved my oven’s failure to heat. This quick check can save you hours by catching simple issues early.
Utilize Smart Diagnostic Tools Effectively
Modern ovens equipped with smart features often have diagnostic modes. To activate these, consult your oven’s manual—most involve pressing specific button combinations. For instance, I used the diagnostic mode on my smart oven to run self-tests, which displayed error codes. These codes are your first clues, guiding you directly to the faulty part. Remember, these codes often point to key parts like the temperature sensor or control board. For detailed interpretations, check this guide to effective oven repair diagnostics.
Test Key Components Methodically
Once you have error codes or suspect parts, test them systematically. Use a multimeter to check electrical continuity or resistance. For example, I tested my oven’s temperature sensor by removing it and measuring its resistance. If it doesn’t match the manufacturer’s specifications, it’s faulty. Focus on core components like the heating element, temperature sensor, and control board—these are the common culprits for heating issues. For detailed testing procedures, visit this resource on essential parts diagnostics.
Isolate Problems by Swapping or Bypassing Parts
When possible, temporarily swap or bypass suspect parts to confirm faults. For instance, I swapped my oven’s temperature sensor with a known-good one from another appliance. The oven started heating normally, confirming the sensor was the issue. This method saves time compared to replacing parts blindly. Always ensure safety precautions when bypassing electrical components.
Document Your Diagnostics Process
Keep a detailed record of what you test and the results. This helps avoid repeating steps and clarifies the problem for future reference. I used a simple notebook to jot down resistance readings and error codes, which streamlined my repair process. Plus, if you need to consult a professional later, detailed documentation makes communication faster.
Use Replacement Parts Strategically
Order key parts identified during diagnostics—like heating elements, sensors, or control boards—before starting the repair. This minimizes downtime. For example, I ordered a replacement heating element after confirming it was faulty, which allowed me to complete the repair in one visit. For reliable parts, review this guide on essential parts solutions.
Many DIY enthusiasts and homeowners assume that the most obvious issues are the only culprits when it comes to oven malfunctions. However, this oversimplification often leads to overlooked nuances and common myths that can sabotage repair efforts. Let’s dig deeper into the unstated pitfalls and advanced nuances that trip up even experienced DIYers.
Debunking the Myth: More Parts Equals Better Repair
A widespread misconception is that replacing more parts will automatically fix the problem. In reality, this approach can lead to unnecessary expenses and further issues. For example, replacing the entire control board without proper diagnostics might mask the real issue, such as a faulty sensor or wiring problem. Accurate diagnostics focus on testing specific parts rather than wholesale replacements, which is more cost-effective and efficient. For expert guidance, visit this diagnostic guide.
The ‘Oops’ Factor: Ignoring the Control Board’s Role
One of the most overlooked nuances is the control board’s role in oven failures. Many assume that if an oven doesn’t heat, the heating element is at fault. But in advanced models, the control board acts as the brain, managing power supply, sensor signals, and safety protocols. A malfunctioning control board can cause heating issues, error codes, or erratic behavior. Ignoring this component can lead to misdiagnosis and unnecessary part replacements. To understand how to test this critical part, see this resource on essential parts.
What Advanced DIYers Need to Know: The Nuance of Error Codes
Many people rely solely on error codes displayed by smart ovens, but these codes are often generic and require interpretation. A code indicating a ‘temperature sensor fault’ might also be caused by wiring issues or a faulty control board. Advanced troubleshooting involves testing the entire signal chain, from sensor to control board to wiring harness, rather than replacing parts based on code alone. This nuanced approach reduces guesswork and streamlines repairs. For detailed diagnostic strategies, explore this expert guide.
Have you ever fallen into this trap? Let me know in the comments. Mastering these advanced nuances ensures that your repairs are both accurate and cost-effective, saving you time and money in the long run.
How do I maintain my oven over time?
Maintaining your oven for long-term performance requires a combination of the right tools, regular inspections, and strategic cleaning. Personally, I rely on a few specific tools that have proven invaluable in diagnosing and preventing issues before they escalate. One of my favorite tools is a high-quality digital multimeter, which allows me to quickly test electrical components like sensors and control boards. I prefer the Fluke 117, known for its accuracy and durability, especially when testing sensitive oven parts. Regularly checking continuity and resistance helps me catch failing parts early, saving significant repair costs.
Another essential tool is a laser thermometer, such as the Etekcity Lasergrip 774, which I use to monitor the oven’s internal temperature during operation. This helps identify temperature inconsistencies that could indicate sensor or heating element problems. Additionally, a set of precision screwdrivers simplifies disassembly and reassembly, minimizing accidental damage and ensuring a secure fit after repairs.
For cleaning and preventative maintenance, I recommend a good quality vacuum with a nozzle attachment to remove dust and debris from behind panels and around sensors. Keeping these areas clean prevents overheating and false error codes. A soft, lint-free cloth with a mild cleaning solution is also helpful for wiping down accessible components without risking damage.
Prediction: Where is oven maintenance heading in the future?
Looking ahead, I believe the integration of smart diagnostics and IoT (Internet of Things) in kitchen appliances will revolutionize oven maintenance. Future ovens will likely feature built-in sensors that continuously monitor component health and alert homeowners or technicians before failures occur. This proactive approach will drastically reduce downtime and repair costs. Additionally, advancements in AI-driven diagnostics could guide even novice DIYers through complex troubleshooting steps via smartphone apps, making maintenance more accessible and less intimidating.
Try this advanced tip to keep your oven working longer
One powerful technique I recommend is regularly updating your oven’s firmware if it’s a smart model. Manufacturers often release updates that optimize performance, fix bugs, and improve diagnostics. To do this, connect your oven to your Wi-Fi network and follow the manufacturer’s instructions for firmware updates. This small step can prevent many software-related issues and extend the lifespan of your appliance. For more detailed maintenance strategies, check out this comprehensive guide.
The Hardest Lesson I Learned About Oven Diagnostics
One of my biggest takeaways was realizing that over-relying on complex tools can sometimes obscure simple solutions. I once spent hours replacing parts based solely on error codes, only to discover a loose wire was the real culprit. Simplifying diagnostics by starting with visual inspections and basic tests can save a lot of time and money.
3 Myths About Oven Repairs That Held Me Back
I used to believe that more parts replaced meant faster repairs, but that’s a myth. Accurate diagnostics focus on testing key components like the heating element, sensor, and control board. Another myth is that control boards are rarely at fault, but in advanced models, they often manage heating functions and can cause failures if faulty.
What Experts Won’t Tell You About DIY Oven Fixes
Many professionals know that understanding error codes in smart ovens requires nuanced troubleshooting. These codes often point to wiring issues or sensor faults rather than just the obvious parts. Investing time in learning how to interpret these signals can make your DIY repairs much more effective.
Curated Recommendations for Smarter Repairs
My Essential Toolkit for Oven Diagnostics includes a high-quality digital multimeter like the Fluke 117, which I trust for its accuracy. I also recommend a laser thermometer such as the Etekcity Lasergrip 774 for monitoring internal temperatures during troubleshooting. For detailed diagnostics, the comprehensive guides at this resource have been invaluable.
Your Turn to Take Control of Your Oven Repairs
Mastering the diagnostic process and understanding key parts can empower you to fix your oven faster and more reliably. Whether you’re tackling minor issues or complex faults, these insights will help you become more confident in your DIY skills. Remember, every repair is a learning opportunity—so don’t hesitate to get started!
Have you ever struggled to identify the root cause of an oven malfunction? Share your experience below and let’s learn together!
Benjamin Carter
This article really hit home for me, especially the part about avoiding unnecessary replacements. I once tried replacing my control board without proper diagnosis, only to find out later that a faulty temperature sensor was causing the issue. It’s so easy to jump straight to the most expensive part, but as the article explains, testing and diagnostics save not only money but time too. I’ve started using a multimeter more consistently now, and it’s made a huge difference in my repair success rate. One thing I’d love to learn more about is the best ways to interpret error codes, especially on newer smart ovens. Does anyone have tips for decoding these codes effectively without being overwhelmed? I think with a little more knowledge on reading those signals, many DIY repairs could be done more confidently and accurately.