There was a morning not too long ago when I nearly lost it over a stubborn dishwasher rack. It was one of those days where everything that could go wrong did—throwing dishes in only to watch them jostle, scrape, and sometimes even dance out of place. That frustrating squeak and the broken wheel cycle felt like a tiny betrayal from my trusty appliance. Sound familiar?
As I wrestled with that rack one more time, I realized I wasn’t alone in this struggle. Many of us are facing issues with dishwasher racks, especially when the wheels that help us load and unload turn into mini hurdles. The good news? There’s a surprisingly simple fix that can make your loading experience smoother and less chaotic. Today, I’ll walk you through how to handle those worn-out or broken dishwasher rack wheels, so your dishes stay in place—and your patience stays intact.
Don’t Let Rack Wheel Woes Ruin Your Loading Routine
The racks in our dishwashers are like the unsung heroes—it’s easy to overlook them until they start acting up. When those wheels get damaged or misaligned, it’s not just about an inconvenient squeak; it’s about the frustration of uneven loads, dishes falling out, or the rack getting stuck. These might seem like small nuisances, but they can mess with your entire cleaning performance. Plus, I’ve learned that ignoring these issues can escalate, leading to more costly repairs or replacements down the line.
Fixing or replacing dishwasher rack wheels is a task within reach—often cheaper and faster than calling in a professional. Trust me, I’ve made plenty of mistakes early on, like trying to force a stubborn wheel or buying generic parts without verifying compatibility. Those missteps just added to the headache. Instead, taking a step back and understanding the true cause of the problem, along with the right parts, makes all the difference. Curious about how to get your dishwasher back to top shape? Let’s dive into the tips and tricks for a smoother, more reliable load every time.
Is Replacing Dishwasher Rack Wheels Really Worth It?
I used to think these tiny wheels were disposable, but I learned the hard way that a small investment in quality replacement parts can pay off big in durability and performance. Early mistakes, like rushing into a repair without proper inspection, taught me to be meticulous. Now, I recommend checking the wheel’s condition carefully—are they cracked, loose, or missing?—before deciding to replace. For more detailed troubleshooting, you might find it helpful to explore guides on related appliance repairs, such as fixing a dishwasher’s spray arm or addressing water inlet issues. Ready to get your hands dirty and restore your dishwasher’s smooth operation? The next section will guide you through sourcing the right parts and tackling the fix with confidence.
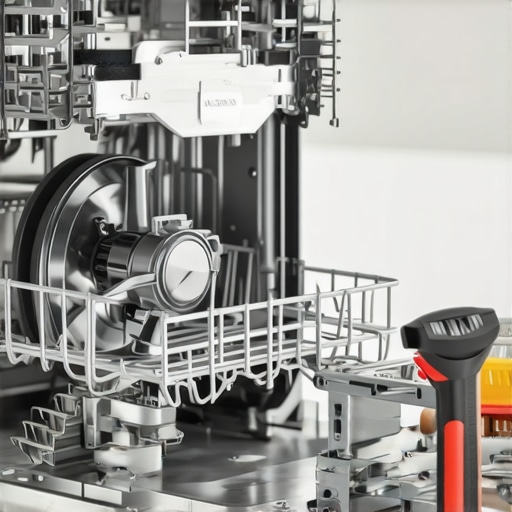
Disassemble the Rack to Access the Wheels
Start by removing the dishwasher rack from its tracks, pulling it out slowly. Turn the rack upside down to locate the wheels—these are usually at the front or sides of the rack’s rails. Use a screwdriver or pliers to gently detach any retaining clips holding the wheels in place, ensuring not to force or break fragile components. I remember once forcing a stubborn wheel and ending up with a broken clip, which prolonged the repair. Carefully inspect the wheels for cracks, chips, or missing parts.
Diagnose the Problem: Worn, Cracked, or Missing Wheels
Check each wheel individually—wheels should spin freely without wobbling or resistance. Spin them manually; if they wobble, squeak, or don’t turn smoothly, it indicates wear or damage. Sometimes, wheels seem fine externally but are attached loosely, causing misalignment. In one instance, I noticed a wheel that looked intact but was loose; securing it firmly restored smooth movement. For a more comprehensive check, consider testing the wheels’ attachment points or exploring related issues like track alignment or bent rails.
Remove Damaged Wheels Carefully and Keep Track of Parts
Once identified, detach the broken wheels using pliers or a screwdriver, gently prying them off. Keep all the small parts—clips, retainers, and wheels—in a tray to avoid losing components. Matching the damaged parts with new replacements ensures compatibility. I once bought generic wheels without verifying the size, which led to fitting issues. Always double-check part numbers or bring the old wheel to the store for precise matching.
Select the Right Replacement Parts for Longevity
Choosing quality replacement wheels is critical. Opt for parts made from durable, heat-resistant plastics or rubber compounds specifically designed for dishwashers. Check the manufacturer’s specifications for your dishwasher model or consult the parts diagram. Low-quality wheels may crack sooner, leading to repeated repairs. For guaranteed compatibility, explore online guides or OEM options—if unsure, read reviews or consult a professional. Doing so saved me from a recurring problem that plagued my dishwasher until I switched to premium parts.
Install the New Wheels and Test the Assembly
Place the new wheels into the track or attachment point, ensuring they click or snap securely into place. Gently spin each wheel to verify smooth operation and proper installation. Reattach any clips or retainers that hold the wheels. Reinstall the rack by sliding it carefully back into the tracks, checking that the wheels align and roll freely without resistance. Testing the rack after reassembly helps confirm the fix—if it still jams or wobbles, re-examining the setup might be necessary. I once overlooked a misaligned wheel and ended up with jammed racks; patience during reinstallation prevents such setbacks.
Maintain Your Dishwasher Racks to Prevent Future Failures
Regularly inspect the wheels and tracks every few months to catch early signs of wear. Clean any debris or mineral deposits that can hinder movement—a task made easier if you remove the rack periodically. Using a mild vinegar solution can dissolve mineral buildup, ensuring wheels spin freely. Proper maintenance not only extends the lifespan of your wheels but also improves your dishwasher’s overall performance. Remember, a little preventive care now can save you from costly repairs later. If you ever encounter persistent issues, you might want to review related parts like the spray arms or water inlet valves, which also impact load performance—check out guides on repairing spray arms or motor and pump fixes.
Many DIY enthusiasts and even seasoned professionals often operate under misconceptions about diagnosing and repairing appliances. One prevalent myth is that a simple visual inspection always reveals the root cause of a problem. In reality, some issues are concealed beneath the surface, requiring nuanced understanding and advanced testing methods. Relying solely on external signs can lead you astray, causing unnecessary part replacements or unsafe repairs. For instance, a dishwasher might exhibit loud noises, but the culprit could be a worn pump bearing hidden behind accumulation of debris—something that isn’t obvious at first glance.
Another common mistake is assuming that all replacement parts are created equal. Cheap, generic parts might save you a few bucks initially but can compromise the long-term performance of your appliance. Quality parts, especially OEM components, are designed to withstand the specific stresses of your appliance’s system. When it comes to critical components like oven sensors or control boards, investing in genuine parts can prevent recurring failures that stem from inferior replacements.
Now, let’s tackle a critical trap many fall into: misdiagnosing based on symptoms alone without proper testing. For example, a boiler or oven that isn’t reaching the desired temperature might tempt you to replace the thermostat. However, as outlined in this guide, the sensor or even the control board could be at fault, not just the thermostat. Proper diagnosis often requires comprehensive testing—like verifying sensor signals with a multimeter or checking for control board faults—before committing to parts replacement. This depth of analysis saves time, money, and frustration.
Why do some diagnostics lead professionals astray?
One reason is the reliance on assumption rather than data. Like in medical diagnostics, appliance repair requires eliminating guesswork through systematic testing. Jumping to conclusions based on a perceived pattern—say, replacing a heating element because an oven won’t heat—without testing can lead to repetitive, unnecessary repairs. Remember, components like heating elements and sensors can fail intermittently, and testing with proper tools helps verify their actual condition, avoiding the ‘oops’ moments that plague many repairs. A good rule of thumb is to perform dedicated, targeted tests—such as checking resistance or voltage—not just swapping parts until one sticks. Interested in honing your diagnostic skills further? Consider exploring professional diagnostic tests for more insight.
Have you ever fallen into this trap? Let me know in the comments. Remember, sharp diagnosis is the cornerstone of efficient repair—don’t take shortcuts that tempt you to patch symptoms instead of curing the cause.
How do I keep my appliances operating efficiently over time?
Maintaining your dishwasher and oven isn’t just about fixing problems as they arise—it’s about establishing a routine that extends the lifespan of your appliances and keeps them performing at their best. One crucial aspect is investing in high-quality diagnostic tools. For example, I personally rely on a digital multimeter capable of precise resistance and voltage measurements. This device allows me to quickly verify components like temperature sensors and control boards without guessing, saving time and preventing unnecessary part replacements. Additionally, a dedicated appliance inspection mirror can help access hard-to-see areas inside the oven or behind the dishwasher, making inspections safer and more thorough.
Software-wise, I recommend using diagnostic apps compatible with your appliance brands, which provide step-by-step troubleshooting guides right on your tablet or phone. These tools often integrate with manufacturer’s manuals and highlight common failure points, facilitating a faster diagnosis process. As technology advances, I predict smarter diagnostic tools—possibly utilizing AI—that can analyze patterns and suggest specific repairs, reducing the complexity of DIY repair work.
Tools I recommend for long-term appliance care
One of my top recommendations is a thermal imaging camera. It enables me to identify hotspots and uneven heat distribution in ovens or dishwashers, which could indicate faulty wiring or failing elements. Though initially expensive, I find it invaluable for preventive maintenance, catching issues before they lead to costly breakdowns. For parts, I prefer OEM components for critical replacements such as water inlet valves or control boards—they’re built to withstand the rigorous demands of daily use and are less likely to fail prematurely. You can often find these on reputable online stores, and they come with detailed compatibility charts to ensure perfect fit.
In the future, I believe appliance diagnostics will become even more integrated with smart home systems, providing real-time alerts and maintenance reminders. This shift will empower homeowners to address issues early, minimizing downtime and repair costs. To get ahead, I suggest trying out a digital multimeter combined with regular visual inspections—this simple yet powerful combo can distinguish between minor issues and serious failures, helping you decide whether to repair or replace a part.
How do I maintain my appliances over time without wasting resources?
Implementing a scheduled maintenance routine is key. Regularly cleaning filters, inspecting visible parts like door seals, and checking water supply hoses for leaks can prevent many common problems. Use CBD-approved cleaning solutions designed for appliance interiors and avoid harsh chemicals that could degrade rubber or plastic components. For instance, periodically running a dishwasher cleaning cycle with a descaling agent prevents mineral buildup that can clog spray arms or water valves. When troubleshooting, consult comprehensive guides—reviewing professional diagnostic tests can reveal underlying issues that simple visual checks might miss.
Don’t forget the importance of suspect testing. When you encounter a malfunction, use your multimeter to verify the condition of specific parts like sensors or relays instead of replacing components blindly. This method saves money and reduces waste, aligning with eco-friendly practices. Remember, consistent maintenance coupled with precise diagnostics is your best approach for long-term appliance reliability. Try testing your oven’s temperature sensor with this detailed guide next time your oven seems off—it’s a small step that can prevent big headaches.
3 Unexpected Truths I Discovered About Dishwasher Fixes
- Never underestimate the importance of inspecting the attachment points; a loose wheel is often the culprit behind misaligned racks, and tightening it can save hours of unnecessary replacements.
- Opting for high-quality OEM parts might seem costly at first, but the durability and smooth operation they provide make them a penny-wise choice in the long run.
- Patience during reassembly is key—rushing can cause misaligned wheels or damaged clips, leading to more frustration and repeat repairs.
- Realizing that many common dishwasher rack issues stem from track misalignment or debris buildup shifted my entire approach—from replacement to regular maintenance routines.
- Understanding that proper diagnosis relies on tactile tests, like manually spinning wheels or checking for wobble, has empowered me to avoid unnecessary part swaps.
Tools and Resources That Changed How I Tackle Appliance Repairs
- A sturdy digital multimeter helps me verify electrical components like sensors and switches accurately, saving time and money.
- OEM replacement parts from reputable suppliers ensure compatibility and reliability, preventing recurrent failures.
- The comprehensive guides available on ApplianceBargainz, such as the detailed steps for fixing a dishwasher’s spray arm or water inlet, give me confidence in complex repairs.
- For preventive care, using mineral deposits dissolvers and regular cleaning cycles keeps my dishwasher running smoothly without unexpected breakdowns.
Your Next Move in Appliance Care Starts Now
Armed with these insights and tools, you can approach dishwasher rack repairs with confidence and precision. Remember, understanding your appliance deeply transforms repairs from dreaded chores into manageable tasks that extend your device’s life. Don’t hesitate to try diagnosing issues with patience, the right parts, and a good toolkit by your side. What’s the first repair you’re planning to tackle? Share your plans below and let’s learn together!