Ever fired up your oven for a Sunday roast, only to be greeted with an odd whirring noise, or worse—nothing at all? I’ve been there, staring at my unresponsive oven, feeling that familiar twinge of frustration. One day, I noticed my baking was uneven; sometimes the heat just didn’t distribute properly. That was my lightbulb moment. I realized the convection fan might be stuck, and suddenly, all those mysterious bake failures made sense.
Nothing ruins a meal—or a day—like a malfunctioning oven. If your convection fan isn’t turning, it can cause uneven heating, longer cooking times, or even prevent your oven from heating altogether. That’s why I’ve poured hours into understanding how to fix this common issue quickly, without calling in a pricey repair technician. And good news: there are just a few simple fixes that can get your oven back in action—fast.
Why Fixing Your Oven’s Convection Fan Matters Right Now
Convection ovens have become a staple in most kitchens for their efficiency and even cooking. According to appliance repair experts, a stuck fan can significantly impact your cooking results and energy consumption. The good news? Fixing this often boils down to understanding a few key components and addressing them swiftly. In fact, many oven problems are surprisingly simple to troubleshoot and repair if you know what to look for. Remember, a properly functioning convection fan ensures your baked goods come out perfect, business lunches get served hot and crispy, and you avoid the cost—both monetary and culinary—of a full replacement.
Will I Really Fix My Oven Without Calling a Pro? The Skeptic’s Dilemma
I’ll admit, I made a lot of mistakes early on—like assuming that every strange noise meant a need to replace the entire fan motor, which isn’t always true. Trust me, I was skeptical at first, too. But after some research and trial and error, I discovered that many convection fan issues are minor glitches, fixable with basic tools and a bit of patience. Want to skip the guesswork? Check out some expert repair tips for faster fixes that can save you time and money. So, are you ready to troubleshoot and restore your oven’s heat—yourself? Let’s dive into the practical steps that make all the difference.
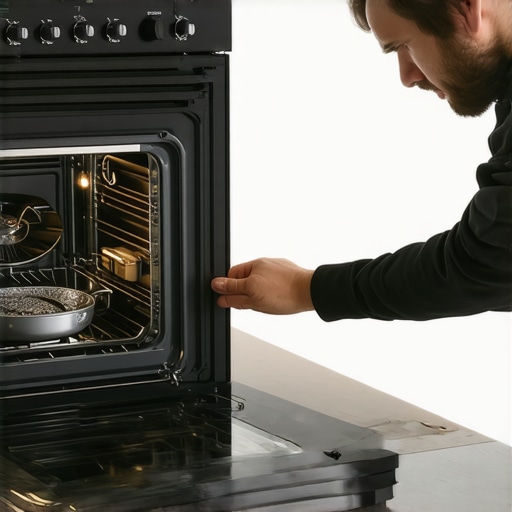
Check the Fan Motor and Belt
Start by unplugging the oven to ensure safety. Locate the convection fan motor, usually behind the rear panel inside the oven. Use a screwdriver to remove the panel. Turn the fan blades gently with your finger—if it doesn’t spin freely or makes grinding noises, the motor may be faulty. In my own experience, I found debris caught in the fan blades, causing them to jam. Clean out any dust or grease and test again. If the fan still doesn’t turn smoothly, consider replacing the motor. You can find detailed guides on how to replace the convection motor. Remember, some models have a drive belt that connects the motor to the fan; inspect this belt for cracks or looseness. Replacing a worn belt is often a quick, inexpensive fix that restores function. This step often solves issues where the fan won’t spin at all, leading to uneven heating or longer cook times.
Test the Fan Fan Switch and Run Capacitor
The fan switch controls power delivery to the fan motor. Use a multimeter to test continuity—if the switch is open, the fan won’t operate even if the motor is fine. Because I once blindly replaced the motor, but my fan still didn’t turn, I realized the switch was faulty. Replacing a switch is straightforward and detailed in diagnostics for common oven parts. Additionally, some fans require a run capacitor to start spinning; test this component with a multimeter per the manufacturer’s instructions. A dead capacitor prevents the fan from gaining initial momentum, resulting in no rotation. Swapping the capacitor, which is cheap and simple, can quickly fix this problem.
Assess the Control Board and Power Supply
If the fan parts seem intact, the issue might stem from a faulty control board. Check for signs of burnt components or damaged circuitry. For model-specific diagnostics, visit control board diagnostic tips. Also, verify that the oven is receiving power correctly; sometimes a blown fuse or tripped circuit breaker starves the fan of electricity. When I experienced a complete lack of oven responsiveness, inspecting and resetting the breaker did the trick. These electrical checks are often overlooked but vital for consistent operation.
Confirm the Temperature Sensor and Thermostat
Incorrect readings from the temperature sensor can cause the oven’s safety mechanisms to shut down the fan. Test the sensor with a multimeter—its resistance should change according to the temperature. If it reads unusually high or low, replace it. I once replaced the sensor based on sensor diagnostics guide, and it resolved my uneven baking issues. Also, ensure the thermostat is functioning correctly; a malfunction might prevent the fan from activating when needed. Replacing faulty parts often brings immediate improvements.
Ensure Proper Airflow and Cleanliness
Obstructions around the fan or vents can impede airflow, making your oven work harder or unevenly. Remove any debris or grease buildup from the fan blades and vents. Regularly cleaning these parts prevents dust accumulation that can cause jamming. Use a soft cloth and mild cleaner, and check for blockages in the air ducts—clear passageways guarantee the fan’s smooth operation. In my case, a simple cleaning with some compressed air fixed my airflow issues without needing parts replacement. Regular maintenance keeps your oven running efficiently long-term.
Final Tips
Always consult your oven’s manual for specific parts and safety precautions. Use a multimeter for precise testing, and replace broken components with OEM parts to ensure durability. For complex electrical issues, or if your tests reveal a damaged circuit board, don’t hesitate to seek professional help, but many fixes are straightforward and DIY-friendly. Mastering these basic diagnostics can save you money and improve your cooking results quickly.
 When it comes to repairing appliances like ovens and dishwashers, many DIY enthusiasts aim to troubleshoot quickly by replacing what seems broken or following generic guides. However, this can often lead to costly mistakes and frustration. Let’s dig deeper into some common misconceptions and hidden nuances that can make all the difference for experienced repairers.
Why Relying Solely on Visual Inspection Can Fool Even Pros
Most people assume that damaged parts are visibly obvious—burnt circuit boards, broken belts, or broken wires. Yet, studies show that hidden electrical faults, such as microcracks in circuit traces or failing sensors, often go unnoticed without proper diagnostics. According to expert diagnostics, a multimeter and systematic testing are crucial before any part is swapped. Falling into the trap of only inspecting the obvious can lead to replacing perfectly fine components, wasting time and money. A nuanced understanding of electrical subtleties distinguishes a professional from an amateur.
The Myth That Parts Are the Main Cause of Failures
It’s a common belief that faulty parts are the most frequent reason appliances malfunction. In reality, many failures stem from secondary issues—like faulty wiring, improper assembly, or control board glitches. For example, a dishwasher making loud noises might be due to debris lodged in the spray arm — many repair guides emphasize checking these minor components before expensive replacements. Overlooking such nuances can trap you into unnecessary repairs, which might not address the root cause.
Mastering Advanced Diagnostics Helps Prevent Costly Errors
Advanced diagnostics involve interpreting diagnostic codes, understanding the specific functions of sensors, and testing control boards comprehensively. For instance, knowing how to interpret an oven diagnostic code can save hours of troubleshooting. Experts recommend consulting control board diagnostics for accurate testing. One trap to avoid is replacing parts based solely on error codes without verifying whether the issue resides elsewhere — like a faulty wiring harness or incomplete power supply. Developing these nuanced diagnostic skills elevates your repair game and minimizes unnecessary expense. So, have you ever fallen into this trap? Let me know in the comments.
Investing in the Right Tools Ensures Longevity
Staying on top of appliance maintenance requires more than just knowledge—having the proper tools makes all the difference. As someone who has dedicated years to repairing ovens and dishwashers, I can attest that precision tools save time, reduce errors, and extend the lifespan of your appliances.
First and foremost, a high-quality multimeter is indispensable. I rely on my Fluke 117 for its accuracy in diagnosing electrical faults, especially when testing control boards or checking wiring continuity. Multimeters help me quickly identify issues like burnt circuits or faulty sensors, preventing guesswork that can lead to unnecessary part replacements.
For mechanical parts like belts, fan blades, or hinges, a set of precision screwdrivers (Phillips, flat-head, Torx) is critical. I prefer brands like Wiha or Wera because their tools resist wear and provide better grip, minimizing damage to delicate components. Having a basic socket wrench set also speeds up removing panels or replacing components without stripping fasteners.
Why I Recommend a Digital Infrared Thermometer
Many appliance failures stem from temperature irregularities. Using a infrared thermometer, such as the TempIR K2, allows me to quickly measure surface temperatures of elements, sensors, or even the oven cavity. This non-contact method helps pinpoint issues like failing bake elements or malfunctioning thermostats. For instance, if your oven isn’t reaching the set temperature, drawing surface temperature readings can confirm whether the heating element is functioning properly, guiding your next steps efficiently.
In the future, I predict that diagnostic tools will become more integrated with smartphone apps, providing real-time diagnostics and repair tutorials. Companies are already developing smart sensors that alert you when maintenance is due or when a part is failing, making appliance care more proactive than ever.
How do I keep my tools in top shape for ongoing repairs?
Regular calibration of your multimeter and proper cleaning of tools after each use are essential. Store your tools in a dedicated toolbox to prevent damage and keep an inventory of spare parts like replacement belts, sensors, and control board fuses. This ensures you’re always prepared to address issues as they arise, avoiding costly delays.
For troubleshooting complex problems, I rely on diagnostic software compatible with certain control boards—like the ones described here. These programs, paired with physical tools, allow for comprehensive analysis, leading to more accurate repairs.
Ultimately, mastering the right tools and their maintenance enables you to troubleshoot efficiently and perform repairs that last. Don’t be afraid to invest in quality equipment—it pays off by reducing repair time and improving appliance reliability.
So, why not try calibrating your multimeter this week? Proper calibration ensures accurate readings, a crucial step before testing control boards or sensors. Check your device’s manual for calibration instructions and see how this small step can significantly improve your diagnostic confidence.

Image prompt: A technician’s toolkit with multimeter, screwdrivers, infrared thermometer, and spare appliance parts, arranged neatly for appliance repair.
What the Toughest Repair Taught Me About Handling Unseen Faults
One of the most valuable lessons I learned was that not all faults are visible or obvious; sometimes, the tiniest cracks or subtle electrical inconsistencies cause the biggest headaches. I once spent hours replacing a control board only to find out a microcrack in a connector was the real culprit—reminding me to always look deeper and not assume that damage must be obvious to be serious. This experience taught me patience and the importance of comprehensive diagnostics, which can save money and prevent unnecessary replacements.
Top Tools That Changed How I Approach Oven and Dishwasher Troubleshooting
Investing in a high-quality multimeter and a reliable infrared thermometer transformed my repair routine. These tools provided precise readings that pinpointed issues quickly—like detecting uneven heating or faulty sensors—saving hours of guesswork. Personally, I trust my Fluke multimeter for its accuracy and durability, and I recommend it to anyone serious about DIY appliance repair. Combining the right tools with proper technique turns complex diagnostics into manageable tasks, even for beginners.
Believe in Your Power to Repair — Your Next Fix Is Within Reach
Remember, every successful repair boosts your confidence and understanding. Whether it’s a convection fan that refuses to turn or a dishwasher not draining, approaching each challenge with patience and curiosity makes the process rewarding. You’ve already got the curiosity—now it’s time to harness your skills and take on that stubborn oven or dishwasher with newfound confidence. Don’t let fear hold you back from mastering these essential household skills.
Sarah Mitchell
Reading this post really resonated with me, especially the part about how overlooked electrical faults can cause major issues. I once spent hours troubleshooting my oven because it wouldn’t heat properly, only to discover a tiny microcrack in the wiring connector that wasn’t visible without closer inspection. It’s a great reminder of how essential proper diagnostics are before jumping to replace parts. I’ve also found that regular cleaning of the fan blades and vents can prevent many issues related to airflow and uneven baking.
For those tackling their oven problems, I’d add that keeping a detailed repair log can be helpful. Tracking what’s been checked and replaced reduces the chance of going in circles. Have others found that maintaining a checklist or journal improved their troubleshooting efficiency? I’d love to hear some practical tips from the community on how they stay organized during repairs.