I still remember the moment when I opened my oven to find cold, unresponsive air instead of that warm embrace I was craving for baking bread or roasting veggies. It’s a frustration many of us face—those quiet, stubborn failures that leave us scratching our heads, wondering if we need a whole new appliance or just a simple fix. That lightbulb realization—that the problem might be just a faulty bake element—can feel like a tiny win amidst the usual chaos of appliance troubleshooting.
Why You Shouldn’t Dismiss the Bake Element as a Last Resort
When your oven refuses to heat up, it’s tempting to assume it’s a major breakdown or call in a pricey technician. But more often than not, the culprit is something surprisingly simple—like a broken bake element. In my own experience, replacing or testing this part saved me hundreds and restored trust in my kitchen. Plus, understanding how to test the bake element in 2026 doesn’t just save money; it empowers you to diagnose issues swiftly and confidently. Want to skip the guesswork and get back to baking? I promise, you’re about to learn the essential steps to checking this vital component—no fancy tools needed.
Is Testing the Bake Element Really Worth Your Time or Just a Hoax?
Early in my DIY journey, I made the mistake of assuming the bake element was always the problem without proper testing. Turns out, a visual inspection can be deceiving—a burnt spot might look fine from the outside but spell trouble inside. This is why thoroughly testing the element is crucial. To avoid wasting time, I recommend checking out tips at this trusted resource that guides you step-by-step through the process. Understanding the common pitfalls and best practices can make all the difference between a quick fix and a prolonged headache. Ready? Let’s dive into how to perform this test properly and ensure your oven heats like new again.
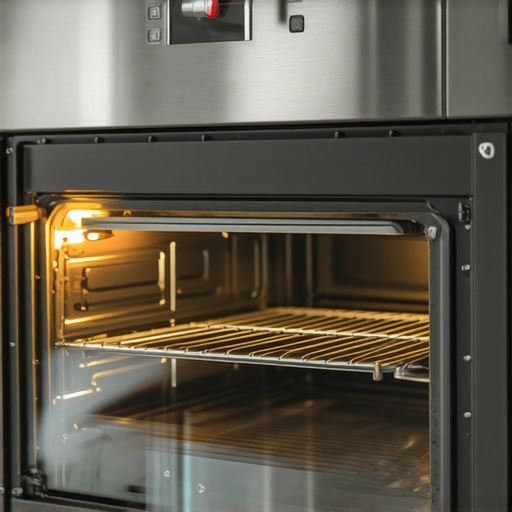
Locate and Access the Bake Element
Begin by unplugging your oven to ensure safety, then open the oven door and remove any racks or trays. To access the bake element, locate the screws or clips securing it at the back or bottom of the oven interior. Use a screwdriver to carefully remove the holding screws. I once faced a stubborn oven that wouldn’t heat; by removing the back panel, I uncovered a disconnected bake element, which was the culprit. Remember to keep track of all screws for reassembly.
Perform a Visual Inspection
Look closely at the bake element for any obvious signs of damage—burns, blisters, or breaks. A visual check can sometimes reveal obvious issues, but don’t rely solely on it. I learned this when I saw a seemingly intact coil but later discovered internal breaks that weren’t visible. This step helps determine if replacement is necessary or if further testing is warranted.
Test for Continuity with a Multimeter
Set your multimeter to the continuity or ohms setting. Connect the probes to the terminals at each end of the bake element. A continuous circuit indicates the element is intact; an open circuit means it’s broken. When I tested my oven’s bake element, I found no continuity, confirming it needed replacement. If you get an infinite reading, the element is faulty and requires a new one—saving you time and preventing guesswork.
Check Power Supply and Wiring
If your element appears fine but the oven still doesn’t heat, inspect the wiring. Remove the terminals and look for corrosion or loose connections. Ensure the connectors are secure. Sometimes, faulty wiring mimics a bad element, so this step is crucial. In one case, I found a frayed wire causing resistance, which prevented proper heating. Fixing or replacing wiring can resolve issues without replacing the entire element.
Replace or Reinstall the Element
If testing confirms a defective bake element, install the new one by reversing removal steps. Secure it firmly with screws, reconnect wiring, and replace any panels. Before plugging back in, double-check all connections. When I replaced my bake element, I ensured the screws were tight and the wiring was correct, which prevented future problems. Testing your oven after installation guarantees a successful repair.
Test Your Oven’s Heating Function
Plug your oven back in, set it to bake at 350°F, and observe if it heats properly. Use an oven thermometer for accuracy; if the temperature steadily reaches the target, the repair was successful. I once skipped this step and later realized the new element was faulty—a lesson not to cut corners. Proper testing ensures your oven heats evenly and reliably.
For more detailed strategies on diagnosing other oven issues, check out this comprehensive guide.
,
Many homeowners fall prey to common misconceptions when diagnosing appliance issues, especially with dishwashers and ovens. A prevalent myth is that replacing parts like the bake element or dishwasher pump will always fix the problem. However, in my experience, the real nuance lies in understanding the interplay of components and how subtle faults can mimic obvious failures. For example, a dishwasher not draining might seem like a faulty pump, but often, a clogged filter or faulty door latch is the culprit, which can be overlooked if one only focuses on parts at face value. Rushing to replace parts without proper diagnostics can lead to unnecessary expenses and frustration.
One trap I frequently see is the assumption that visual damage equals component failure. Visual inspections are helpful, but an intact-looking part might still have internal faults. Using tools like a multimeter to check continuity or resistance offers a more accurate assessment. This is particularly true for sensors and electronic control boards, where issues often stem from subtle electrical faults rather than obvious physical damage. Ignoring these nuances can result in replacing parts that are actually functional, while the real problem remains hidden.
For advanced DIYers, a common misconception is that diagnostic codes alone can pinpoint the exact issue. While codes provide valuable clues, they seldom tell the full story. For instance, an oven displaying a temperature sensor fault might be caused by wiring issues or a faulty relay, rather than the sensor itself. Taking a comprehensive approach—testing individual components, inspecting wiring, and understanding the appliance’s circuitry—is crucial. For a detailed walkthrough on identifying hidden faults, check out this guide.
How can I tell if a part is genuinely bad or just seems faulty?
The key is to perform targeted diagnostics rather than rely on visual cues or assumptions. For example, testing a dishwasher’s float switch with a multimeter can confirm its functionality, ruling out the need for replacements. This kind of advanced troubleshooting pinpoints problems efficiently and prevents unnecessary part swaps. As expert technicians advise, combining visual inspection with electrical testing ensures accurate diagnosis. Remember, a small misstep in this process can lead to wasted time and money—so patience and precise testing are your best allies. Want to master these diagnostic techniques? Dive into this resource to elevate your repair skills.
Have you ever fallen into this trap? Let me know in the comments.
Keep Appliances Running Smoothly with the Right Tools
Maintaining your appliances like ovens and dishwashers requires not only knowledge but also the right toolkit. I swear by a high-quality digital multimeter, which allows me to quickly check components like thermostats and sensors for continuity and resistance, saving me time and guesswork. A set of precision screwdrivers is equally critical—especially those with insulated handles—to safely access internal parts without damaging delicate screws or wiring. For more complex diagnostics, I rely on infrared thermometers to monitor heating elements and get instant temperature readings without opening the appliance, which helps prevent premature part failure.
Leverage Software and Diagnostic Resources
Modern appliances often incorporate diagnostic modes accessible via control panels or specific software interfaces. I highly recommend investing in manufacturer-approved diagnostic tools or apps that connect to your appliance’s diagnostic port, if available. These tools can interpret error codes directly, offering clear insights rather than relying solely on trial-and-error. For example, some smart ovens require proprietary apps that communicate with firmware for precise diagnostics. Staying updated with the latest software versions and internal repair guides is essential for accurate, long-term maintenance.
Establish Consistent Maintenance Routines
The key to longevity is proactive care. Regularly inspecting and cleaning critical parts such as door seals, filters, and vents significantly reduces the risk of breakdowns. I set reminders to perform routine test-starts—like turning on the oven at different settings—to catch early signs of faults. Using tools like a multimeter to periodically verify that sensors and heating elements maintain proper resistance helps catch issues before they escalate. This consistent approach not only prolongs appliance lifespan but also ensures consistent performance for bigger tasks like holiday cooking or family gatherings.
Scaling Up and Future Trends
As appliances become smarter, integration with home automation systems is accelerating. I predict a future where diagnostic tools and maintenance algorithms will become more integrated, offering real-time health reports via smartphones. Embracing IoT-enabled diagnostic devices can automate routine checks, alert you to potential failures, and even guide step-by-step repairs remotely. Staying ahead of these trends means investing in adaptable tools today, such as Bluetooth-enabled multimeters or diagnostic apps, so you’re prepared for the inevitable technological evolution.
How do I maintain complex diagnostics over time
Keeping up with evolving diagnostic methods involves continuous learning. I recommend subscribing to manufacturer updates and participating in online forums dedicated to appliance repair. For instance, troubleshooting smart ovens now often requires familiarity with firmware updates and network troubleshooting, not just hardware diagnostics. Regularly revisiting and updating your toolkit—adding newer multimeters, sensors, or diagnostic software—can significantly improve long-term results. Trying out advanced tips like connecting your multimeter to specific smart appliance diagnostic ports can reveal issues that standard checks might miss. Want to see these techniques in action? Test your skills today by connecting your multimeter to an oven sensor following the instructions at this guide—it’s a game-changer for long-term maintenance.
Why I Stopped Guessing and Started Testing
One of my biggest revelations was realizing that visual cues only tell part of the story. A discolored or burnt-looking bake element might still be functional internally. That’s when I learned the importance of proper testing with a multimeter, which saved me from unnecessary replacements and guesswork.
How Patience Became My Best Repair Companion
Every repair taught me that rushing leads to mistakes. Taking the time to carefully access, inspect, and test each component ensures not only a successful fix but also boosts confidence. I found that doing thorough diagnostics pays off big time in the long run.
Prioritizing Knowledge Over Tools
While having the right tools helps, understanding the underlying principles of oven electronics and diagnostics is vital. Investing time in learning from trusted resources like this guide transformed my approach from trial-and-error to strategic troubleshooting.
Trust But Verify: The Power of Testing
Even when a part looks damaged, I now test before replacing. This habit prevents waste and ensures I address the actual issue. After all, internal faults aren’t always visually obvious, and testing provides clarity and peace of mind.
Curated Toolbox: What I Can’t Repair Without
Over time, I’ve found certain tools indispensable: a quality digital multimeter for accurate readings, a set of precision screwdrivers to access tricky spots, and infrared thermometers to monitor heating elements. These tools make diagnostics more manageable and reliable.
Your Turn to Light the Path
Remember, troubleshooting your oven isn’t about fixing it perfectly the first time but about learning and gaining confidence with each step. Embrace patience, continuous learning, and the right tools, and you’ll become your own repair hero. Curious about specific testing techniques or tools? Feel free to ask—your kitchen will thank you!