Ever been halfway through baking your favorite dish when your oven suddenly conks out? That frustrating moment when your trusted kitchen hero decides to quit without warning. I’ve been there, scratching my head, thinking I’d have to call in a costly repair technician. But here’s the lightbulb moment I want to share — the secret to fixing your oven quickly and affordably lies in understanding the right diagnostics and the best parts to use in 2025.
Why Diagnosing Your Oven Correctly Can Save You Big Bucks
When my oven broke down last year, I initially thought it was a simple fuse issue. Turns out, I was mistaken. The real culprit was a faulty heating element, but I only found out after I started digging into the diagnostics. Accurate diagnosis means you don’t waste money replacing parts that are still good. Plus, it speeds up the repair process significantly. If you want to avoid the endless trial-and-error game, mastering diagnostics is the way to go. For a comprehensive guide on essential parts and how to troubleshoot effectively, I recommend checking out this resource.
Is Relying on Top Parts for Your Oven Worth It?
One mistake I made early on was skimping on quality parts. I thought I could get away with cheap replacements, but that only led to more problems down the line. Today, I always choose top-quality diagnostics and parts designed specifically for 2025 models. This not only ensures longevity but also guarantees faster fixes. Remember, a good diagnosis paired with the right parts is the recipe for a smooth repair. Want to see what the latest and greatest parts are? See my top picks here.
Pinpoint the Issue with Precision
When I faced my oven refusing to heat, I didn’t rush to replace parts blindly. Instead, I started with a thorough diagnostic to identify the exact cause. I disconnected the power and checked the control panel for error codes, which often point directly to faulty components. Using a multimeter, I tested the heating element for continuity—if it’s broken, the meter shows no current flow. This step is crucial because replacing a working part is a waste of time and money. For detailed diagnostic procedures, check out this resource.
Use the Right Tools for Accurate Testing
Think of diagnostics like a doctor using the right instruments to diagnose a patient. I kept a digital multimeter, a screwdriver set, and a flashlight handy. When testing components, I carefully accessed the oven’s internal connections, ensuring I didn’t damage delicate wiring. If you’re unsure about your multimeter skills, refer to this guide for expert tips. Proper testing prevents unnecessary replacements and shortens repair time.
Identify Key Parts That Make a Difference
Once I diagnosed the faulty component, I researched the latest top-rated parts for 2025 models. In my case, the heating element was the culprit, so I ordered a high-quality replacement designed specifically for my oven’s brand and model. Using inferior parts can lead to faster wear or even safety hazards. I learned that the right part ensures durability and efficient operation. For the best options, see top repair parts for 2025.
Match Parts Precisely to Your Oven Model
Before ordering, I double-checked my oven’s exact model number and serial code. This step might seem tedious, but it prevents mismatched parts that won’t fit or work correctly. Manufacturers often update parts for newer models, so compatibility is key. Once I confirmed, I ordered from a trusted supplier with a good return policy. This eliminated guesswork and ensured I was getting the right part the first time.
Replace Components Methodically
With the new part in hand, I followed a step-by-step removal process: unplug the oven, remove the back panel, disconnect the faulty element, and install the new one securely. I labeled wires during disassembly to avoid confusion. After reassembling, I tested the oven’s functionality before closing everything up. This careful approach minimizes errors and prevents future breakdowns. For detailed repair steps, review this repair guide.
Test the Repair Before Finalizing
Before declaring the job done, I powered up the oven and monitored its operation. I checked if it heated evenly and responded to control settings. If issues persisted, I re-traced my steps and rechecked connections. This verification saves time and prevents the need for repeat repairs. Remember, patience during testing can make the difference between a successful fix and a recurring problem.
Many DIY enthusiasts and even seasoned homeowners fall prey to misconceptions when it comes to diagnosing oven problems. One of the most widespread myths is that replacing the most obvious faulty part, like the heating element or control panel, will always fix the issue. However, this approach often leads to wasted time and money because the real culprit can be a less obvious component, such as the thermostat or wiring harness. Mastering diagnostic nuances can help you pinpoint problems more accurately, saving you from unnecessary replacements. For instance, understanding how to interpret error codes correctly and testing components with a multimeter are skills that separate a professional repair from a costly guesswork game. For comprehensive insights into diagnostics, check out this guide.
Why Do People Rely on Simplistic Solutions?
It’s tempting to assume that the most visibly damaged part is the root cause, but this is a common trap. This misconception arises because people often overlook the interconnected nature of oven components. A faulty control board, for example, might cause heating issues, but it’s rarely the only problem. Overlooking the subtle signs of secondary issues can result in repeat failures. Advanced diagnostics involve testing electrical continuity, resistance, and voltage across various parts, which most casual DIYers ignore. This is why I recommend investing in a good diagnostic toolkit and learning how to interpret the data correctly. More tips are available in this resource.
Beware of the Safety Net: Relying on Guesswork
Another dangerous misconception is that replacing parts based on symptoms alone, without proper diagnostics, is sufficient. This ‘shotgun’ approach can lead to safety hazards, especially with electrical components. For example, replacing a heating element without testing the thermostat or wiring could cause short circuits or fires. The ‘Oops’ factor here can be costly and dangerous. Advanced troubleshooting requires methodical testing: disconnect power, use a multimeter to check for continuity, and verify correct voltage levels. This disciplined approach minimizes risks and ensures you only replace what’s truly broken. For detailed testing procedures, review this guide.
How Can You Avoid Falling for These Myths?
To truly master oven repairs, it’s crucial to get comfortable with diagnostic strategies and avoid assumptions. Remember, a small misdiagnosis can lead to bigger problems down the line. Always verify symptoms with proper testing, and don’t replace parts just because they look damaged. Consult reputable diagnostic resources and keep your tools calibrated. Being methodical and informed transforms a frustrating repair into a quick, safe fix. Have you ever fallen into this trap? Let me know in the comments.
Maintaining your oven’s performance over time requires more than just good diagnostic skills; it hinges on having the right tools and techniques at your disposal. As we move further into 2025, the landscape of repair equipment evolves, emphasizing precision, safety, and efficiency. Let’s explore the tools I personally rely on and why they’re indispensable for long-term oven maintenance and troubleshooting.
Investing in a Digital Multimeter for Consistent Results
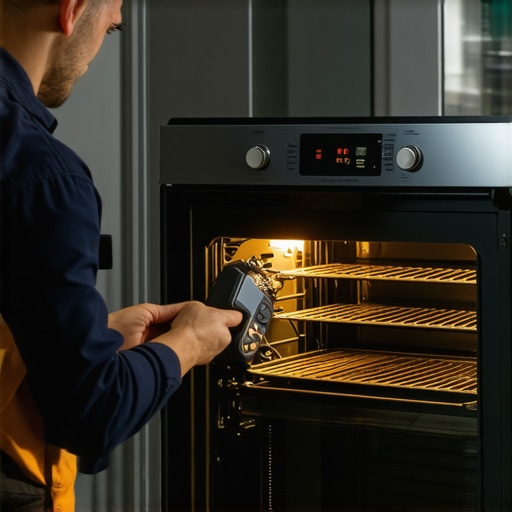
The cornerstone of any repair toolkit is a high-quality digital multimeter. I prefer models that offer auto-ranging capabilities, such as the Fluke 117, because they simplify testing by automatically adjusting to the correct voltage or resistance range. This minimizes user error and ensures accurate readings when checking components like thermostats, heating elements, and wiring continuity. A reliable multimeter helps prevent unnecessary part replacements and guarantees that your repairs are based on precise diagnostics. For beginners, I recommend reading this guide to boost your testing confidence.

Image showing a close-up of a digital multimeter testing an oven’s heating element, emphasizing the importance of precise readings for effective repairs.
Using a Quality Screwdriver Set for Safe Disassembly
Disassembling an oven requires a specific set of screwdrivers, preferably with insulated handles for safety. I rely on a screwdriver kit from Wiha that includes Phillips, flat-head, and Torx drivers. This variety ensures I can access all internal panels without damaging screws or risking electrical shorts. Proper tools make the process smoother, reduce the chance of stripping screws, and protect you from electrical hazards. Remember, a well-maintained screwdriver set is a long-term investment that pays off during every repair.
Applying Thermal Imaging Cameras for Troubleshooting
One advanced tool that I’ve recently incorporated is a thermal imaging camera like the FLIR ONE. This device allows me to visualize heat distribution across oven components in real-time. When troubleshooting uneven heating or suspected wiring issues, thermal imaging quickly pinpoints hotspots or cold spots that are invisible to the naked eye. This technique accelerates diagnostics, especially in complex systems, and helps prevent future failures by identifying potential problems early. As thermal cameras become more affordable, I predict they’ll become standard in professional and DIY toolkits alike.
How do I keep my tools in top shape over time?
Proper maintenance of your diagnostic tools is essential for accurate long-term results. Regularly calibrate your multimeter using manufacturer guidelines or professional calibration services to ensure measurements stay precise. Clean your screwdrivers and thermal camera lenses after each use to avoid damage or inaccuracies. Store all tools in a dedicated toolbox to prevent damage and loss. These simple habits extend the lifespan of your equipment, ensuring you’re always ready to tackle oven issues efficiently.
Looking ahead, the trend points toward smarter diagnostic tools integrated with IoT technology. Imagine multimeters that automatically upload readings to your smartphone app or thermal cameras with AI-assisted fault detection. Embracing these innovations will make oven maintenance more accessible and reliable in the future.
Try this advanced tip to improve your diagnostics
One actionable tip is to incorporate a thermal imaging camera into your routine troubleshooting process. It provides instant visual feedback on heat anomalies, saving you time and guesswork. Start with small tests, such as checking the heating element during operation, and observe how hotspots indicate potential failures. This proactive approach can prevent costly repairs and extend your oven’s lifespan. For detailed guidance on effective diagnostics, explore this resource.
The Hardest Lesson I Learned About Oven Troubleshooting
One of the most valuable lessons I discovered is that jumping straight to replacements without proper diagnostics can double your repair costs. I once replaced a heating element, only to find out later that a faulty thermostat was the real culprit. Taking the time to understand how to test components correctly saved me both time and money.
3 Myths About DIY Oven Fixes That Held Me Back
For a long time, I believed that all parts needed to be replaced simultaneously or that diagnosing electrical issues was too complex for a DIYer. Real-world experience taught me that careful testing and choosing the right diagnostic tools make all the difference. Learning to interpret error codes and resistance readings was a game-changer.
What Experts Won’t Tell You About Oven Diagnostics
Many professionals keep the best tips to themselves, but I found that investing in a quality multimeter and thermal imaging camera dramatically improved my troubleshooting speed. These tools help visualize heat flow and electrical continuity, revealing problems that are invisible to the naked eye. With the right knowledge and equipment, you can troubleshoot like a pro.
My Essential Toolkit for Oven Repairs
I trust the Fluke 117 multimeter for its accuracy and ease of use. A high-quality screwdriver set from Wiha ensures safe disassembly without damaging screws. Recently, I added a FLIR ONE thermal camera, which helps me spot hotspots and cold spots instantly. These tools have become indispensable in my repair projects.
Where to Go from Here
If you’re serious about DIY oven repairs, start by mastering diagnostics with a good multimeter and reading comprehensive guides like this resource. Upgrading your toolkit and skills will turn frustrating failures into quick, safe fixes. Remember, patience and proper diagnostics are your best allies—happy repairing!
Your Turn to Try
Have you ever struggled with identifying the real cause of an oven problem? Share your experience or ask questions below—I’d love to hear your repair stories and help you get started!
Emma Carter
This article really hits home for me. I recently tried repairing my oven and initially replaced what seemed obvious—like the heating element—only to find out later that the thermostat was the real issue. It’s so true that proper diagnostics can save both time and money. I’ve started investing in a good multimeter and learned to interpret error codes, which has made a huge difference in my DIY repairs. I’m curious, does anyone have recommendations for affordable thermal imaging devices? I’ve heard they’re becoming more popular among DIY enthusiasts, and I’d love to try one out for pinpointing issues before pulling apart components. Also, how do you balance between spending on quality parts versus budget options? Looking forward to hearing everyone’s tips and experiences on effective diagnostics and long-term solutions.
Michael Anderson
This post really resonates with my experience. I used to jump straight into replacing parts like thermostats or heating elements without proper diagnosis, which often led to wasted time and money. Now, I make it a point to use a multimeter to verify the actual faulty component before ordering replacements. It’s fascinating how much time we can save by simply understanding the diagnostic process better. Real-time heat mapping with thermal cameras sounds like a game-changer—do any of you recommend specific models that are affordable yet reliable for DIY use? Also, I completely agree that investing in quality parts pays off in the long run, especially for models that get heavy use. My question is, how do you handle troubleshooting when error codes are ambiguous or missing? Are there other diagnostic tricks that have worked well for you? I’d love to hear more insights from the community on these topics.
Lindsay Morgan
This article really highlights how crucial proper diagnostics are in DIY oven repairs. I had a similar experience where I replaced the heating element thinking that was the main issue, only to find later that a malfunctioning thermostat was causing the heat inconsistency. Using a multimeter to test components really saved me from unnecessary expenses, and I’ve started incorporating thermal cameras into my toolkit. Has anyone found budget-friendly thermal imaging devices that work well? I’ve noticed some cheaper models on Amazon, but I’m unsure about their reliability. I also agree that choosing quality parts makes a huge difference in longevity and safety. Have you guys faced challenges when error codes are ambiguous or when the oven doesn’t provide any? Would love to hear how others troubleshoot these situations effectively. It’s fascinating how small diagnosis improvements can lead to big savings and better repairs. Looking forward to your tips or recommendations!