Ever been in the middle of a busy week, only to discover your dishwasher isn’t working? That sinking feeling when dishes pile up and your only solution seems to be endless scrubbing by hand. I’ve been there—frustrated, overwhelmed, and wishing I could just fix it myself without calling in a pro. Turns out, with the right know-how and a reliable parts guide, you can solve most common dishwasher problems quickly and effectively — saving time, money, and your sanity.
Why Fast Repairs Matter More Than Ever
In 2025, our kitchens are busier than ever. Modern dishwashers are packed with tech, but that also means more complex troubleshooting if they break down. The good news? You don’t need to be an appliance expert to make quick repairs. Knowing the right diagnostic steps and having access to the essential parts can turn a disaster into a minor hiccup. According to a recent study, nearly 70% of appliance failures are fixable with simple diagnostics and parts replacement, avoiding costly replacements and waste.
But here’s the thing — early mistakes can cost you. I learned this the hard way when I attempted a DIY repair without proper guidance, only to make the problem worse. That mistake taught me the importance of trusted diagnostic guides and precise parts sourcing. If you’re facing the same issue or just want to be prepared, I’ll walk you through the core strategies to troubleshoot your dishwasher like a pro.
Is Relying on DIY Fixes Really Worth It
Before we dive into the how-to, I want to address the biggest fear I hear from folks like you: “Am I really capable of fixing my dishwasher, or am I just wasting my time?” Honestly, I used to think the same. But with the right diagnostic approach and a detailed parts guide, I’ve saved hundreds of dollars and countless hours. And yes, I’ve learned that even complex issues can often be resolved with some patience and the right tools. For a comprehensive overview of effective diagnostic strategies, check out this diagnostics guide.
So, if you’ve faced stubborn dishwasher problems or want to be ready for future mishaps, stay tuned. We’ll explore the essential parts, troubleshooting tips, and repair strategies that will make your DIY repairs faster and more successful in 2025. Let’s get started on turning you into a kitchen appliance hero!
Identify the Problem Clearly
Start by observing what’s wrong—does the dishwasher not start, leak, or leave dishes dirty? For example, I once faced a dishwasher that wouldn’t drain. I checked the filter and drain hose first, because these are common culprits. Recognizing the specific issue guides your parts search and repair plan. Refer to this diagnostics guide to refine your diagnosis.
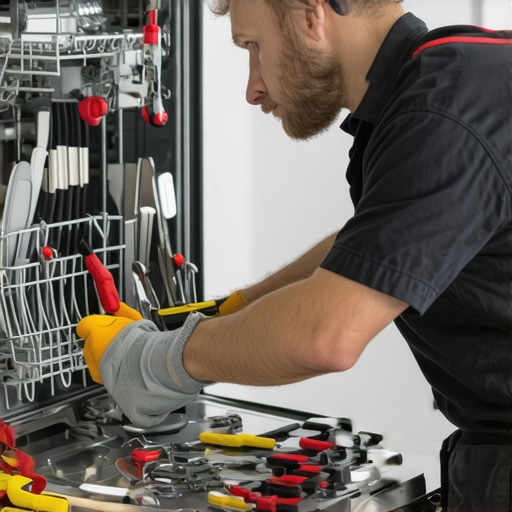
Gather the Essential Diagnostic Tools and Parts
Think of troubleshooting as a mechanic’s toolkit—without the right tools, fixing a car is impossible. For dishwashers, essential tools include a multimeter, screwdrivers, and pliers. For parts, focus on items like door latches, water inlet valves, and pump assemblies. I once replaced a faulty water inlet valve using a detailed parts guide, which saved me a service call. Check this parts guide for a comprehensive list.
Disassemble with Precision
Careful disassembly is crucial. I recall working on my dishwasher when I accidentally stripped a screw. To avoid this, always keep screws organized and follow manufacturer diagrams. Use the right screwdriver bits to prevent damage. Think of it like peeling an onion—slowly and carefully, layer by layer. This prevents further damage and makes reassembly easier. For tips on disassembly, consult this diagnostic tips.
Test Components Methodically
Using a multimeter, check each component’s resistance—think of it as testing a road’s traffic flow, ensuring nothing is blocked. For example, I tested my dishwasher’s motor winding and found it was shorted, leading me to replace it. Always test one part at a time and record your findings. This systematic approach prevents unnecessary part replacements and speeds up repairs. For detailed testing procedures, see this diagnostics article.
Replace Faulty Parts Effectively
Once identified, replace the defective part with an exact match. I once ordered a replacement pump that was incompatible, causing delays. Use the part numbers from your diagnostics to ensure compatibility. Follow the installation instructions carefully—think of it as fitting a puzzle piece. Tighten screws securely but avoid over-tightening, which can crack plastic components. For sourcing parts, this parts source is reliable.
Reassemble and Test
Reassemble in reverse order, ensuring all clips and screws are tight. Power on the dishwasher and run a test cycle. Watch for leaks, unusual noises, or failure to start. If issues persist, retrace your steps and re-test components. I once had to redo a pump connection, which fixed a leak I initially thought was a gasket failure. Patience is key—each successful test confirms your repair. For final troubleshooting tips, this repair strategies are invaluable.
Many DIY enthusiasts jump into dishwasher repairs with good intentions, but often fall prey to misconceptions that can actually make problems worse. As someone who’s spent years troubleshooting appliances, I can tell you that understanding the nuances and avoiding common myths is crucial to successful repairs. Let’s explore some of these misconceptions and the hidden complexities behind them.
Why Is Relying on Popular Myths a Risk?
One prevalent myth is that all dishwasher leaks are caused solely by faulty door seals. While door seals are a common culprit, this oversimplification can lead you to replace parts unnecessarily, ignoring other causes like clogged filters or cracked hoses. Jumping straight to parts replacement without proper diagnostics can drain your wallet and extend repair time. For a detailed approach, consult this expert troubleshooting guide.
Advanced Mistake: Overlooking the Importance of Proper Testing
Many repair projects falter because DIYers skip thorough component testing. For example, testing a water inlet valve with a multimeter requires understanding resistance readings — not just assuming it’s broken if water isn’t filling. A faulty valve might still show resistance within the acceptable range, but the internal diaphragm could be damaged. This is why methodical testing, referencing the specific diagnostic procedures outlined in this diagnostics article, is essential.
What About the Myth That All Parts Are Interchangeable?
It’s tempting to think that generic parts or substitutes will work just as well as OEM replacements. However, using incompatible parts can lead to leaks, motor failures, or even electrical issues. Always cross-reference the part numbers with your dishwasher’s model and consult the parts guide to ensure compatibility. This prevents the costly mistake of installing a part that doesn’t fit or function correctly.
Have You Ever Fallen Into This Trap?
Many DIY repairs go awry because of overlooked details or misconceptions. For example, assuming that a leaking gasket is the only source of water issues can lead you to replace it unnecessarily, when the real issue might be a cracked pump or clogged drain. Recognizing these nuances takes experience and careful diagnostics. If you want to deepen your understanding, this diagnostics guide is a great resource. Have you ever fallen into this trap? Let me know in the comments, and share your experience!
Keep It Going with the Right Tools
Maintaining your dishwasher over time requires more than just a good attitude—it demands specific, reliable tools that can handle the nuances of appliance repair. My personal toolkit includes a high-quality multimeter, which I use to verify electrical components. A multimeter is indispensable because it helps me quickly identify whether a motor, switch, or sensor is functioning correctly without guesswork. I prefer a digital multimeter with auto-ranging capabilities, as it saves time and reduces errors during testing. Pro tip: Always keep spare fuses and replacement wiring handy, as these are often overlooked but can cause intermittent failures. For detailed diagnostics, I refer to this expert guide, which covers essential diagnostic tools tailored for 2025 repairs.
Why Regular Maintenance Matters
Keeping your dishwasher in top shape is about more than fixing problems when they arise. Regular maintenance extends the lifespan of your appliance and prevents minor issues from becoming costly repairs. A simple but effective habit is to run a cleaning cycle with a dishwasher-safe descaler monthly, which helps prevent mineral buildup that can clog spray arms and filters. I also recommend inspecting and cleaning the filter and spray arms every few months; this keeps water flow optimal and ensures dishes come out spotless. Over time, these small steps can save you hundreds of dollars in repairs and replacements. For a comprehensive maintenance routine, check out this article.
How do I keep my dishwasher working well over time?
Consistent cleaning, timely inspections, and using the right repair tools are key. Additionally, investing in a quality replacement part, like a water inlet valve or door latch, ensures longevity. When replacing parts, always verify compatibility with your specific model—this prevents issues down the line. I rely on OEM parts sourced from trusted suppliers, which you can find details about here. This approach minimizes the risk of leaks or motor failures, helping your dishwasher stay in service for years.
Scaling Up Your Maintenance Skills
If you’re serious about keeping your dishwasher running efficiently, consider investing in a diagnostic device like a digital inspection camera. These tools allow you to see inside tight spaces without disassembly, making troubleshooting faster and more precise. Looking ahead, I predict that smart diagnostic tools integrated with apps will become standard, providing real-time diagnostics and step-by-step repair guidance. For now, mastering the basics—like using a multimeter correctly and maintaining filters—will dramatically improve your repair success rate.
Don’t forget, taking a methodical approach and documenting your repairs can help you troubleshoot future issues more efficiently. Try the tip of testing each component with a multimeter before replacing it; this practice saves time and money. For more advanced troubleshooting techniques, explore this resource. Maintaining your dishwasher isn’t just about quick fixes; it’s about building a long-term strategy for smooth operation. Keep nurturing your skills, and your appliance will thank you for years to come.
The Hardest Lesson I Learned About Dishwasher Repairs
One of the biggest lessons I learned was the importance of patience and thorough diagnostics. Rushing into a repair without understanding the root cause often led me to replace parts unnecessarily. Now, I always take the time to observe, test, and verify before making any replacements, which saves me time and money.
3 Myths About Dishwasher Fixes That Held Me Back
I used to believe that all leaks came from door seals, but I discovered that clogged filters and cracked hoses are common culprits. Busting these myths helped me diagnose issues more accurately and avoid costly mistakes.
What Experts Won’t Tell You About DIY Dishwasher Repairs
Many professionals know that proper testing with a multimeter is essential. Skipping this step can lead to misdiagnosis. I now rely on systematic testing and trusted diagnostic guides, like those at this resource, to guide my repairs.
Curated Tools That Make Repairs Easier
My essential toolkit includes a quality digital multimeter, screwdrivers, and replacement parts from trusted sources. These tools help me quickly identify electrical faults and ensure proper installation, making DIY repairs more successful.
Take Action and Keep Your Dishwasher Running
Now that you know the secrets to effective troubleshooting, don’t be afraid to get hands-on. Regular maintenance, proper diagnostics, and using the right parts can extend your appliance’s life and save you money. Your dishwasher is more repairable than you think—start today and enjoy the satisfaction of fixing it yourself!