Ever had that sinking feeling when your dishwasher stops mid-cycle, leaving you with a sink full of dirty dishes and a headache? I’ve been there. One moment, everything is running smoothly; the next, silence and frustration. It’s a moment that can make even the most seasoned DIY enthusiast feel helpless. But here’s the thing — understanding the ins and outs of effective diagnostics and the right parts can turn that headache into a quick fix. I want to share what I’ve learned from countless hours of troubleshooting, so you don’t have to stumble in the dark as I did early on.
Why Proper Diagnostics Matter More Than Ever
When your dishwasher fails, your first instinct might be to call a repair technician. While professional help is sometimes necessary, most of the time, a little know-how and the right parts can save you hundreds of dollars. The key is mastering diagnostics — knowing what to check, where to look, and which parts are most likely to cause problems. This approach not only speeds up repairs but also prevents unnecessary replacements and future breakdowns. Plus, with the rise of reliable diagnostic guides like expert troubleshooting tips, you’re never alone in your repair journey.
Have You Faced This Specific Problem?
It’s a common scenario: your dishwasher won’t drain, and you’re left wondering if it’s a clogged filter, a faulty pump, or something else entirely. Trust me, early mistakes—like ignoring simple checks—only prolong the frustration. A quick diagnosis can reveal whether the issue is a bad float switch or a worn-out pump, and knowing the right parts to replace makes all the difference. If you’re tired of throwing parts at your dishwasher without success, I promise this guide will help you troubleshoot smartly and efficiently.
Before diving into repair, understanding the common issues and their diagnostic pathways is essential. For example, quick checks like inspecting the door latch or testing the motor can save you from unnecessary part replacements. When it’s time to replace parts, choosing quality components tailored for your model ensures longevity and smooth operation. For expert advice on troubleshooting parts, check out top strategies for troubleshooting parts.
Now, let’s get into the real meat of the matter—how to diagnose your dishwasher like a pro and pick the right parts for quick, lasting repairs. Stay tuned, because a well-maintained dishwasher isn’t just a dream—it’s within your reach.
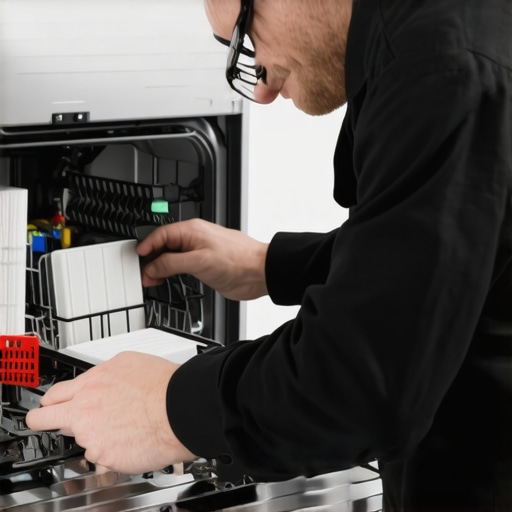
Get Your Hands Dirty: Step-by-Step Diagnostics
Think of diagnosing your dishwasher like troubleshooting a car engine. First, you need to isolate the problem. Start by inspecting the door latch — a simple visual check can tell you if the door isn’t sealing properly, which halts the cycle. For example, I once found that a loose latch was causing my dishwasher to stop mid-cycle. Tightening it fixed the issue instantly. Next, listen for strange noises or lack of noise, which can point to motor or pump problems. You can test the motor by manually activating it with a multimeter, similar to testing a faulty relay in an oven (see this guide for detailed steps).
Test the Drain Pump and Check for Clogs
Remove the filter and look for debris or buildup. If the filter is clear but the dishwasher still won’t drain, the pump might be faulty. To test, locate the pump motor and spin it manually — if it’s stiff or doesn’t turn, it’s likely dead. I once replaced a worn-out pump that was making grinding noises, and my dishwasher drained like new afterward. Use a multimeter to test the pump’s continuity, a process that’s straightforward once you get familiar with the parts. For more on diagnosing these components, visit diagnostics and parts.
Identify the Core Parts to Replace
Once you pinpoint the issue, focus on the core parts: the float switch, the drain pump, or the motor. The float switch acts like a safety valve, preventing overflow — if it’s stuck, your dishwasher won’t drain properly. Test it by removing the panel and manually pressing the switch; if it doesn’t click or reset, replace it. For pump issues, choose a high-quality replacement to avoid future breakdowns — check top troubleshooting strategies for guidance.
Choosing the Right Parts for Longevity
Quality parts are crucial. I learned this the hard way when I installed a cheap pump that failed after three months. Investing in OEM or reputable third-party parts ensures longevity. When ordering, verify compatibility with your dishwasher model, which you can do by consulting the part number or the manufacturer’s guide. For a comprehensive list of essential parts, see essential parts guide.
Putting It All Together
With diagnostics in hand and the correct parts, you’re ready for the repair. Follow the disassembly instructions carefully, using the appropriate tools. Remember, safety first: unplug your dishwasher before starting any repair. Replace the faulty parts, then run a test cycle to confirm success. My first attempt at replacing the pump was messy — I spilled water everywhere and had to redo a connection — but the satisfaction of fixing it myself was worth it. Detailed guides like oven repair diagnostics can also help if your dishwasher shares components with other appliances. Keep practicing, and troubleshooting will become second nature.
Many DIY enthusiasts and even seasoned repair folks often fall prey to misconceptions that can hinder effective troubleshooting. Let’s clear the air and dig into what most people get wrong about diagnosing dishwasher problems, selecting parts, and even oven repairs. By understanding these nuances, you’ll avoid costly mistakes and become more confident in your repairs.
Why the Popular Belief That All Parts Are Interchangeable Is a Trap
One common myth is assuming that any replacement part will do, especially when it comes to dishwasher pumps or oven thermostats. In reality, parts are highly model-specific, and using a generic or incompatible component can cause more damage or lead to recurring issues. For example, some might think that a cheap pump will suffice, but OEM parts are designed to meet precise specifications, ensuring longevity and proper function. To avoid this mistake, always cross-reference part numbers with your model and consult reputable sources like top troubleshooting strategies.
The Oops Factor: Underestimating the Power of Proper Diagnostics
Many jump straight to replacing parts without thorough diagnostics, which is a surefire way to waste time and money. A common trap is assuming a faulty pump or motor without testing the float switch or inspecting for clogs first. This oversight often results in unnecessary replacements. Remember, effective diagnostics involve verifying each component’s function with tools like a multimeter, and not just relying on visual cues. For instance, testing the continuity of a drain pump can reveal whether it’s truly dead or just jammed. For advanced diagnostic techniques, check out expert troubleshooting tips.
Are You Overlooking the Importance of Compatibility?
One subtle but critical mistake is ignoring compatibility when ordering replacement parts. A part that fits physically may not work electrically or functionally, especially with complex components like control boards or sensors. This oversight can cause intermittent failures or even damage other parts. Always verify part numbers and consult your appliance’s manual or trusted guides before purchasing. This approach is especially vital when dealing with oven diagnostics, where a mismatch can lead to inaccurate temperature readings or safety hazards. For guidance, visit our essential parts guide.
Have you ever fallen into this trap? Let me know in the comments. Remember, a nuanced understanding of these hidden factors makes all the difference between a quick fix and a recurring nightmare. So next time you’re troubleshooting, dig deeper, verify everything, and don’t settle for assumptions. Your appliances—and your wallet—will thank you.
Investing in the Right Tools for Long-Term Success
Maintaining your appliances over time requires more than just a screwdriver and a wrench. I personally swear by a high-quality digital multimeter because it allows me to quickly test electrical components like thermostats and sensors without guesswork. When diagnosing a faulty heating element in an oven, for instance, I use a multimeter to check for continuity, which saves time and prevents unnecessary part replacements. Additionally, a set of precision screwdrivers with magnetic tips makes disassembly smoother, especially when dealing with tight spaces or delicate connectors. These tools not only help me work efficiently but also reduce the risk of damaging sensitive parts.
Keeping Your Appliances Running Through Routine Checks
Routine maintenance is key to preventing unexpected breakdowns. For dishwashers, regularly inspecting and cleaning the filter and spray arms ensures optimal water flow. I do this every few months, which helps avoid clogs that can cause draining issues. For ovens, keeping the door seals clean and checking the temperature calibration with an oven thermometer ensures consistent cooking results. Using a thermal imaging camera can even help identify uneven heating or hot spots, providing insights that simple visual checks might miss. This proactive approach extends the lifespan of your appliances and keeps repairs manageable.
Tools I Recommend for Effective Diagnostics
When it comes to diagnostics, I rely heavily on a reliable outlet tester with built-in GFCI testing capabilities. This simple device helps verify that your outlet wiring is safe, especially when dealing with oven or dishwasher power issues. For more advanced diagnostics, a digital clamp meter allows me to measure current flow without disconnecting wires, which is invaluable when inspecting motor currents or detecting electrical shorts. I also use a leak detection dye in appliances like dishwashers and washing machines to identify hidden leaks before they cause significant damage. These tools have become my go-to arsenal for swift, accurate troubleshooting.
How do I maintain appliances over time?
Consistent maintenance routines are vital. I schedule quarterly inspections to clean filters, check seals, and test safety devices. Keeping a detailed log of repairs and parts replacements helps me spot recurring issues early. Additionally, staying updated with manufacturer manuals and diagnostic guides, such as those found at this resource, ensures I’m using the right procedures and parts. Predictive maintenance, like replacing aging seals or worn-out sensors before they fail, minimizes downtime and repair costs. The future of appliance maintenance will likely involve smarter diagnostic tools integrated with IoT sensors, making proactive care even more accessible. Start by trying out a multimeter test on your oven’s heating element today—it’s a simple step that can save you a lot of hassle.
The Hardest Lesson I Learned About Dishwasher Diagnostics and Parts
One of the biggest mistakes I made early on was assuming that every replacement part was interchangeable. It’s tempting to grab a generic pump or sensor, but I learned the hard way that model-specific parts last longer and work more reliably. That lightbulb moment taught me always to double-check part numbers and consult reputable sources, like the top troubleshooting strategies before ordering.
The Myth That All Parts Are Created Equal
I used to believe that if a part physically fit, it would work just fine. Turns out, electrical compatibility and precise specifications matter just as much. Installing an incompatible control board or sensor can lead to recurring failures or even damage to other components. Always verify compatibility through manuals or part numbers, and avoid costly surprises by doing your homework first.
The Hidden Power of Proper Diagnostics
Jumping straight into parts replacement often wastes time and money. I’ve learned that thorough diagnostics—using tools like multimeters and inspecting each component—are game changers. For example, testing the continuity of a drain pump can reveal whether it’s truly dead or just jammed. Dive deeper into expert tips at expert troubleshooting tips to avoid guesswork.
Curated Tools That Make My Repairs Easier
Over the years, I’ve built an essential toolkit that saves me hours. A reliable digital multimeter is my best friend for electrical tests, while a magnetic screwdriver set makes disassembly smoother. Using these tools prevents accidental damage and speeds up diagnostics. Check out this guide for more must-have tools.
Keep Your Appliances Healthy with Routine Checks
Preventive maintenance is key. I schedule quarterly inspections of filters and spray arms, which helps avoid clogs and drainage issues. Keeping a detailed repair log also helps me spot recurring problems early. Small habits like this extend the lifespan of appliances and turn repairs into quick fixes rather than major projects.
Sophia Bennett
I really appreciate this deep dive into troubleshooting dishwashers! I can relate to the frustration of a cycle suddenly stopping, and this guide offers practical steps to diagnose the problem without jumping straight to costly replacements. I especially agree with the importance of testing components like the float switch and drain pump before replacing them; I’ve learned the hard way that a little patience goes a long way. One tip I’ve found helpful is using a multimeter to check the continuity of the pump—it saves me from buying parts I don’t need. Has anyone found that regular maintenance, like cleaning filters and inspecting hoses, has helped prevent these issues from cropping up? It’s made a noticeable difference in my dishwasher’s performance, and I think preventive care is a real game-changer. I’d love to hear more tips from others on how they keep their appliances in top shape and avoid major repairs. It’s encouraging to know that with the right diagnostics, DIY repairs are often manageable and cost-effective.
Benjamin Carter
This post really hits home for me! I’ve spent quite some time trying to troubleshoot my dishwasher, and I agree that understanding the diagnostic pathways makes a huge difference. I recall a situation where I replaced the drain pump only to find the issue persisted. It turned out that the float switch was stuck and preventing proper drainage, which I wouldn’t have checked if I hadn’t read up on diagnostic procedures. I’ve also found that keeping a detailed maintenance log helps track recurring issues and plan preventative actions better. A question I have is what are some of the most common mistakes DIYers make when replacing parts — aside from choosing incompatible components? I believe one challenge is ensuring the new part is installed correctly and securely to prevent future issues. Curious others’ thoughts on best practices for installation to maximize part longevity. Overall, this article highlights that patience, proper diagnostics, and quality parts are key to successful DIY repairs, which I totally agree with.