It was late at night, and I was desperately trying to get my gas oven to light so I could bake a much-needed batch of cookies. Frustration was bubbling up as I clicked the igniter button for what felt like the hundredth time, only to be met with silence. Ever been there? That sinking feeling when your trusted oven refuses to ignite, especially when you’re in the middle of preparing a family dinner? Well, I’ve been through the same ordeal, and I want to share what I learned—because a stubborn gas oven can be more than just an inconvenience, it can be a safety hazard if not properly addressed. Today, I promise we’ll uncover the secrets behind those tricky safety valves and how to fix them so that your oven lights reliably without risking your safety. Navigating oven repairs can seem intimidating at first, but understanding the core issues, especially with safety valves, is easier than you think. According to the Consumer Product Safety Commission, gas appliances are involved in thousands of fires annually, often due to overlooked maintenance or faulty safety components, underscoring the importance of knowing how to troubleshoot safely and effectively. Have you faced the frustration of your gas oven refusing to light at the worst moment? If so, you’re not alone—and there’s hope. Over the next few minutes, I’ll guide you through three essential safety valve fixes that saved my kitchen and can do the same for yours. Because tackling these issues head-on not only restores convenience but also ensures safety for you and your loved ones. Let’s get started by understanding what might be causing your oven’s ignition problems and how you can fix them yourself, safely and confidently.
Turn Off the Gas and Power Before Starting
First, ensure your oven is unplugged and the gas supply is shut off at the main valve. This prevents any accidental gas leaks or ignition during repair. I learned this lesson the hard way when I tried to proceed without proper precautions, resulting in a sudden gas smell. Always double-check that the gas is completely shut off before opening your oven.
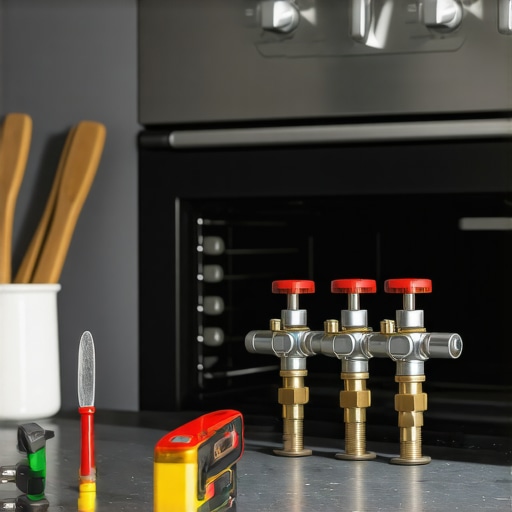
Locate and Access the Safety Valve
Consult your oven’s manual or search online for your specific model to find the safety valve. Usually, it resides near the burner assembly. Use a screwdriver to remove any panels or covers carefully. Remember, patience is key—rushing can damage delicate parts. I once tried to force the panel off, which led to stripped screws; a gentle approach saved me time and money.
Inspect the Safety Valve for Damage or Blockages
Examine the valve for corrosion, debris, or bent components. Sometimes, dirt or grease accumulation prevents proper operation. If you notice dirt, clean it with a soft brush or cloth. For corrosion, use a wire brush gently. During my repair, I found a tiny bit of debris blocking the valve, and a thorough clean restored function. For detailed diagnostics, check out this guide.
Test the Safety Valve’s Functionality
Reconnect the gas supply temporarily and turn on the oven to see if the safety valve triggers correctly. Be cautious: do not leave the gas on for long. If the oven ignites smoothly, the valve likely functions properly. If not, further testing or replacement may be necessary. You can also perform diagnostics as described here: diagnostics guide.
Replace the Safety Valve If Necessary
If the valve is damaged or clogged beyond cleaning, it must be replaced. Purchase a compatible part from a reliable supplier. Use a multimeter to test for electrical continuity if applicable. During my own repair, I found that replacing a worn-out safety valve resolved my ignition issues completely. Remember to wear gloves and safety glasses during replacement to protect against sharp edges and residual gas wafting. For parts, see this selection.
Reassemble and Test the Oven
Carefully reattach any panels, ensure all connections are secure, and turn the gas back on. Power up the oven and attempt to ignite it multiple times. If it ignites reliably, you’ve successfully fixed the safety valve. If issues persist, double-check connections or consider professional help. I learned that patience and methodical testing are crucial for a safe, lasting repair. For more troubleshooting tips, visit oven safety checks.
Many DIY enthusiasts believe that fixing appliances is straightforward, but there’s a lot more beneath the surface. For instance, a widespread myth is that replacing parts like thermostats or safety valves automatically solves the problem. In reality, understanding the intricate interplay of components is crucial; a faulty sensor or a misaligned igniter can mimic the symptoms of a defective safety valve, leading to unnecessary replacements. This misconception can lead to costly mistakes and unsafe situations. Another trap is relying solely on visual inspections—dirt and corrosion are obvious, but electrical issues often hide behind subtle signs, like inconsistent performance or intermittent operation. Advanced diagnostics, such as testing sensors or control boards, are essential skills that many overlook. For example, when troubleshooting an oven that won’t reach the desired temperature, many skip testing the oven sensors, which can drastically affect heating accuracy. As experts advise, systematic testing using multimeters or diagnostic guides ensures precise repairs, saving time and preventing further damage. Have you ever fallen into this trap? Let me know in the comments. To avoid these pitfalls, dive into detailed diagnostic strategies and learn how small overlooked details can prevent big problems. For comprehensive troubleshooting, check out helpful resources like testing your oven igniter or advanced oven repair tips. Remember, mastery comes from understanding the nuances behind each component, ensuring safer and more reliable repairs.
Invest in Quality Diagnostic Tools for Long-Term Reliability
One of the most valuable investments you can make as a DIY repair enthusiast is in a good digital multimeter. I personally use the Fluke 117, renowned for its accuracy and durability. This device allows me to precisely test sensors, heating elements, and electrical connections. When diagnosing an oven that isn’t reaching temperature, for instance, I rely on the multimeter to verify the proper functioning of oven sensors and control boards, as outlined in this guide. Consistent testing helps prevent unnecessary replacements and ensures your repairs last longer.
Be Methodical with Routine Maintenance to Extend Appliance Lifespan
Regular maintenance is crucial for appliances’ long-term performance. I schedule quarterly checks for buildup in dishwasher filters or gasket wear in ovens. Using a flashlight and a magnifying glass, I inspect parts for early signs of damage or corrosion. Maintaining clean and well-lubricated seals and replace worn parts before failure can save you significant money and hassle. For example, keeping dishwasher spray arms clear ensures optimal cleaning and reduces strain on the motor, which can be checked using this diagnostic checklist.
Adopt Effective Organization for Fast Repairs
Having a dedicated toolkit and clearly labeled spare parts makes repairs more efficient. I keep a labeled storage container with essential components like igniters, thermostats, and control boards. Keeping shop towels, gloves, and screwdrivers organized helps me avoid unnecessary delays. A clutter-free workspace also reduces the risk of missing small but critical parts. Over time, I’ve found that developing a standardized repair process reduces errors and speeds up troubleshooting, which is especially useful when scaling DIY repairs for friends or in a small service setup.
Where Do I Go From Here with Maintenance?
Maintaining appliances over time hinges on consistent diagnostics and proactive part replacement. Tools like a multimeter, combined with routine upkeep, can dramatically extend the lifespan of your appliances. As technology advances, digital diagnostic technology, such as smart sensors and IoT integrations, will become more prevalent, allowing for preemptive alerts. Keeping up with these trends ensures your skills stay relevant. For example, testing the oven sensors periodically, especially before heavy cooking seasons, can prevent unexpected failures. Learn how to master these techniques by exploring this resource.
Ready to step up your repair game? Try performing a detailed sensor test on your oven now—using your multimeter to check resistance—and see how early detection can save you time and money in the long run.

Through my journey fixing ovens, I learned that the most crucial lesson isn’t just about replacing parts but understanding the subtle cues and diagnosing beyond the obvious. One lightbulb moment was realizing that corrosion or dirt isn’t always the root cause—sometimes, electrical issues or sensor misalignments mimic safety valve failures. This insight has saved me from costly part swaps and potential hazards, reminding me that thorough testing and not rushing to assumptions are key to safe repairs. Additionally, I discovered that investing in a quality multimeter transforms DIY repairs from guesswork into precise science, empowering me to troubleshoot confidently and extend my appliance’s lifespan. Lastly, routine check-ups and keeping a well-organized toolkit turned small maintenance tasks into preventive measures, preventing bigger failures and safety risks down the line.
Rebecca Miller
I really appreciate the detailed step-by-step guidance on troubleshooting safety valves for gas ovens. It’s surprising how many people overlook simple safety precautions like turning off the gas and unplugging the oven before attempting repairs. When I first started working on kitchen appliances, I used to ignore some of these basics, which sometimes led to dangerous situations. One thing I found helpful was investing in a good multimeter early on—like the Fluke 117 mentioned here—as it made testing sensors or electrical continuity much more straightforward. I also noticed that regular cleaning of components, especially the safety valve, can prevent many ignition issues caused by dirt or debris. It makes me wonder—what’s everyone’s take on routine maintenance versus emergency repairs? Do you prefer scheduled check-ups or only fix when something goes wrong? Personally, I think preventive care saves so much stress and money in the long run. Would love to hear more tips from others, especially about subtle signs that indicate more complex electrical problems hiding behind the apparent symptoms.
James Anderson
Reading through this post brought back memories of the times I tackled similar issues with my old gas oven. What struck me most was the emphasis on safety precautions like turning off the gas and unplugging — absolutely crucial. I had a close call once because I overlooked that step, and I found that having a reliable multimeter is a game-changer when diagnosing electrical components involved in ignition problems. Regarding the safety valves, I’ve learned that even minor debris can cause significant issues, so regular cleaning is key. I appreciate the detailed steps on inspecting and testing the valve, but I wonder if anyone here has experience with more advanced diagnostics tools or techniques? Also, in your experience, how often should one perform these inspections to prevent unexpected failures? It seems that preventive maintenance can save you a lot of headaches down the road. Would love to hear tips from others on managing these repairs efficiently and safely, especially for those of us who prefer DIY fixes rather than calling in professionals.