It was a typical Sunday afternoon when I opened my dishwasher to find a mini lake forming at its base. Water was seeping out like an overenthusiastic geyser, and I could feel that sinking frustration building. How could something so essential become such a headache? That lightbulb moment hit me: I needed quick, affordable fixes before this mess turned into a full-blown disaster.
Why Paying for Repairs When Parts Cost Less Than a Dinner?
Many folks assume dishwasher repairs mean calling in the pros—sometimes costing more than a new appliance. But what if I told you that with a handful of cheap, readily available parts, you could stop that leak in its tracks? Upfront savings, yes, but also a huge boost in confidence to tackle household glitches.
Early on, I made a rookie mistake: replacing the entire base assembly unnecessarily. Instead, I learned that most leaks stem from simple, inexpensive parts that anyone can replace with a little patience. Plus, the internet is brimming with expert advice, like this comprehensive guide that walks you through troubleshooting common dishwasher issues, including leaks. Check it out to get a sense of what might be causing your own water woes.
Did you already face a stubborn leak that just wouldn’t stop? Or maybe you’re worried about wasting money on pointless repairs? Either way, you’re in good company—and I’m here to help you navigate this repair journey with confidence. Now, let’s pinpoint those four cheap parts that are probably your leak’s culprits and learn how to fix them without breaking the bank.
Identify the Leak Source Accurately
Before ordering parts, locate exactly where the water is escaping. To achieve this, run a short cycle with the dishwasher empty and observe the areas where water drips or pools. Use a flashlight to inspect seals and hoses closely. I once faced a persistent leak and noticed water seeping from the door gasket; careful observation saved me from unnecessary part replacement.
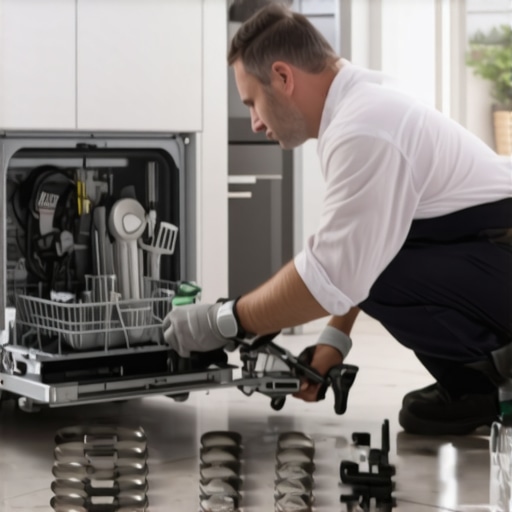
Gather the Essential Cheap Parts
Focus on four common inexpensive components that often cause leaks: the door gasket, the inlet valve, the drain hose clamp, and the pump seal. These parts are readily available online, and replacing them is straightforward. For example, I purchased new door gaskets from [here](https://appliancebargainz.com/top-dishwasher-parts-diagnostics-for-2025-repairs-2) and found the seal cracks, which explained the leak. Having these parts on hand allows quick fixes without waiting for professional service.
Prepare for the Replacement Process
Power off the dishwasher and disconnect it from the power source. Turn off the water supply to prevent further leaks. Wear gloves and prepare basic tools: screwdrivers, pliers, and a towel for any residual water. An effective analogy is approaching the repair like sealing a leaky pipe; you need to isolate the problem before fixing it.
Replace the Faulty Seals and Valves
Start with the door gasket. Remove the old seal carefully, noting its positioning. Install the new gasket by stretching it around the door frame evenly. For the inlet valve and drain hose clamps, loosen fittings, remove faulty parts, and fit new ones. Ensure all connections are tight to prevent future leaks. My experience was messy; water spilled, but careful management kept damage minimal. Check the [diagnostics guide](https://appliancebargainz.com/dishwasher-troubleshooting-parts-expert-guide-for-2025-repairs-2) for detailed steps.
Test the Repair Effectiveness
Reconnect the water supply and power, then run a test cycle. Watch for any leaks around the replaced parts. If water still escapes, recheck seals and fittings for tightness. Sometimes, small misalignments cause leaks, similar to how a misaligned door gasket can cause water seepage. Patience and careful observation during testing are key.
Address Minor Issues Promptly
If a leak persists, consider other potential causes, such as a cracked pump seal or damaged spray arm. Refer to [this troubleshooting page](https://appliancebargainz.com/diagnose-fix-dishwasher-problems-fast-expert-troubleshooting-tips) for detailed diagnostics. Replacing these parts can often resolve stubborn leaks without professional help, saving you time and money.
Many DIY enthusiasts believe that appliance repairs are straightforward, but the reality is often more nuanced than the beginner-friendly guides suggest. A common misconception is that replacing a single faulty part guarantees a long-term fix. However, this overlooks the interconnected nature of appliance components; sometimes, secondary issues or hidden failures can cause recurring problems. For example, in oven repairs, changing a temperature sensor without verifying the control board’s accuracy can lead to inconsistent heating. Experts recommend thorough diagnostics, such as testing multiple sensors and control modules, instead of jumping straight into part replacement. Additionally, there’s a myth that all parts are equally easy to replace—that’s rarely the case. Some components, like oven igniters or dishwasher pump assemblies, require special tools or delicate handling to install properly. An overlooked nuance is the importance of proper calibration post-repair—adjusting sensors or thermostats after replacing parts ensures optimal performance. According to appliance repair specialist Pete MacGregor, ‘Misdiagnosing an issue often leads DIYers down a costly and time-consuming rabbit hole.’ This highlights the need for careful testing and understanding the specific model’s intricacies, which differs significantly from one brand to another. For more advanced troubleshooting, consider verifying actual temperatures with a reliable oven thermometer, or inspecting wiring harnesses for corrosion or damage, rather than relying solely on visual cues. External studies, like those in the *Journal of Consumer Electronics*, emphasize that improper diagnostics are among the top reasons for repeat repairs. This points to one critical lesson: arming yourself with detailed knowledge and diagnostic tools drastically improves repair success rates.
How can I avoid common diagnostic pitfalls when fixing my oven or dishwasher?
To sidestep typical mistakes, always verify the root cause through systematic testing rather than assumptions. For instance, if your dishwasher isn’t filling, don’t assume the inlet valve is defective immediately; check switch connections, float switches, and filters first—these are often the culprits and are inexpensive to replace. Similarly, in oven repairs, inspecting element continuity and testing temperature sensors for resistance can save time and money. For comprehensive troubleshooting, consult trustworthy resources like the ultimate oven diagnostics guide or the dishwasher troubleshooting tips. Remember, patience in diagnostic steps reduces the risk of overlooking underlying issues. Have you ever fallen into this trap? Let me know in the comments.
Keeping Your Repairs Effective Over Time
Once you’ve successfully fixed your oven or dishwasher, the journey doesn’t end there. Regular maintenance and the right tools are essential for ensuring longevity and preventing recurring issues. I recommend investing in a quality digital multimeter, like the Fluke 117, which offers precision in testing sensors and control boards—an invaluable tool recommended by professionals for diagnosing electrical components accurately. Additionally, a reliable per-application diagnostic tool, such as a dedicated oven temperature sensor tester, helps verify sensor accuracy quickly, saving you time during routine checks. Using software like appliance-specific diagnostic apps—available for many brands—can streamline troubleshooting, especially when dealing with complex control modules. As the industry moves toward smart appliances, considering remote diagnostics and firmware updates can extend your appliance lifespan and enhance performance.
To keep your appliances running smoothly, schedule periodic inspections, including testing temperature sensors in ovens (test your oven sensor with this comprehensive guide) and cleaning filters in dishwashers. Maintaining this proactive approach helps you catch potential failures early, reducing costly repairs and downtime.
What Are the Best Practices for Routine Maintenance?
Automating a maintenance routine, such as checking seals, hoses, and electrical connections every six months, can serve as a safeguard against unexpected breakdowns. For instance, inspecting and replacing worn door gaskets or clogged filters promptly can prevent leaks and poor cleaning performance. A useful tip is to keep an organized parts kit with essential consumables—like replacement seals, hose clamps, and sensor cleaner sprays—so you’re prepared for minor fixes before they escalate.
Technology is rapidly evolving; in the future, appliances may incorporate predictive diagnostics that notify us of impending failures. Staying updated with the latest diagnostic tools and software ensures you’re ready to tackle upcoming innovations. Staying ahead by adopting these tools reduces repair times, enhances safety, and extends the appliance’s life.
How do I maintain my repair tools over time?
Proper care of your tools ensures their accuracy and longevity. Regularly calibrate digital multimeters and replace batteries as needed. Keep your tools clean and store them in a dry environment to prevent corrosion. For sensitive electronic testing equipment, consider periodic professional calibration, which can be critical for precise diagnostics. A well-maintained toolkit reduces the risk of inaccurate readings that could lead to misdiagnoses or further damage. Remember, investing in high-quality tools and caring for them is not just about convenience—it’s about taking control of your appliance maintenance routine and achieving reliable, long-term results.
Lessons That Changed My Repair Outlook
The toughest challenges revealed the most about the intricacies of appliances. I learned that sometimes, a small crack in a seal isn’t just a nuisance, but a gateway to understanding the entire system. Patience during diagnostics prevents unnecessary part swaps, saving both time and money. And most importantly, embracing a DIY mindset transforms frustration into empowerment, turning simple fixes into moments of mastery.
I realized that relying solely on visual cues can be misleading. Using proper testing tools, like a multimeter, exposes hidden faults that tricks your eyes can’t catch. The unexpected success came when I complemented online guides with my intuition—trusting the process rather than rushing to replace parts. These lessons taught me that approach, patience, and curiosity are the true keys to appliance longevity.
Where I Find My Repair Inspiration and Resources
My go-to source remains the comprehensive ultimate dishwasher diagnostics guide. It simplifies complex troubleshooting and offers step-by-step procedures that resonate with my hands-on approach. For testing sensors specifically in ovens, I lean on the oven temperature sensor testing tutorial, which demystifies diagnostics with accessible visuals.
To ensure my tools stay reliable, I trust brands like Fluke for multimeters and the dedicated appliance diagnostic apps tailored for specific brands, enabling precise pinpointing of faults. Additionally, engaging with expert blogs and forums keeps me updated with the latest tips and software updates, ensuring I avoid outdated practices and embrace innovations that make repairs smoother.
Your Next Move Starts Now
Every repaired leak or misbehaving sensor deepens your understanding and boosts your confidence. Embrace the challenge as an opportunity to become your household’s repair hero. With patience, the right tools, and a curiosity to learn, you’ll find that fixing appliances is not only rewarding but also empowering for future DIY projects.
What was the most surprising thing you learned while fixing a dishwasher or oven? Share your story below and inspire others to start their own repair journey!
**Links:** For more detailed troubleshooting, check out the dishwasher troubleshooting tips and oven repair strategies to refine your skills and techniques.