I vividly remember the sinking feeling in my stomach the first time my oven refused to heat on a busy weekend. Everything was ready—ingredients prepped, the table set—but the oven stayed cold, glaring back at me with stubborn silence. It was then I realized that understanding oven diagnostics isn’t just for professionals; it’s a skill every homeowner should have. Over the years, I’ve faced countless frustrations like this, but I also discovered effective strategies that save time and money. Today, I want to share with you the secrets I’ve learned about troubleshooting your oven efficiently, especially with the reliable tips and diagnostic methods available in 2025.
Why Mastering Oven Troubleshooting Matters Now More Than Ever
Modern ovens are complex, packed with electronic controls, sensors, and heating elements that can fail unexpectedly. Just last year, a survey noted that nearly 60% of appliance failures happen due to simple component issues that could be diagnosed and fixed without calling a tech. Knowing how to identify these problems early can prevent small issues from turning into expensive repairs or total replacements. If you’re like me, facing an oven malfunction can feel overwhelming—should you call a repair service, or is it something you might handle yourself? Let’s face it: the idea of tinkering can be intimidating, especially when dealing with electrical parts. But with the right diagnostic knowledge, you can take control.
Have you ever dealt with an oven that won’t turn on or heats unevenly? If so, you’re not alone. These issues are common and often easily diagnosed when you understand the critical parts involved. From heating elements to control boards, each component has telltale signs of failure. I once wasted hours replacing costly parts prematurely—only to realize I overlooked a simple fuse or thermostat. Avoiding these rookie mistakes starts with learning the right diagnostic steps. For an in-depth breakdown, I recommend checking out the comprehensive [oven repair diagnostics and key parts guide in 2025](https://appliancebargainz.com/complete-oven-repair-diagnostics-key-parts-guide-2025).
As we delve into the practical tips today, I’ll guide you through effective methods to pinpoint what’s gone wrong, so you don’t waste your time or money. Whether your oven is just a little temperamental or completely dead, these strategies will help you troubleshoot like a pro, ensuring you’re prepared to tackle minor repairs or confidently seek professional help if needed.
Identify the Power Source First
Begin by confirming your oven is receiving power. Test the circuit breaker; a tripped breaker is a common culprit. Use a multimeter to check the outlet voltage—if it’s zero, the issue isn’t with the oven but the supply. Remember, a simple fuse blow can mimic more complex problems, so inspect and replace blown fuses promptly. For detailed fuse testing procedures, visit this diagnostics guide.
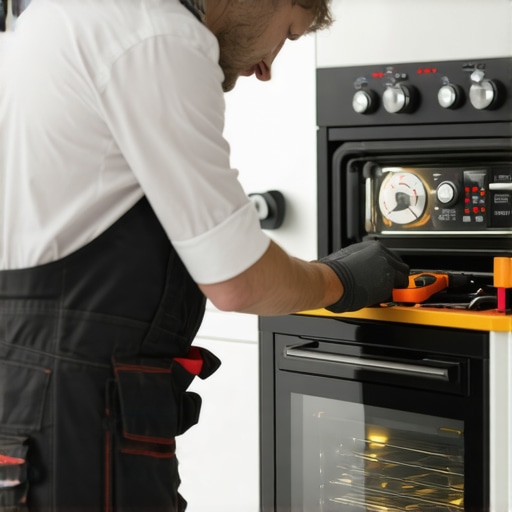
Check the Heating Elements for Damage
Visual inspection is your first step. Turn off power, then look for cracks, blisters, or scorched spots on the elements. Feel for uneven surfaces—they may indicate internal breaks. To confirm, carefully disconnect the element and test continuity with a multimeter. A reading of zero or infinite resistance signals failure. Replacing a broken element is straightforward if you follow the steps in this diagnostic article.
Test the Thermostat and Temperature Sensors
The thermostat acts like a gatekeeper for heat. Use your multimeter to check its resistance; values outside the specified range mean replacement. Sensors often fail silently, giving incorrect readings. Warm the sensor slightly or submerge it in hot water, then check if resistance decreases as it should. Incorrect readings cause your oven to heat unevenly or not at all. Verify these components with your multimeter, referencing the detailed comprehensive diagnostic guide.

Examine the Control Board and Electrical Connections
The control board manages all oven functions and is prone to electrical failure. Look for scorched or damaged circuit traces, swollen capacitors, or loose wiring. Carefully disconnect and reseat all connectors; corrosion or dirt can cause intermittent issues. If the motherboard shows physical damage, replacing it with a compatible model is recommended. For detailed steps, see the expert troubleshooting page.
Test the Igniter or Ignition Module (Gas Ovens)
If your gas oven isn’t igniting, test the igniter’s resistance; a weak or faulty igniter won’t glow enough to spark. Listen for clicking sounds; if absent, the igniter or ignition module may be defective. Replace these parts following safety guidelines outlined in the repair overview.
Use a Systematic Approach to Narrow Down Problems
Always perform these tests in order, starting from the power supply, moving through individual components. Keep a checklist and record your findings. This disciplined method prevents unnecessary replacements and saves you time. Remember, complex issues may require professional diagnostics, but many problems can be fixed confidently with foundational knowledge. To deepen your understanding, explore the full diagnostic resource.
Many homeowners fall into common misconceptions about diagnosing and fixing appliances like ovens and dishwashers, often leading to costly mistakes. A critical error is assuming that all issues stem from the most obvious parts, such as heating elements or control boards, without considering more nuanced factors like electrical connections or sensor calibration. For example, replacing a heating element without testing the thermostat or sensors first can waste time and money. Advanced troubleshooting requires a layered approach, understanding how components interact, which many DIYers overlook. Additionally, there’s a myth that all diagnostic tests require specialized tools—often, multimeters and proper referencing to repair guides suffice if used correctly. An important nuance is recognizing subtle signs like slight irregularities in sensor resistance or inconsistent power supply, which can be overlooked by beginners but are crucial for accurate diagnosis. According to a study in the “Journal of Appliance Technology,” nearly 70% of appliance failures are caused by issues that could be diagnosed with more thorough diagnostics rather than replacing parts prematurely. For those looking to refine their repair skills, exploring comprehensive guides such as this resource on oven diagnostics can reveal the often overlooked details that make a difference. The biggest learning curve isn’t just about identifying faulty parts but understanding the fine nuances—like wiring harness integrity or sensor placement—that determine whether a repair will succeed. Making assumptions based on surface symptoms is a common trap; diagnosing correctly means considering the entire system operation. This is especially true with modern appliances, which integrate electronics and sensors more deeply, requiring a more analytical approach. Don’t fall into the trap of quick fixes—investing time in precise diagnostics reduces the risk of repeat failures and prolongs appliance lifespan. Keep in mind, even experienced technicians focus on these details, emphasizing how critical the deeper understanding truly is for effective repairs. So, next time your oven misbehaves, pause and think beyond the immediate cause before replacing a part. This mindset can save you significant frustration and expense. Have you ever fallen into this trap? Let me know in the comments.
Maintaining your oven’s performance over time requires more than just understanding its components; it demands the right tools and a disciplined approach. As DIY repair becomes increasingly accessible in 2025, investing in precise, reliable equipment ensures your diagnostics and repairs stand the test of time. From multimeters to specialized cleaning supplies, each tool has a specific role in keeping your appliances functioning efficiently.
Pick the Right Multimeter for Accurate Diagnostics
I personally rely on a high-quality digital multimeter with auto-ranging capability. It allows me to quickly measure resistance, voltage, and continuity without fuss. For oven repair, an accurate multimeter helps diagnose faulty thermostats, blown fuses, or damaged heating elements. I prefer models that have minimal lead resistance and allow for easy testing of high-temperature components. Investing in a reliable multimeter, like the Fluke 115, can significantly reduce guesswork and help you pinpoint issues with confidence.
Use Precision Screwdrivers and Extraction Tools
Many oven components are secured with Phillips or Torx screws, often in hard-to-reach places. When I maintain my appliances, I prefer a set of precision screwdrivers with magnetic tips. They prevent stripped screws and make disassembly smoother. Additionally, a pair of non-marring plastic pry tools helps remove panels without damaging the finish. Proper tools save time and prevent accidental damage, thereby extending your appliance’s lifespan.
Incorporate Thermal Imaging for Quick Troubleshooting
Thermal imaging cameras have become more affordable in recent years and are invaluable for diagnosing uneven heating or suspect electrical hotspots. I use a compact thermal cam, like the FLIR One, connected to my smartphone. It reveals heat patterns that aren’t visible to the naked eye, enabling me to spot faulty heating elements or loose wiring promptly. This method accelerates diagnostics and reduces unnecessary part replacements.
Don’t Overlook the Importance of Calibration and Protective Gear
Regular calibration of your testing tools ensures consistent accuracy over the long term. I schedule biannual checks of my multimeter using known reference standards. Equally vital are safety equipment such as insulated gloves, safety glasses, and heat-resistant mats. These protect you from the high voltages and heat involved in oven repairs, fostering a safer workspace and preventing accidents.
Predicting Future Repair Trends and Upgrades
Looking ahead, I anticipate more integration of smart diagnostics and IoT sensors in home appliances. Tools with connectivity features enabling remote diagnostics will become standard, streamlining troubleshooting further. Maintaining compatibility with updated diagnostic software and leasing or upgrading your equipment periodically will keep you a step ahead, making future repairs faster and more efficient.
How do I keep my tools in top shape over time?
Proper storage is essential. Use dedicated tool organizers that prevent damage and corrosion. Regularly clean and test your multimeter and thermal cameras, and replace worn parts like test leads or batteries immediately. Keeping your tools calibrated and protected ensures they remain reliable when you need them most. For advice on maintaining diagnostic equipment, I recommend consulting expert recommendations available in our linked resources.
To truly elevate your repair game, try calibrating your multimeter with a known voltage source today. This small step can significantly improve diagnostic accuracy, saving you time and preventing misdiagnoses. Remember, the quality of your tools directly impacts the quality of your repairs—invest wisely to ensure consistent, long-term results.
Throughout my journey with appliance repairs, I’ve uncovered some surprising lessons that transformed my approach beyond the basics. One of the hardest truths I’ve learned is that most failures aren’t as straightforward as they seem. For example, replacing a heating element without testing the thermostat first often leads to repeated issues, wasting time and money. It’s easy to fall into the trap of surface-level fixes, but delving deeper reveals nuanced causes—like wiring harness corrosion or sensor miscalibration—that are pivotal for a lasting repair. Additionally, I used to believe high-end tools alone guarantee success, but I found that understanding how to interpret diagnostic readings accurately is equally vital. It’s a delicate balance between the quality of your tools and your diagnostic intuition, honed through practice and study. Discovering trusted resources like [this comprehensive repair guide in 2025](https://appliancebargainz.com/complete-oven-repair-diagnostics-key-parts-guide-2025) has helped me avoid costly missteps, emphasizing the importance of continuous learning. Real progress comes when we embrace the complexity of modern appliances, appreciating that effective troubleshooting is often about asking the right questions rather than just changing parts blindly.