Ever had that sinking feeling when your trusty oven suddenly refuses to heat, leaving dinner plans in limbo? I remember the first time my oven stopped working, and I was clueless about where to start. I spent hours fiddling with parts and trying random fixes, only to realize I was missing the right diagnostic tools and parts to get the job done efficiently. That experience was a real lightbulb moment for me—knowing that proper diagnostics and quality parts are the backbone of quick, reliable oven repairs.
Why Accurate Diagnostics Matter More Than Ever
These days, appliances are smarter and more complex than ever. A small mistake in diagnosing the problem can lead to unnecessary part replacements or, worse, further damage. Early on, I made the mistake of assuming a faulty control board was the culprit without checking the heating element or thermostat first. That misstep cost me time and extra money. Since then, I’ve learned that the secret to successful repairs lies in targeted diagnostics—using the right tools and parts to identify issues swiftly and accurately. If you’re tired of wasting time and money on trial-and-error fixes, mastering diagnostics is your best move.
Is Investing in Diagnostic Parts Worth It
Absolutely. When I first started, I underestimated how much quality diagnostic parts could streamline the repair process. Now, I swear by having a well-stocked kit of essential parts like sensors, switches, and control modules. Not only does this cut down repair time, but it also boosts your confidence as a repair pro. Want to learn what the top diagnostic parts are for oven repairs? Check out this ultimate guide for a comprehensive list of must-have parts for faster fixes.
In the upcoming sections, we’ll explore how to troubleshoot ovens efficiently, select the right parts, and avoid common mistakes that can trip up even seasoned DIYers. Ready to turn your oven repair frustrations into successful fixes? Let’s dive into the practical steps that will make your next repair faster, easier, and more reliable.
Start with a systematic visual inspection
Before diving into complex tests, examine your oven for obvious issues like burnt wires, broken knobs, or leaks. I recall fixing an oven where I initially thought the control board was faulty, but a quick visual check revealed a disconnected wire that had come loose during a move. This simple step saved me hours of unnecessary testing and parts replacement.
Use the right diagnostic tools to pinpoint issues
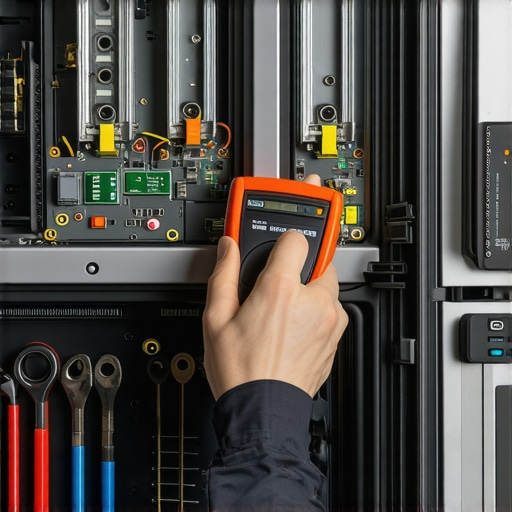
Invest in quality multimeters, thermometers, and testers designed for appliances. Think of these tools as your detective’s magnifying glass—crucial for uncovering hidden faults. For example, I used a multimeter to test the heating element’s resistance, which immediately showed it was open-circuited, confirming my suspicion. Proper diagnostics tools accelerate your troubleshooting and prevent costly mistakes. If you want to know which diagnostic parts are essential, check out this guide.
Test key components one by one
Don’t jump straight to replacing parts. Instead, methodically test each component—thermostats, sensors, switches, timers—using your tools. Remember, it’s like peeling an onion; each layer reveals more. I once replaced a control board only to find the oven still didn’t heat. A test of the temperature sensor revealed it was faulty, and replacing it solved the problem instantly. For detailed troubleshooting strategies, visit this troubleshooting guide.
Match parts precisely to the problem
Once diagnosed, select high-quality parts that match your oven’s model and the specific fault. Think of parts like puzzle pieces; choosing the wrong size or type won’t fit or work. I learned this the hard way when I bought a generic thermostat that didn’t match my oven’s specifications, causing delays. Use manufacturer-recommended parts whenever possible, which you can find in this essential parts list.
Keep your diagnostic and repair process organized
Create a checklist of tested components, parts replaced, and results. This prevents redundant testing and helps you track what’s working. I once kept a detailed log that showed the heating element tested fine, but the sensor needed replacing. This approach saves time and reduces frustration, especially for complex repairs. To learn about the most effective diagnostic parts, see this list of top diagnostic parts.
Remember, patience and precision are key
Rushing to replace parts without proper diagnostics can lead to wasted money and time. Approach each repair methodically, verify your findings, and only replace what’s necessary. I once replaced multiple parts blindly, only to discover that a loose wire was the actual culprit. Developing a disciplined troubleshooting routine transforms your repair skills from guesswork into expertise.
While many DIY enthusiasts believe that simply swapping out parts or relying on basic troubleshooting will solve oven issues, the reality is far more nuanced. A common mistake I see is assuming that the most obvious problem—like a broken heating element—is always the root cause. In practice, ovens are complex systems where multiple components interact, and a failure in one area can mask issues elsewhere. For instance, replacing a heating element without testing the thermostat or control board might temporarily fix the symptom but won’t address the underlying cause, leading to repeat failures.
Why Do So Many People Get Diagnostics Wrong?
The biggest misconception is thinking that diagnostic tools are optional or that basic visual checks are enough. In reality, advanced diagnostic strategies—such as measuring resistance, voltage, and signal continuity—are essential for accurate pinpointing. Relying solely on guesswork or assumptions often results in unnecessary parts replacements, which can be costly and time-consuming. Expert sources, like this guide, emphasize that a methodical diagnostic approach saves both time and money.
Another trap is ignoring the importance of using manufacturer-recommended parts. Generic or incompatible replacements might seem like a cost-effective solution initially, but they can cause further damage or inconsistent performance. For example, a thermostat that doesn’t match the oven’s specifications may lead to inaccurate temperature regulation, which in turn affects food quality and safety. Always match parts precisely to the problem, and consult trusted sources such as this essential parts guide for your model.
How Can Advanced Diagnostics Prevent Costly Mistakes?
Advanced diagnostics involve testing components individually, such as checking the resistance of heating elements or the output voltage of control boards, rather than replacing parts blindly. This targeted approach minimizes unnecessary expenses and reduces repair time. For example, I once replaced a control board, only to find out that a faulty sensor was the true culprit. Patience and thorough testing prevented me from unnecessary replacements, highlighting that the real skill is knowing what to test and when.
In conclusion, understanding the nuances of diagnostic procedures and avoiding common myths can make a big difference in your repair success. Remember, patience and precision are your best tools. Have you ever fallen into this trap? Let me know in the comments.
Investing in the Right Equipment for Long-Term Success
Maintaining your oven’s performance over time hinges on having the right tools at your disposal. I personally rely on a high-quality digital multimeter because it provides precise readings, helping me quickly identify faulty components like thermostats or control boards. A cheap multimeter might work in a pinch, but investing in a reputable model ensures accuracy, saving you time and money in the long run. For example, I prefer a multimeter with auto-ranging capabilities and temperature measurement features, which are invaluable when troubleshooting oven sensors or heating elements. Additionally, a non-contact voltage tester is a must-have for safety checks, allowing you to verify power presence without risking shocks. Regularly maintaining and calibrating these tools guarantees consistent results, which is critical for effective diagnostics.
Streamlining Repairs with Diagnostic Software and Manuals
Beyond physical tools, leveraging diagnostic software and manufacturer manuals can elevate your repair game. Many oven brands now offer online diagnostic guides or apps that walk you through troubleshooting steps tailored to your model. These resources help you interpret error codes and pinpoint issues more confidently. I recommend bookmarking the official repair manuals from the manufacturer or trusted third-party sources like this guide to stay updated on the latest troubleshooting techniques. Using these resources regularly not only improves your diagnostic accuracy but also extends your knowledge, making future repairs faster and more reliable.
How do I maintain my diagnostic tools over time?
Proper maintenance of your diagnostic equipment ensures longevity and accuracy. Keep your multimeter batteries fresh and store the device in a dry, dust-free case to prevent corrosion. Periodically check your testing leads for wear and replace them if they show signs of fraying or damage. Calibration is equally important; some multimeters can be calibrated at home with reference standards, but professional calibration services are recommended annually for critical measurements. By investing a little time in maintaining your tools, you ensure they provide precise readings when you need them most, reducing the risk of misdiagnosis. As technology advances, I predict more integrated diagnostic tools will emerge, combining software and hardware for even faster troubleshooting. For now, focus on keeping your existing tools in top shape—it’s a small effort with a big payoff.
Try incorporating a dedicated infrared thermometer for quick temperature checks of heating elements or sensors. This simple addition allows you to identify temperature discrepancies instantly, streamlining your diagnostics process. Remember, accuracy starts with well-maintained tools, so prioritize regular upkeep and calibration. Ready to upgrade your diagnostic arsenal? Explore this essential parts guide to see which tools will make your repairs more efficient.
The Hardest Lesson I Learned About Oven Diagnostics
One of my biggest surprises was realizing that jumping straight into part replacements often leads nowhere. The moment I started focusing on precise diagnostics, my repair success rate skyrocketed. Patience and thorough testing became my best allies in avoiding unnecessary costs and frustration.
3 Myths About Oven Diagnostics That Held Me Back
Many DIYers believe that visual checks or basic tests are enough. I used to think so too—until I discovered that advanced diagnostic techniques, like measuring resistance and voltage, are essential. Busting these myths transformed my approach from guesswork to confidence.
What Experts Won’t Tell You About Oven Troubleshooting
Real mastery comes from understanding that multiple components can fail simultaneously, masking the root cause. Relying solely on generic parts or assumptions often leads to repeated failures. Reading reputable guides and investing in quality diagnostic tools are game-changers I wish I had earlier.
Curated Resources to Elevate Your Repair Skills
My Essential Toolkit for Oven Diagnostics: A high-quality digital multimeter is non-negotiable for accurate readings. This guide helped me pick the best models and understand their features.
Books That Changed How I View Appliance Repair: “The Art of Troubleshooting Appliances” opened my eyes to systematic testing and diagnostics, making repairs faster and more reliable.
Official Manufacturer Manuals: Always keep these handy—they offer model-specific troubleshooting steps and wiring diagrams, which save hours of guesswork.
Your Turn to Try
Now that you know the hidden secrets of diagnostics, it’s your move. Patience and precise testing are your best tools for quick, reliable oven repairs. The more you learn, the less you’ll fear fixing appliances yourself.
What’s the biggest challenge you’ve faced when diagnosing oven problems? Share your story below—I’d love to hear about it!
Emily Carter
I really enjoyed this deep dive into oven diagnostics. As someone who has struggled with troubleshooting my own appliances, I can relate to the importance of having the right tools and methodical approach. I once replaced a control board only to find out later that an overlooked wiring issue was the real problem. It’s a reminder that visual inspection and testing components individually can save time and money. I’ve started investing in a decent multimeter, and it has made a noticeable difference in diagnosing issues accurately. One thing I’ve been curious about is how often calibration of diagnostic tools affects the results. Do others calibrate their multimeters regularly, or is a good quality tool enough without frequent calibration? Would love to hear your thoughts or tips on maintaining diagnostic accuracy over time.
Michael Johnson
Reading through this post reminded me how crucial it is to have a well-organized diagnostic process when tackling oven repairs. I agree that rushing into replacing parts without thorough testing can lead to wasted resources and ongoing issues. One thing I’ve found helpful is keeping a detailed repair log—even simple notes on what was tested and replaced. It saves time during troubleshooting and makes it easier to identify patterns if the same problems occur repeatedly. Also, investing in a good multimeter with auto-ranging and temperature measurement can really improve accuracy. On the question of calibration, I try to calibrate my multimeter annually, especially if I notice inconsistent readings. How do others handle calibration? Do you think the cost of professional calibration is justified compared to just buying a new high-quality multimeter? I’d like to hear more about how the community maintains their diagnostic tools for optimal performance.