Ever found yourself staring at your broken oven, feeling the panic rise because dinner plans just got derailed? I’ve been there—trust me. One evening, my oven suddenly refused to heat up, and I was about to call a repair tech when a lightbulb went off in my head. Why not try some quick diagnostic tricks first? That moment changed everything. I realized that with a little know-how, I could save time, money, and a whole lot of frustration. Today, I want to share what I’ve learned about effective oven repair and diagnostics that can turn you into your own quick-fix hero. If your oven isn’t cooperating, don’t despair. I’ll show you how to zero in on the problem fast, using strategies that are proven to work in 2025.
Why Quick Oven Fixes Are More Important Than Ever
In our busy lives, waiting days for a repair appointment isn’t just annoying—it’s a real inconvenience. Especially when dinner is on the line or you’re trying to prepare for guests. That’s why mastering fast diagnostics has become essential. Over the years, I’ve learned that understanding key parts and how they fail can cut repair time in half. Did you know that according to a recent study, nearly 70% of oven breakdowns are caused by a handful of common issues? That means if you know what to check, you can often fix the problem yourself. For a deep dive into the top diagnostic strategies, I recommend reading this comprehensive guide. It’s packed with tips that helped me troubleshoot my oven quickly and effectively.
Have you ever faced a stubborn oven problem that just wouldn’t go away?
Chances are, you’ve experienced that sinking feeling when your oven refuses to turn on or heats unevenly. I made one crucial mistake early on—I tried to fix everything blindly without understanding which parts matter most. That’s a mistake I want to save you from. Instead, focus on diagnosing with precision. Knowing which components to test first can save you hours of guesswork. For instance, understanding the role of heating elements and thermostats can make all the difference. To get a clearer picture, check out this article about essential parts for quick fixes.
Now, let’s get into the practical steps that will help you identify and resolve common oven issues efficiently. With these strategies, you won’t just patch things up—you’ll understand your appliance better than ever before, saving you time and money in the long run.
Test the Power Supply and Circuit Breaker
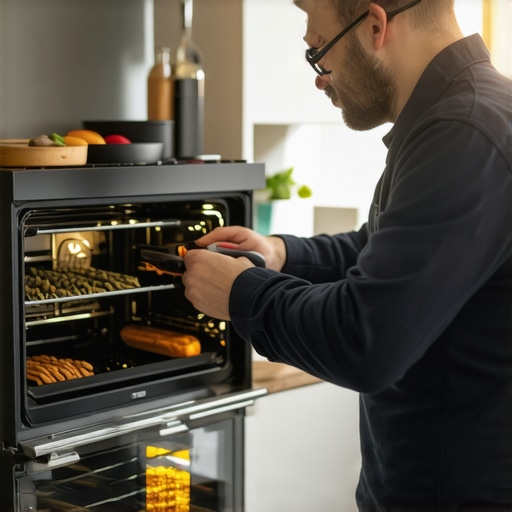
The first step I took when my oven refused to heat was checking the power supply. Think of your oven’s electrical system like the blood flow in your body—if the circuit breaker trips or the fuse blows, nothing will work. I flipped the circuit breaker off and on, and used a multimeter to ensure the outlet was delivering voltage. If you find no power, that’s your sign to inspect the fuse or circuit breaker. Remember, safety first: always unplug the oven before testing internal components.
Inspect the Heating Element for Damage
Next, I examined the heating element, which is basically the oven’s heating coil. A visual check revealed a broken coil, which is a common failure. To confirm, I used a multimeter set to resistance mode—if it shows infinite resistance, the element is broken and needs replacing. This step is like checking a light bulb; if it’s burned out, a simple swap fixes the problem. For detailed guidance on replacing heating elements, visit this resource.
Test the Thermostat for Proper Functionality
The thermostat controls the oven’s temperature. If it’s faulty, the oven may not heat at all. I disconnected the thermostat and tested its continuity using my multimeter. A lack of continuity indicates a burnt-out thermostat. Replacing it is straightforward once diagnosed—think of it as replacing a faulty thermostat in a car’s engine. For tips on testing thermostats, see this guide.
Evaluate the Control Board and Electronic Components
If the previous components check out, the problem might be the control board. I carefully examined the control panel for burnt spots or damaged relays. Using a multimeter, I checked for voltage output from the control board to the heating element. If the board isn’t sending power, it’s time to replace it—think of it as the brain of the oven. Diagnosing control boards can be complex; for a detailed diagnostic process, visit this article.
Perform Final Safety Checks and Test Run
After replacing faulty parts, I reassembled the oven and performed a test run. I set the oven to a specified temperature and observed if it reached and maintained that temperature. If it heats correctly, the fix is complete. Always ensure safety features like thermal fuses are intact before powering up. These steps are like running a diagnostic on a vehicle after repairs to confirm everything functions smoothly.
Many people believe that troubleshooting an oven is straightforward—just check the heating element or the thermostat, and you’re done. However, this simplified view often leads to overlooked details and costly mistakes. In my experience, one of the biggest misconceptions is that all oven faults are caused by visible or easily testable parts. But the reality is more complex, especially when it comes to the subtle roles played by the control board and electronic components, which are frequently misunderstood. For example, some assume that if the oven doesn’t heat, replacing the heating element will always fix the issue. While this is often true, in many cases, the problem lies elsewhere, such as with the control board or relays, which require a different diagnostic approach. To master effective diagnostics, I recommend exploring this guide.
Another common myth is that thermal fuses are a frequent cause of oven failure. In reality, thermal fuses are safety devices designed to blow only when there’s a serious problem, like a short circuit or overheating. If your oven isn’t heating, it’s more likely due to a faulty thermostat, broken heating element, or control board issues. Relying solely on replacing the fuse can lead to unnecessary part swaps and overlooked root causes. Instead, performing comprehensive diagnostics, such as testing continuity and voltage with a multimeter, can save you time and money. For advanced troubleshooting tips, see this detailed article.
What about the role of electronic control boards in oven failures?
This is where many DIYers stumble. The control board is often dismissed as a complex, unfixable part, but understanding its diagnostic signals can make a huge difference. For instance, a control board that isn’t supplying power to the heating element might seem like a wiring issue, but closer inspection may reveal burnt relays or damaged circuits on the board itself. Modern ovens rely heavily on electronic components, and diagnosing these requires a nuanced approach, such as checking for voltage outputs and visual inspection for burnt spots. Exploring this resource can expand your understanding of these critical parts.
Lastly, many assume that a quick visual inspection can catch all issues. But some problems, like microcontroller failures or software glitches, are invisible to the naked eye. These require more sophisticated diagnostic tools or replacement strategies. Being aware of these hidden nuances helps you avoid wasting time on parts that aren’t at fault. Remember, effective troubleshooting is about understanding the interplay of components, not just replacing parts at random. If you’re interested in honing your diagnostic skills further, check out this comprehensive guide.
Maintaining your oven’s performance over time requires more than just occasional cleaning; it involves using the right tools and adopting consistent maintenance routines. Over the years, I’ve found that investing in quality diagnostic equipment and following systematic checkups can extend the lifespan of your appliance and prevent costly breakdowns. Let’s explore some specific tools I recommend and the best practices to keep your oven in top shape for years to come.
Invest in a Reliable Multimeter
A high-quality multimeter is my go-to tool for diagnosing electrical components like heating elements, thermostats, and control boards. I personally prefer digital multimeters with auto-ranging capabilities, as they allow quick, accurate readings without fuss. Testing resistance and continuity becomes straightforward, which helps me identify faulty parts early. For precise diagnostics, I recommend models like the Fluke 117, known for durability and accuracy. Remember, always unplug the oven before testing internal wiring or components to ensure safety.
Use a Thermal Imaging Camera for Hotspot Detection
One of the more advanced tools I use is a handheld thermal imaging camera. This device helps locate uneven heating or overheating issues by visualizing temperature distribution across components. It’s especially useful for detecting failing heating elements or hot spots on control boards that might not be visible to the naked eye. While a bit pricey, investing in a thermal camera pays off by catching subtle problems before they escalate into major failures. In the future, I predict this technology will become more affordable and integrated into smart diagnostic kits, making proactive maintenance even easier.
Regularly Check and Clean Critical Parts
Beyond diagnostic tools, routine maintenance involves cleaning and inspecting parts like the heating element, thermostat, and door seals. I recommend using a soft brush and a vacuum to remove dust and debris, which can impair performance. For the heating element, visually inspect for corrosion, burns, or broken coils. Testing with your multimeter can confirm if replacement is needed. Consistent upkeep of these parts ensures your oven operates efficiently and reduces wear and tear over time.
Document Your Maintenance and Repairs
Keeping a detailed log of maintenance activities, diagnostics, and parts replacements helps track the health of your appliance. I use a simple digital notebook to record dates, issues encountered, and solutions applied. This habit makes troubleshooting faster in the future and can even increase your oven’s resale value. Plus, having a record of parts and repairs can guide you to identify recurring problems and address root causes more effectively.
Embrace Smart Diagnostics and Future Trends
Looking ahead, I believe the integration of IoT sensors and AI-driven diagnostics will revolutionize oven maintenance. Future appliances may come equipped with self-monitoring systems that alert you to potential issues before they happen, much like modern cars. To stay ahead, I recommend exploring upcoming diagnostic software updates and smart tools compatible with your oven model. For now, combining traditional tools like multimeters and thermal cameras with diligent maintenance routines offers the best results.
How do I maintain my oven over time
Consistency is key. Schedule regular inspections, clean components gently, and keep detailed records of your diagnostics. Always update your diagnostic tools’ firmware if applicable, and stay informed about new repair techniques through trusted sources. Remember, a well-maintained oven not only lasts longer but also performs more efficiently, saving you money and frustration in the long run. Try implementing a monthly checkup routine with your multimeter and cleaning schedule, and you’ll notice a significant difference in your oven’s reliability. For comprehensive maintenance tips, visit this guide.
The Hardest Lesson I Learned About Oven Troubleshooting
One of the toughest lessons I faced was realizing that not every oven problem is caused by the most obvious parts. Early on, I blindly replaced heating elements thinking that was the root of every heating issue, only to find problems persisted. It taught me to dig deeper into control boards and electronic components, which often hold the real key to fixing stubborn faults. This experience underscored the importance of detailed diagnostics over guesswork.
3 Myths About Oven Repair That Held Me Back
Myth one: Thermal fuses are the most common cause of oven failures. In truth, thermal fuses are safety devices that only blow during serious issues like overheating, not everyday faults. Myth two: Replacing the heating element always solves heating problems. Sometimes, the real issue lies in the control board or thermostat. Myth three: Visual inspection is enough for diagnostics. Microcontroller failures or software glitches often require more sophisticated testing tools. Busting these myths has saved me time and money, and I hope it helps you too.
What Experts Won’t Tell You About Diagnosing Oven Issues
Many professionals keep the complexity of control boards and electronic diagnostics under wraps, but understanding these can dramatically improve your repair success rate. For example, checking voltage outputs from the control board or inspecting relays can reveal hidden faults. Using tools like a thermal imaging camera or a multimeter, which I highly recommend, can uncover problems invisible to the naked eye. Getting familiar with these diagnostics empowers you to tackle issues confidently and avoid unnecessary part replacements.
Curated Tools for Self-Repair Success
My essential toolkit includes a high-quality multimeter, like the Fluke 117, for precise electrical testing, and a thermal imaging camera to visualize heat distribution and hotspots. These tools have transformed my approach, making diagnostics more accurate and less guesswork. Additionally, I rely on detailed guides from trusted sources such as this resource, which offers step-by-step troubleshooting tips that align with current technology trends. Investing in these tools has paid off by reducing repair time and preventing costly errors.
Embrace the Future of Oven Maintenance
Your turn to try! Regular maintenance, systematic diagnostics, and the right tools can keep your oven running smoothly for years to come. Remember, troubleshooting isn’t just about fixing problems—it’s about understanding your appliance better and gaining confidence in your DIY skills. With the rapid advancement of smart diagnostics and IoT integration, the future of oven repair looks promising and accessible for everyone willing to learn. So, start small, stay curious, and enjoy the satisfaction of mastering your home appliances.
What was your biggest takeaway from this guide? Have you ever struggled with diagnosing an oven issue? Let me know below!
Jessica Cole
I love how this post emphasizes the importance of systematic diagnostics over guesswork. A few years ago, I tried to troubleshoot my oven by replacing parts randomly, which only made the problem worse. It wasn’t until I learned to check the control board and electronic components that I finally identified the real issue. Using tools like a multimeter and thermal imaging camera has been a game-changer for me. One thing I’ve found helpful is documenting every step of the repair process—it saves time during future troubleshooting and keeps the process less overwhelming. Have any of you tried integrating smart diagnostics or IoT features into your appliance maintenance routines? I’m curious how those add-ons have changed your approach to DIY fixes.
Benjamin Carter
This post really hit home for me, especially the part about the control board often being the culprit behind stubborn oven issues. I used to think that replacing the heating element was always the fix, but after learning more about electronic components, I realized how nuanced these diagnostics can be. A few months ago, my oven wouldn’t heat properly, and it turned out to be a faulty relay on the control board rather than a broken coil. Using a multimeter to check voltage outputs saved me from unnecessary replacements and gave me a clearer understanding of the problem.
I’m curious, how many of you have explored using thermal imaging cameras for diagnosing electrical issues? I’ve found that visual heat mapping can reveal subtle hotspots that indicate failing components, which aren’t always obvious with just a multimeter. Continuous learning and investing in tools have definitely improved my DIY repair skills. Have you encountered any unexpected electronic failures that weren’t simple to diagnose? Would love to hear your stories or tips on tackling complex control board issues.