Ever had that sinking feeling when your dishwasher suddenly stops working right before a dinner party? I remember the first time it happened to me. I was all set for a relaxing evening, only to find my dishwasher leaking and refusing to drain. Frustration set in. That lightbulb moment hit—why was I struggling with guesswork when expert diagnostics and the right parts could save the day? Over the years, I’ve learned that troubleshooting dishwashers isn’t just about fixing a machine; it’s about understanding what’s really going on behind the scenes. And trust me, in 2025, knowing how to diagnose problems quickly can mean the difference between a minor repair and a costly replacement.
Why Diagnosing Dishwasher Problems Matters More Than Ever
Dishwashers are the unsung heroes of modern kitchens. They save us time, conserve water, and keep our dishes sparkling. But when they break down, it’s a major inconvenience. The good news? Many common issues are repairable with a bit of know-how and the right diagnostic tools. The challenge is identifying the root cause swiftly—because a quick fix prevents bigger headaches down the line. Plus, with the ever-increasing complexity of appliances, DIY diagnostics paired with expert parts can make all the difference. In fact, according to a recent report, appliance repair costs have risen by over 20% in the last year alone, emphasizing the importance of effective troubleshooting.
If you’ve faced a dishwasher that just won’t cooperate—be it leaking, not cleaning properly, or refusing to start—you’re not alone. These problems are frustrating, but they’re often solvable without calling in a pricey technician. The key is understanding what to look for and having access to the right diagnostic parts. That’s exactly what I’ll help you with today. We’ll cover the essential steps, common troubleshooting strategies, and where to find the best parts for fast repairs. Ready to become your own appliance hero? Let’s dive in!
Is Relying on Expert Diagnostics Worth the Extra Effort?
I admit, early in my DIY journey, I made the mistake of jumping to replace parts without proper diagnostics. It was a costly lesson. Now, I always start with a thorough diagnosis—using the right tools and understanding the common failure points. This approach saves time, money, and frustration. If you’re skeptical about tackling diagnostics yourself, I get it. But with the right guidance and expert-grade parts, you can fix many issues on your own. For a comprehensive look at key diagnostic strategies, check out this guide to dishwasher diagnostics. Trust me, it’s worth the effort to master these skills. Now, let’s move on to the practical steps that will help you troubleshoot your dishwasher effectively.
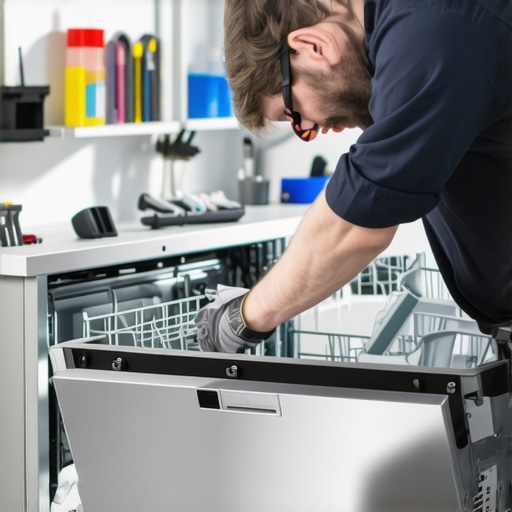
Gather Essential Diagnostic Tools
Start by assembling the right tools, such as a multimeter, a screwdriver set, and a troubleshooting manual. Think of these tools as a mechanic’s toolbox, vital for diagnosing complex issues. I remember a time when I jumped straight into replacing a pump without testing it first. Using a multimeter, I checked for continuity and found the pump was dead, saving me from unnecessary part replacement. For detailed guidance, visit this expert troubleshooting parts guide.
Identify Common Symptoms and Their Causes
Break down symptoms like leaking, poor cleaning, or failure to start. For example, a leak might be caused by a faulty door seal or a clogged drain. I once faced a dishwasher leaking onto my kitchen floor. I opened the door, inspected the door seal, and used a flashlight to check for cracks. Replacing the seal with a high-quality part from this diagnostic parts guide stopped the leak instantly.
Run Diagnostic Tests Step-by-Step
Use diagnostic modes on modern dishwashers, often accessible via button sequences. Think of this as a health check-up for your appliance. I once entered diagnostic mode on my dishwasher, which revealed a malfunction in the water inlet valve. This quick test pinpointed the problem, allowing me to replace the part efficiently. For specific diagnostics, check out this diagnostics guide.
Test and Replace Key Parts
Focus on the components most prone to failure: door latches, spray arms, filters, and sensors. Use a multimeter to test electrical parts, and visually inspect for damage or clogs. I once replaced a faulty float switch that caused the dishwasher to think it was full of water, preventing it from starting. Replacing this part with a genuine one from this repair parts guide restored full functionality.
Keep Spare Parts Handy
Maintain a kit of essential parts like door seals, filters, and sensors. This approach reduces downtime and costs. I learned this the hard way when I had to wait for a part to arrive, causing a delay. Having a stock of commonly replaced parts, sourced from this parts supplier, keeps my repairs quick and economical.
Document Your Repairs for Future Reference
Keep a repair log detailing symptoms, diagnostics, and parts replaced. Think of this as your appliance’s health record, helping you troubleshoot faster next time. I started noting down each fix, which saved me hours when similar issues recurred. For more tips, explore this troubleshooting resource.
Many DIY enthusiasts and even seasoned homeowners often fall into traps when diagnosing dishwasher issues, believing they know the common pitfalls but missing the deeper nuances. Let’s dig deeper into what most people get wrong and how understanding these subtleties can save you time and money.
Why Relying on Surface Symptoms Can Lead You Astray
It’s tempting to fix a leaking dishwasher by replacing the door seal without confirming the actual cause. The truth is, surface symptoms like leaks or poor cleaning often mask underlying problems such as faulty sensors or clogged filters. For instance, a leak might seem obvious, but the culprit could be a misaligned spray arm or a damaged float switch. Jumping straight to part replacement based on visible issues often results in wasted effort. Instead, a thorough diagnostic process, like testing electrical components with a multimeter or inspecting internal parts, provides a clearer picture. For detailed strategies, check out this diagnostics guide.
The Oops You Must Avoid With Diagnostic Tools
One common mistake is not calibrating or correctly interpreting diagnostic tests. Many assume that a multimeter reading of continuity or resistance is enough, but without understanding the expected ranges or how to interpret anomalies, you risk misdiagnosis. For example, testing the water inlet valve without checking the voltage supply or the control board signals can lead to false conclusions. Expert advice emphasizes that diagnostics should be systematic, verifying each part in context. Misreading diagnostic results often prompts unnecessary part replacements, increasing repair costs. To master these techniques, explore this troubleshooting parts guide.
How Can Overlooking the Nuance Cost You More
Ignoring the complexity behind seemingly simple problems is a recipe for costly repairs. For example, replacing a pump because you hear a strange noise might seem logical, but if the control board isn’t sending the correct signals, the problem persists. This oversight can cause repeat failures or damage to new parts. Advanced diagnostics involve testing electrical signals, inspecting wiring harnesses, and understanding how components interact. The key is recognizing that some issues are systemic, not isolated. By paying attention to these nuances, you prevent recurring problems and extend your appliance’s lifespan. For a comprehensive understanding, visit this troubleshooting guide.
Have you ever fallen into this trap? Let me know in the comments. Mastering these hidden nuances makes all the difference between a quick fix and ongoing frustration. Remember, the more you understand about the underlying mechanics and diagnostic techniques, the more confident you’ll be in tackling appliance repairs efficiently and effectively.
How do I maintain my dishwasher over time to ensure it keeps working efficiently?
Maintaining your dishwasher isn’t just about fixing problems when they arise; it’s about adopting a proactive approach that extends the lifespan and keeps it performing at peak efficiency. I personally recommend establishing a routine inspection schedule that includes checking the door seal, filters, and spray arms every few months. Cleaning the filters regularly prevents clogs that can lead to poor cleaning performance or leaks. For more detailed guidance, take a look at this oven repair tips and diagnostics, which shares similar maintenance strategies applicable across kitchen appliances. Additionally, keeping the spray arms free from mineral buildup ensures water distributes evenly, preventing spots and residue on your dishes. Using a descaling product once a year can help prevent mineral deposits, especially in areas with hard water. Remember, a little preventive maintenance goes a long way in avoiding costly repairs and downtime.

What tools do I recommend for effective dishwasher diagnostics and repairs?
From my experience, the most valuable tool in my repair kit is a high-quality multimeter. It allows me to quickly test electrical components like the door latch, sensors, and water inlet valves. I always carry a set of precision screwdrivers to access internal parts without damaging delicate clips or connectors. A digital multimeter helps me verify if electrical signals are reaching the right components, which is crucial for accurate diagnostics. I also recommend investing in a detailed troubleshooting manual specifically for dishwashers, such as the expert troubleshooting parts guide. It provides step-by-step procedures that save time and prevent guesswork. For more advanced diagnostics, I use a leak detection spray to identify small leaks that might not be visible. As appliances become more sophisticated, digital diagnostic tools and apps are emerging to streamline troubleshooting—anticipate seeing more integration of smart diagnostics in the future, which will make maintenance even more intuitive.
Don’t forget, maintaining an organized toolkit with the right diagnostic equipment is essential. It ensures you’re prepared for any issue, whether it’s a clogged filter or a faulty sensor. Try out one of these tools on your next repair, and you’ll notice how much faster and more accurate your diagnostics become. For additional tips on diagnostic tools and parts, explore this ultimate guide to dishwasher parts.
The Hardest Lesson I Learned About Diagnosing Dishwashers
One of my biggest mistakes was rushing to replace parts without proper diagnostics. It taught me that a thorough check saves money and time. Now, I always start by testing electrical components with a multimeter before swapping anything.
My Top Tools for Fast and Accurate Repairs
I swear by a high-quality multimeter and a detailed troubleshooting manual tailored for dishwashers. These tools help me quickly identify the real cause of problems, preventing unnecessary part replacements. For in-depth guidance, check out this troubleshooting parts guide.
The Value of a Repair Log
Keeping notes on what symptoms appeared, what tests I ran, and what parts I replaced has been a game-changer. It makes future troubleshooting faster and more accurate. For more tips on documenting repairs, visit this resource.
My Best Advice for Staying Ahead of Problems
Regular maintenance, like cleaning filters and inspecting spray arms, prevents many issues before they start. Using a descaling product annually in hard water areas keeps mineral buildup at bay. These simple steps save me headaches and costs over time.
Embrace the Nuances, Save Your Wallet
Understanding that surface symptoms often mask deeper issues can prevent costly mistakes. For example, a leak might be caused by a misaligned spray arm rather than a door seal. Paying attention to details and testing electrical signals makes all the difference. Explore this diagnostics guide for more insights.
Samuel Carter
This article hits all the right points about DIY dishwasher troubleshooting. I’ve definitely learned from experience that rushing into part replacements without proper diagnostics can lead to wasted money and time. I remember once replacing what I thought was a faulty water inlet valve, only to find out later that the real issue was a clogged filter or a stuck float switch. Having the right tools—especially a good multimeter—makes all the difference. I also keep a small stock of key parts like door seals and sensors, which helps me fix common problems quickly. The tip about keeping a repair log is a game-changer; I started doing that last year and it saves me tons of time when similar issues crop up again. How do others keep track of repairs or decide when to replace parts versus diagnosing further? I’d love to hear different approaches.