Ever stood by your dishwasher, soap still foaming, but dishes come out less than sparkling? I’ve been there, frustrated, thinking my trusty appliance was giving up on me. Then it hit me during one particularly dull weekend—those stubborn, grimy nozzles might be the culprit. Before, I’d ignored the little things, dismissing mineral buildup as normal wear and tear. But reality proved otherwise.
Why Your Dishwasher Isn’t Cleaning Like It Used To
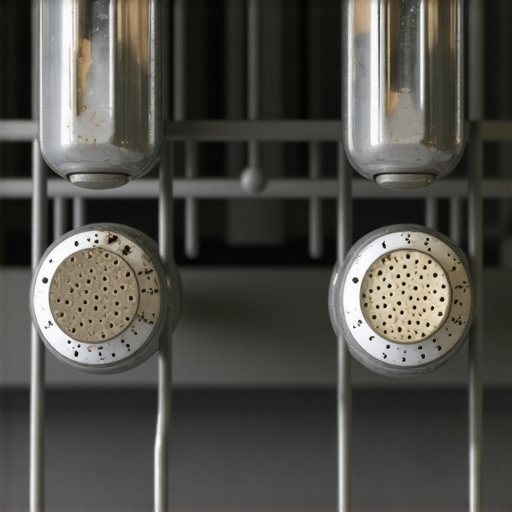
If your dishes aren’t getting that crisp shine, chances are, those four nozzles are clogged with grime, making the spray less effective. Over time, mineral deposits, soap scum, and debris can clog the nozzles, reducing water pressure and spray coverage. As a result, food particles stick around, and your dishwasher’s performance plummets. Interestingly, a study published in the Science Daily highlights how mineral buildup can decrease water efficiency by up to 25%, impacting energy use and cleaning power.
Is This Fix Really Worth the Effort or Just a Fad?
Admittedly, my early mistake was thinking replacing the entire spray arm was the only solution. I was so sure of it until I realized a simple cleaning or clearing of those nozzles could restore full spray performance. Trust me, I’ve learned that many dishwasher issues are surprisingly manageable once you know what to do. So, if you’ve faced stubborn residue or stubborn spots despite multiple runs, keep reading. We’ll walk through how to tackle those nozzles for a spotless, efficient dishwasher in 2026—and beyond.
Now that you’re ready to get your dishwasher back in top shape, let’s dive into the practical, step-by-step process to clean and maintain those vital nozzles for optimal performance.
Remove and Inspect the Spray Arm
Start by opening your dishwasher and carefully removing the spray arm. Use a screwdriver if necessary to release it from its mounting. Hold it close and examine the nozzles for visible buildup or clogging. I once faced a stubborn spray arm clogged with mineral deposits, which caused uneven water distribution. By gently prying out solid debris with tweezers, I restored the spray’s pressure and improved cleaning results.
Clear Clogged Nozzles Effectively
Utilize a stiff brush, like an old toothbrush, to scrub the nozzles thoroughly. For stubborn mineral deposits, soak the spray arm in a vinegar solution—mix equal parts vinegar and warm water—and let it sit for 30 minutes. After soaking, use a pin or needle to poke through each nozzle opening, dislodging any residual obstruction. Once cleared, rinse with water and reassemble. This simple step can significantly enhance water flow, preventing residue and ensuring spotless dishes.
Dealing with Persistent Blockages
If mineral buildup persists despite cleaning, consider replacing the spray arm. Check the part’s compatibility on [appliancebargainz.com](https://appliancebargainz.com/4-grimy-dishwasher-filter-parts-to-swap-for-a-fresh-2026). Replacing worn-out or damaged spray arms restores optimal spray coverage and pressure, directly impacting cleaning power. Remember, a well-functioning spray arm is crucial for avoiding residue, especially if your dishwasher continues to leave spots despite multiple cycles.
Reinstall and Test the System
After cleaning, reattach the spray arm securely, ensuring all mounting points are snug. Run a short cycle with a cup of white vinegar on the top rack to flush out any remaining debris. Watch the spray pattern during this test to confirm water is flowing evenly from all nozzles. Repeated tests help calibrate your cleaning routine and catch lingering clogs early. Regular maintenance involves inspecting nozzles every few months, especially if you live in an area with hard water, which promotes mineral buildup.
Maintain Optimal Performance
To prevent future clogging, install a water softener or use rinse aid to mitigate mineral deposits. If your dishwasher’s performance still lags, check other components like filters and inlet screens. For guidance, see [dishwasher filter maintenance](https://appliancebargainz.com/4-grimy-dishwasher-filter-parts-to-swap-for-a-fresh-2026). Keeping nozzles clean not only prolongs the life of your appliance but also saves you time and money on costly repairs down the line, like replacing entire spray arms or dealing with persistent residue issues.
Many DIY enthusiasts and even professionals often overlook critical subtleties when diagnosing and repairing appliances like dishwashers, ovens, and other household devices. A prevalent myth is that parts such as seals, thermistors, or spray arms are merely wear-and-tear components, and replacing them is straightforward. However, in my experience, the real challenge lies in understanding how these parts interact within complex systems and recognizing subtle signs of malfunction. For example, a leaking oven isn’t always caused solely by a faulty gasket; sometimes, misaligned door hinges or warped mounting plates contribute significantly, and addressing only the gasket may lead to recurring issues. One common mistake I see is the assumption that replacing a singular faulty part will resolve the problem entirely, while neglecting underlying causes like electrical issues, sensor calibration, or buildup that can undermine new parts quickly. Advanced diagnostics involve testing voltage at sensor terminals, checking for proper grounding, and interpreting error codes that often mask deeper malfunctions. For instance, the popular oven seal leaks can sometimes be traced to warped door frames, which require more than just a new seal. Overlooking such nuances can result in wasted time and money, or worse, unsafe repairs. A tip for seasoned repair technicians is to always perform a comprehensive system check, not just part swaps, especially when diagnostic codes point to multiple potential causes. This approach helps prevent misdiagnosis and ensures that you’re addressing the root cause rather than temporary fixes. Remember, a deep understanding of the appliance’s design and common failure points enhances repair accuracy and safety. For thorough troubleshooting techniques, consider exploring thermistor diagnostics or spray arm performance checks to refine your repair strategy. Ultimately, mastering these nuances elevates your skill from basic fix-it to expert troubleshooting. Have you ever fallen into this trap? Let me know in the comments.
Keep Your Appliances Running Smoothly with the Right Tools
Maintaining appliances like dishwashers and ovens isn’t just about quick fixes; it requires precision and the right equipment. I personally rely on a high-quality digital multimeter, such as the Fluke 115, because it gives me accurate voltage and resistance readings, essential for diagnosing issues like faulty sensors or wiring problems. Pairing this with a digital thermometer allows me to verify temperature-related faults effectively, particularly when troubleshooting oven seal leaks or thermostat problems.
For delicate tasks like unclogging nozzles or cleaning filters, I find a set of fine-tipped pliers invaluable. They help remove stubborn debris without damaging surrounding components. Additionally, a service manual specific to the appliance model is a game-changer—it provides detailed schematics, troubleshooting flowcharts, and calibration procedures that save time and prevent misdiagnosis.
Using Software for Diagnostics Improves Reliability
Modern appliances often feature diagnostic modes accessible via manufacturer-specific software or code readers. For instance, checking error codes on your dishwasher’s control panel with a compatible diagnostic tool can pinpoint issues like malfunctions in the filter system or spray arms. I recommend investing in a USB-enabled diagnostic interface compatible with a laptop—this enables real-time readings and system tests, making troubleshooting much more accurate.
Plan for Long-Term Results and Scaling Up
When fixing or replacing parts, consider the future. For example, installing a water softener can drastically reduce mineral buildup, keeping nozzles and seals clear longer. Regularly testing key components, like thermostats and sensors, with multimeters and thermal probes, ensures your appliance operates efficiently over years rather than months. As technologies evolve, staying updated with the latest diagnostic tools and software updates from manufacturers will be crucial. Expect more appliances to incorporate IoT features, allowing remote monitoring and predictive maintenance—embracing these trends will help you scale your DIY repair skills seamlessly.
How do I maintain appliances over time to prevent major repairs?
Routine inspections and cleaning are your best allies. For dishwashers and ovens, schedule bi-annual deep cleaning that includes filters, spray arms, and seals. Using the right cleaning agents, like vinegar solutions for mineral deposits, complements tool-based diagnostics. Also, keep an eye on error codes and system alerts; addressing issues proactively extends appliance lifespan. For persistent problems relating to temperature sensors or heating elements, consult detailed diagnostic guides and don’t hesitate to replace wearable components early. This way, you avoid costly repairs or replacements down the line.
For an advanced tip, try calibrating your oven thermistor using a digital multimeter and an ice bath to ensure accurate temperature readings—a step that can prevent uneven cooking and save energy. Remember, consistent maintenance and the right tools are the backbone of affordable, reliable appliance ownership. As the industry advances, integrating smart diagnostics and predictive maintenance will become standard—getting familiar with these early positions you as a resilient DIY technician.

Over the years, I’ve realized that the real game-changer in appliance repair isn’t just fixing parts—it’s understanding the subtle lessons lurking beneath each problem. One of the most valuable insights I’ve gained is that many issues stem from overlooked details and assumptions. For example, I once thought replacing a spray arm was enough, only to discover that regular cleaning and early diagnostics save so much trouble in the long run. The toughest lesson? Sometimes, the simplest fixes, like clearing a clogged nozzle, prevent costly replacements and downtime.
What the Pros Won’t Tell You About Keeping Appliances Reliable
- Don’t dismiss minor symptoms—small signs like uneven spray patterns or erratic temperature readings often point to underlying issues that escalate if ignored.
- Understand that mineral buildup isn’t just a nuisance; it actively reduces performance and can cause premature component failure. Regular descaling and inspections are your best defense.
- Tools and diagnostics are your allies—learning to interpret error codes and conducting basic tests can prevent many emergencies before they happen.
- People often forget that components like seals or thermistors are interconnected; addressing only one without considering the system can lead to recurring problems.
My Favorite Tools for Appliance Mastery
- High-quality multimeters like the Fluke 115—These provide accurate readings necessary for diagnosing electrical faults efficiently.
- Specialized screwdrivers and pliers—For accessing tight spots and delicate components without damage.
- Manufacturer diagnostic software—Harnessing these tools unlocks deep insights into system errors and helps plan targeted repairs.
- DIY reference manuals—Detailed guides tailored to specific models save time and boost confidence when troubleshooting complex issues.
Believe in Your Repair Skills: Your Appliances Deserve It
Embarking on appliance repairs might seem daunting, but with patience, the right mindset, and proper tools, you become more than a DIYer—you turn into an appliance heirloom protector. Imagine achieving all those perfect loads of dishes without spots or dryness, knowing you played a part. Every successful fix boosts your confidence and deepens your understanding of your home’s inner workings. So, gear up, stay curious, and remember—the next repair could be your most rewarding yet.
Have you ever struggled with a stubborn nozzle clog or misdiagnosed an error code? Share your experiences below and let’s learn from each other!
,