It was a quiet Saturday morning when I noticed the unmistakable stench wafting from my dishwasher. My heart sank—another pesky clog, another frustrating repair. If you’ve ever experienced that sudden smell or dishwasher failure, you know how disruptive it can be. I realized then that ignoring basic maintenance can turn a simple issue into a major headache, especially as appliances age. So, I made a promise to myself: tackle these common culprits before they become disasters. Today, I want to share how I learned to identify and clean the top three clogged dishwasher parts, saving me time and money—and how you can do the same.
Why Preventing Dishwasher Clogs Matters More Than Ever
In 2026, our homes are more connected and efficient, but that also means appliances face more use and wear. According to recent appliance failure statistics, clogged filters and drains are among the top reasons dishwashers break down prematurely. These issues not only lead to poor cleaning performance but also increase water and energy bills. Plus, a backed-up dishwasher can cause water leaks, risking damage to your flooring and cabinets. That’s why staying ahead with simple maintenance is a game-changer. Ignoring early signs of clogging can snowball into costly repairs, which most homeowners would rather avoid. Have you noticed your dishes aren’t quite as sparkling as they used to be? Or maybe your dishwasher smells worse than your teenage gym bag. It’s time to inspect—trust me, it’s easier than you think.
Is Cleaning Your Dishwasher Parts Actually Worth the Effort?
I’ll admit, I once thought cleaning those tiny filters and spray arms was a chore I could skip. I was wrong. Early on, I made the mistake of ignoring a slow drain and a faint foul odor, assuming it would just resolve itself. Spoiler alert: it doesn’t. In fact, neglecting these parts can lead to full-blown clogs, mold growth, and even damage to the mechanical components. Regularly cleaning the key parts of your dishwasher ensures it runs efficiently and extends its lifespan. Curious about how to identify these trouble spots? Keep reading—next, we’ll dive into the specific parts that most commonly clog and how to keep them clear. Ready to get your dishwasher back in shape before 2026? Let’s go.
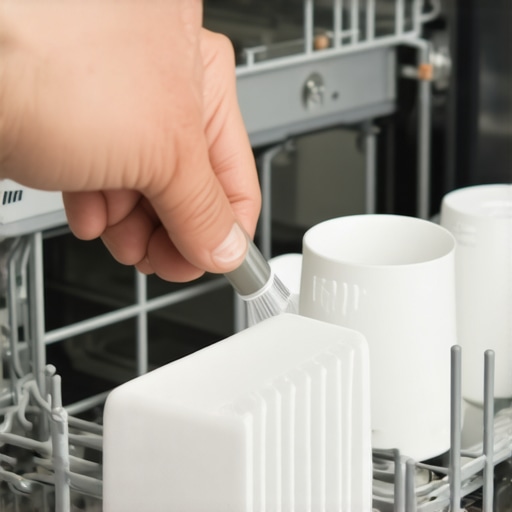
Inspect and Clean the Filter First
To start, locate your dishwasher’s filter, often found at the bottom. Remove it carefully—think of it as rinsing a tea strainer after brewing. Use a soft brush and warm, soapy water to scrub away trapped food particles and debris. I once ignored this step, leading to persistent odors; now, I never skip it. Cleaning the filter restores proper water flow and prevents clogs. Don’t forget to check for any damages or buildup that could block drainage.
Clear the Spray Arms Like a Pro
Next, examine the spray arms, which resemble round, spiny wheels. Use a small screwdriver or pin to poke through the tiny holes—dislodging mineral deposits or food particles. If spray patterns are uneven, it’s a sign these arms are clogged. Remember the time my dishes came out still grimy? After cleaning the spray arms, everything improved. Remove them by unscrewing or unclipping, then soak in vinegar if there’s mineral buildup. This boosts cleaning efficiency and reduces strain on your dishwasher.
Test and Unclog the Drain Pump
The drain pump is like the dishwasher’s trash collector—if it’s blocked, water won’t drain properly. To check, empty the dishwasher and remove the lower panel. Spin the pump impeller manually—listen for free movement. If it’s stuck or noisy, debris might be blocking it. Sometimes, I found a small crumpled piece of foil that caused a jam. Clear out any obstructions gently, then run a short cycle to verify proper drainage. Regular checks prevent floods and persistent smells.
Address Odors and Long-Term Blockages
If your dishwasher still smells after cleaning, it indicates residual buildup or mold. For a deep refresh, run a hot cycle with a cup of white vinegar or baking soda. You can also remove and clean the door gasket, which can harbor grime. Regular maintenance like this minimizes future clogs and keeps your appliance smelling fresh. For comprehensive tips, visit this guide. Properly maintaining these core parts is like giving your dishwasher a healthy diet—essential for longevity and performance.When it comes to diagnosing appliance issues, many homeowners rely on popular myths or superficial tips they find online. But as an appliance repair enthusiast with years of hands-on experience, I can assure you that understanding the nuances can make the difference between a quick fix and a costly mistake. One dangerous misconception is that a single faulty part is always the root cause of a malfunction. In reality, appliances often present complex symptom clusters that require comprehensive diagnostics. For example, a dishwasher that doesn’t drain might not only have a clogged pump but also a faulty float switch or misaligned door latch. Jumping straight to replacing a component without confirming the actual culprit is a common trap that can lead to unnecessary expenses.
Many think that replacing the most visible or accessible part is the best initial move. This amateur approach ignores the interconnected nature of appliance systems. A failure in one area often masks deeper issues elsewhere. For instance, if your oven isn’t heating properly, replacing the bake element without testing the temperature sensor or control board could be futile. Experts recommend conducting systematic tests — like measuring electrical continuity or checking for error codes — before swapping parts. For those interested in mastering diagnosis, visiting this guide can sharpen your skills.
**Are Diagnosing Your Appliance Just About Fixing the Obvious?**
A crucial nuance often overlooked is the importance of interpreting diagnostic signals correctly. Modern appliances are equipped with error codes that serve as vital clues. However, many DIYers misinterpret these, leading to misguided repairs. For example, a dishwasher displaying a drainage error might actually have a timer malfunction or a clogged air gap, not just a faulty pump. Understanding the root causes involves testing electrical components with multimeters and inspecting wiring harnesses — step that many skip due to lack of tools or expertise.
Additionally, remember that age and usage patterns influence repair priorities. Older appliances are more prone to multiple simultaneous issues, so isolated fixes might be ineffective. As appliance systems grow more sophisticated, so does the potential for misdiagnosis if one relies solely on machine error codes without incorporating basic testing techniques.
Trusting superficial assumptions is tempting but risky. Deep diagnostic expertise helps prevent the trap of unnecessary part replacements and ensures long-lasting repairs. For instance, if your oven isn’t maintaining accurate temperatures, a thorough check of the temperature sensor, calibration settings, and control board often reveals hidden problems. You can learn more about pinpointing these issues in this resource.
Have you ever fallen into this trap? Let me know in the comments. Mastering diagnostics isn’t just about fixing appliances; it’s about understanding their language, so your repairs are precise, cost-effective, and durable.
Keep it running with the right tools and maintenance
Maintaining your appliances over time requires more than just basic cleaning—investing in specific tools and adopting disciplined routines can significantly extend their lifespan and improve performance. One essential tool I personally rely on is a digital multimeter. It enables me to quickly test electrical components like heating elements, sensors, and switches with precision, providing immediate insights that guide my repair decisions. Unlike generic testers, a high-quality multimeter with auto-ranging capabilities saves me time and reduces errors, especially when diagnosing complex issues such as an oven that isn’t heating properly or a dishwasher displaying error codes.
Another indispensable instrument is an inspection camera with a flexible probe. Hidden components inside ovens or behind the dishwasher panels can be challenging to reach, and a camera helps me identify problems like corrosion, leaks, or disconnected wires without invasive disassembly. This proactive approach saves me from unnecessary part replacements and helps me spot long-term issues before they escalate.
On the software side, I use diagnostic apps tailored for different brands, which provide troubleshooting flows based on error codes. These apps often include wiring diagrams, part lists, and step-by-step testing procedures. Investing in such tools enhances my diagnostic accuracy, streamlines repairs, and builds confidence, especially when working on more sophisticated appliances. As technologies evolve, embracing digital diagnostics should become a standard part of any dedicated repair toolkit.
How do I maintain reliability over time?
Consistent upkeep goes beyond cleaning and includes scheduled inspections and part replacements. For instance, I recommend checking the condition of the oven’s convection fan blades—cleaning or replacing minor components like these prevents overheating and uneven cooking. Similarly, for dishwashers, regularly inspecting the spray arms for clogs and lubricating moving joints ensures optimal water distribution. Maintaining a detailed repair log can help track recurring issues and inform future preventive measures. Upgrading key parts before failure, such as installing higher-quality replacement heating elements or sensors, also pays off in long-term durability. Looking ahead, I foresee smart diagnostic tools integrating IoT technology, offering real-time appliance health reports accessible via smartphones. To stay ahead, I suggest trying advanced troubleshooting tips, like using an infrared thermocouple to measure surface temperatures during operation, which can reveal hidden faults early. For detailed part checks, visit this expert guide and consider implementing one advanced diagnostic step today.
Lessons That Still Surprise Me in Appliance Troubleshooting
One of the biggest surprises I had was discovering how intertwined appliance systems truly are. Fixing a clogged filter isn’t just about cleanliness; it often reveals underlying issues like worn-out pump seals or wiring troubles I didn’t notice at first. Over time, I learned that every simple cleaning has the potential to uncover hidden problems, turning routine maintenance into proactive diagnosis.
Another lesson learned the hard way was that error codes are like a foreign language—without proper understanding, misinterpretation leads to unnecessary part swaps. Investing in a good diagnostic app and learning to interpret signals accurately saved me hundreds and extended my appliances’ lifespan. The more I trusted my tools and knowledge, the fewer surprises I faced during repairs.
The most valuable insight came from realizing that patience beats haste. Rushing to replace parts without thorough testing often compounded issues. Now, I take my time to systematically verify every component, which has made my repairs more reliable and less stressful. Remember, understanding your equipment deeply makes all the difference in successful DIY repairs.
Tools and Resources That Elevated My Kitchen Gadget Game
My essential toolkit started with a quality digital multimeter. This little device became my best friend for testing electrical continuity in sensors, heating elements, and switches—saving time and guesswork. Pairing it with a flexible inspection camera helped me peek behind panels and inside tight spaces where dirt and corrosion hide, preventing unnecessary disassembly.
For more advanced diagnostics, I rely on brand-specific troubleshooting apps. These tools guide me through error code interpretation and testing procedures, which is especially useful for newer appliances with smart features. They’re like having a seasoned technician by my side, making complex repairs approachable and confident.
To complement my physical tools, I keep a detailed maintenance log. Tracking what I’ve checked and replaced helps identify recurring issues and plan preventive actions. As appliance tech evolves, I see smart diagnostics and IoT integrations becoming indispensable, providing real-time insights. For in-depth resources, I recommend exploring online guides and forums—like the ones linked in this article—that continually expand my understanding and skills.
Take Action Today and Keep Your Appliances in Top Shape
Don’t let appliance issues slow you down. With the right knowledge, tools, and routine maintenance, you can extend the life of your dishwasher and oven, saving money and stress in the process. Remember, mastering diagnostics isn’t about perfection; it’s about progress. Each repair builds your confidence and deepens your understanding of your home’s vital appliances.
What’s the next upgrade or fix you’re excited to try? Share your plans and questions below—I’d love to hear about your repair journey and help you succeed with your next project!
Diana Carter
This article really resonated with me because I’ve experienced that sudden foul smell from my dishwasher more than once. I used to think it was just due to leftover food, but I never realized how much buildup in the filter or spray arms could contribute to persistent odors and even mechanical issues. Cleaning these parts regularly has made a noticeable difference in performance and smell. It’s surprising how many homeowners overlook this simple maintenance step until a major problem occurs. One tip I’ve found helpful is to soak the spray arms in vinegar to break down mineral deposits—it’s such an easy fix that yields great results. For those struggling with stubborn odors, do you think replacing the gasket or deeper cleaning the drain pump might help, or are there other preventive measures you recommend? I’d love to hear more practical tips from others who’ve tackled these issues.